28 February 2009

Chocolate Valentino and Chubby Hubs Ice Cream


The February 2009 challenge is hosted by Wendy of WMPE's blog and Dharm of Dad ~ Baker & Chef. We have chosen a Chocolate Valentino cake by Chef Wan; a Vanilla Ice Cream recipe from Dharm and a Vanilla Ice Cream recipe from Wendy as the challenge. Although I didn't use either ice cream recipe, as we were allowed to make any kind we wanted...

Okey dokey, the official wording is out of the way, so now I can do my real write up :)

Like probably half of the Daring Baker community, I made my cake for Valentine's Day. I mean really - what could be more romantic than a dense brownie-like cake and some homemade ice cream for dessert? I ran into a bit of a snag, but I was no worse for the wear.

This cake only has 3 ingredients. Now, at first reading I thought, Piece of cake! I'll have this one finished and done in no time. True, very true, but when I actually settled in to make it, I realized that if I mess up any part of this recipe, it'll be an expensive thing to re-do (especially since I was using my precious stash of Valrhona chocolate for this). But not to be easily intimidated, I forged ahead.


Things were a little hairy right off the bat, when I freaked for a second thinking I had overheated my butter/chocolate (therefore burning the chocolate to worthlessness), but thankfully that was fine. Whew! I whipped my whites and carefully folded them in. No screwing around. I carefully poured my batters into my cake pan and mini Le Creuset heart pan (perfect for pictures, thanks Anne!). I bake, and watch that lovely rise and slight fall of the cake, the characteristic dimpling of the top. I pulled the cakes out and set them too cool. Ten minutes later, faithful to the recipe, I picked up the round cake pan to unmold my cake.

Um. Well, here's where I had a problem: I went to gracefully (but quickly) flip it onto the cooling rack to finish cooling. Only I kinda moved too quick, and my pregnant butter-fingers started to lose grip on the pan. I fumbled with it, flipped it (very impressively, I might add) in the air, and then popped it with my palm when I went to desperately grasp it. Well, that was it. Up! it went and then Down! it landed. With a splat. Chocolate Valentino, shredded and smooshed and not looking too good:


Yeah.

It wasn't a total loss - I just let the darn thing cool in the state you see above, then chunked up the surviving parts to make a lovely ice cream parfait for our dinners. The Le Creuset heart, fortunately, was just fine so I used that the next morning to take pictures.

So: on to the cake. If you try this, keep in mind that there is no messing around with this Valentino recipe! Use good chocolate, as the cake will taste exactly like the chocolate you use. It gets a bit expensive (as you need to use a pound of chocolate), but that won't stop me from making this again. The cake ends up very dense, reminiscent of a brownie. Oooooh, so good.

We were asked to make homemade ice cream to accompany the cake. Initially I was going to make something plain, as I didn't want to overtake the glorious cake. Then at the last minute I changed my mind, when I thought about just how good Chubby Hubby is (and how much I didn't want to buy ice cream when I needed to also make ice cream...). I came up with my own version thanks in part to this recipe, and I must say: it tastes remarkably like the original. Awesome.

For those not in the know: Chubby Hubby is only the BEST flavor ever made by Ben & Jerry's. It's a malted vanilla ice cream with chunks of chocolate-covered, peanut-butter-filled pretzel nubs, and ribbons of peanut butter and fudge. It is salty and sweet and creamy and crunchy and just all-around perfect. Go buy a pint and see for yourself, or make my version below...


Chocolate Valentino
(from Sweet Treats by Chef Wan)


Ingredients:
16 oz. of roughly chopped chocolate (I used half Ghirardelli milk chocolate, half Valrhona bittersweet)
1/2 c. + 2 Tbsp. unsalted butter
5 large eggs, separated

Put chocolate and butter in a heatproof bowl and set over a pan of simmering water (the bottom of the bowl should not touch the water) and melt, stirring often.

While your chocolate butter mixture is cooling. Butter your pan and line with a parchment circle then butter the parchment.

Separate the egg yolks from the egg whites and put into two medium/large bowls.

Whip the egg whites in a medium/large grease free bowl until stiff peaks are formed (do not over-whip or the cake will be dry).

With the same beater beat the egg yolks together. Add the egg yolks to the cooled chocolate.

Fold in 1/3 of the egg whites into the chocolate mixture and follow with remaining 2/3rds. Fold until no white remains without deflating the batter.

Pour batter into prepared pan, the batter should fill the pan 3/4 of the way full, and bake at 375 F. Bake for 25 minutes until an instant read thermometer reads 140 F. Note – If you do not have an instant read thermometer, the top of the cake will look similar to a brownie and a cake tester will appear wet.

Cool cake on a rack for 10 minutes, then unmold.


(Not Actually) Chubby Hubs Ice Cream
(my shameless adaption of B&J's Chubby Hubby, and no my Hubs is not actually chubby)


Ingredients:
2 c. half and half (or 1 c. heavy cream + 1 c. whole milk)
4 egg yolks
1/2 c. sugar, divided
A dash of salt
1 c. heavy cream
2/3 c. malt powder
1/2 recipe of Peanut Butter Swirl (follows)
Hot fudge (I just used jarred)
1 c. chocolate-covered, peanut-butter filled pretzel nuggets (World Market has them!)

Whisk yolks and 1/4 c. sugar until ribbon-like in a medium bowl.

Heat half and half and 1/4 c. sugar and the salt over medium heat until barely boiling, stirring constantly. Add the half and half mixture to the egg yolk mixture, slowly so as not to curdle the eggs, and return everything to the pan. Bring the mixture to a boil over medium-low heat and cook for about 10 minutes or so or until the mixture coats the back of a wooden spoon (you're going to have to stir it the entire time and probably will be using a wooden spoon, so at some point, take the spoon out, run your finger down the back and if the track stays 'clear', the mixture is done).

Turn off the heat, and add the heavy cream to cool the mix and then strain into the medium bowl.

Put the bowl over a larger bowl filled with ice water and stir in order to speed up the cooling process, whisk in the malt and vanilla, and then chill in the refrigerator overnight to make the following day.

Mix the malted custard in your ice cream maker as directed. Once the ice cream has finished churning (after 20-40 minutes): place in your freezable container. Add a few blobs of Peanut Butter Swirl and hot fudge, and fold a few times into the soft ice cream mixure. Add the pretzels, and fold 2-3 more times to fully incorporate. Freeze for at least a few hours before serving.

Peanut Butter Swirl

Ingredients:
1 c. creamy peanut butter
1 (14 oz.) can sweetened condensed milk
3-4 Tbsp. heavy cream, to thin

Whip peanut butter until fluffy. Slowly add the sweetened condensed milk. Once incorporated, use the heavy cream to thin the mixure a bit.

25 February 2009

Naan


I love our local corner Indian restaurant. Every afternoon they have a fantastic buffet, chock-full of tandoori and chicken tikka masala, aloo mutter and veggie korma; as well as pakora, tikki, and samosa galore.

But best of all, to scoop up every spicy bite - hot, soft-yet-crispy naan, that buttery Indian flatbread that is to die for. Well, on the buffet at India Palace, the naan is the first thing to disappear. Usually you and your fellow diners enjoy your lunch with one eye on the buffet - once the piping hot naan hits the warming plate, you lunge to get yours before it's gone again, which doesn't take but a minute or two. Good stuff, that naan.

This one has a smiley face!


If you are like me and eat Indian out a bit too much for your pocketbook, then you decide to just make your own Indian at home. Much more economical. And yet, you strike out again if you try to get your naan at the grocery store: for one, it's a poor substitute to the fresh stuff. Secondly, you're going to pay a ton for 2 measly pieces. Ladies and gents, let me tell you: this is the point where you realize you just have to make the naan yourself.

Making your own naan is easy, cheap, and this recipe makes A TON so no worries about running out! Almost exactly what you get from the restaurants (I don't have the clay tandoor, but the grilled version here is pretty darn close). Give it a shot next time you make your own Indian at home - well worth the effort.


Naan
(from Allrecipes)


Ingredients:
1 pkg. active dry yeast
1 c. warm water
1/4 c. white sugar
3 Tbsp. milk
1 egg, beaten
2 tsp. salt
4 1/2 c. bread flour
2 tsp. minced garlic
1/4 c. butter, melted

In a large bowl, dissolve yeast in warm water. Let stand about 10 minutes, until frothy. Stir in sugar, milk, egg, salt, and enough flour to make a soft dough. Knead for 6 to 8 minutes on a lightly floured surface, or until smooth. Place dough in a well oiled bowl, cover with a damp cloth, and set aside to rise. Let it rise 1 hour, until the dough has doubled in volume.

Punch down dough, and knead in garlic. Pinch off small handfuls of dough about the size of a golf ball. Roll into balls, and place on a tray. Cover with a towel, and allow to rise until doubled in size, about 30 minutes.

During the second rising, preheat grill to high heat.

At grill side, roll one ball of dough out into a thin circle. Lightly oil grill. Place dough on grill, and cook for 2 to 3 minutes, or until puffy and lightly browned. Brush uncooked side with butter, and turn over. Brush cooked side with butter, and cook until browned, another 2 to 4 minutes. Remove from grill, and continue the process until all the naan has been prepared.

22 February 2009

Cornbread Supreme


We had a charity Chili Cookoff at my office, and I offered to bring some cornbread - mainly because I had the best, most delicious recipe for cornbread compliments of Ali over at Divine Domesticity. It is the perfect companion to the Calico Beans, but also works with chili or ham n' greens or hearty stews... Or by itself, too, that works :)


I omitted the green chiles this time because I was making it for others (who probably are not used to the heat coming from their sweet cornbread), but it's fantastic in there, so give it a shot at least once. This cornbread is more moist than your usual, and so much more flavorful. I love the addition of all that actual corn that dots the inside, and the slight heat that comes from the chiles. Stir in some of the cheese if you want to incorporate that flavor throughout as well (I certainly do on occasion). Great stuff! Best warm, but will work at room temperature too. And feeds a crowd...


Cornbread Supreme
(from Ali)


Ingredients:
1 (16 oz.) can whole kernel corn, drained
1 (16 oz.) can cream style corn
1 (4 oz.) can diced green chiles
16 oz. container sour cream
4 eggs, slightly beaten
1 cup margarine or butter, melted
2 boxes Jiffy cornbread mix (7 1/2 oz. each)
2 c. shredded cheddar cheese

In a large bowl, combine cornbread mix, sour cream, butter, whole kernel corn, cream style corn, diced chiles, and eggs. Place in a lightly greased 9" x 13" baking dish and sprinkle with shredded cheddar cheese.

Bake at 350 F for 45 to 50 minutes, or until golden on top and cooked through.

19 February 2009

Muzzy's Ice Cream Sandwiches


A favorite treat from my younger days – my mom used to make a ton of these, and keep them in the deep freezer in our basement. This was perfect, as half of our basement was finished off into a rec room/play area where we spent a ton of time growing up. That made it easy for us kids - just walk to the back room of the basement and snitch one of these goodies when we wanted a treat.


They are deceptively easy: just store-bought cookies and Cool Whip, that’s all you need. That doesn’t mean they aren’t fantastic, though! The Cool Whip is better than ice cream if you ask me, not sticky and thick but instead light and creamy even when frozen. The cookies are kinda blah on their own but make perfectly crispy, fudgey bookends to an ice cream sandwich. Oh, so divine, a definite taste of my childhood. These are a mainstay in our freezer.


Muzzy Ice Cream Sandwiches

(from Muzzy)


Ingredients:
1 pkg. fudge-striped shortbread cookies
1 container Cool Whip

Spread a few tablespoons of Cool Whip On the bottom of one of the cookies. Top with a 2nd cookie. Make as many as desired, setting them on a baking sheet when prepped. Place in freezer for 2-3 hours until set, then wrap each individually with wax paper. Keep in the freezer in freezable container or Ziploc bag. Makes about 2 dozen sandwiches, which will last absolutely forever in your freezer :)

17 February 2009

Chicken Ravioli Soup with Zucchini and Tomatoes


Most Sundays, I find myself roasting a chicken. Not just for dinner, though (and this recipe, by the way? The best; I use it as my standard recipe). With just me and Hubs in the house, that means I can de-bone the rest of the chicken and have meat for, at the very least, one more meal. Plus the diced meat freezes really well.

More often than not, I roast that chicken and just de-bone it right away, so that ALL the meat can be used for casseroles or chicken salad or whatever little recipe I am taken with at the moment. Last week I found a great recipe for a chicken soup base on Allrecipes, and also linked to it was a nice brothy soup. So, that was my latest reincarnation from a roasted chicken.


This soup is fairly healthy and tasty! I made it so we could have soup to grab for lunches, and we slurped up every last bit. The raviolis make the soup a little more hearty, and are a nice twist from your usual chicken noodle variety out there. Freezes well too, which is perfect: I'm currently (desperately!) stocking the freezer for when the little Robot arrives. And be sure to use the soup base recipe linked below - it's an easy way to make your own broth and starter for chicken-based soups.

Chicken Ravioli Soup with Zucchini and Tomatoes
(from Allrecipes)


Ingredients:
1 recipe Fast Chicken Soup Base
1 (8 or 9 oz.) package refrigerated small cheese ravioli
1 (14.5 oz.) can diced tomatoes
2 medium zucchini, diced
1 tsp. dried basil
1/2 c. chopped fresh parsley
Salt and freshly ground black pepper

Prepare Fast Chicken Soup Base. Bring to a simmer.

Add the next 4 ingredients, then simmer until tender, 10-20 minutes. All done! Before removing from heat, stir in: 1/2 c. chopped fresh parsley. Salt and pepper to taste, and serve.

15 February 2009

Cookies and Cream Rice Krispie Treats


These were awesome. Seriously awesome.

Another treat I made, this time especially for my brother Paulo. He has this addiction to Oreos, you see. I mean, bad. He has been this way from the time he could toddle around. My mom didn't really stock the pantry with them, but my brother was entranced by the ads on TV. "Oreo" was one of the first words he learned how to spell, thanks to those ads. In fact, because of his adoration, my mother actually started buying Oreos. He loved them; you'd never know from his beanpole physique, but he grew up eating these things all the time, and I mean all the time, even for breakfast. His obsession with all things Oreo continues until this day: the man has Oreo novelties galore, notepads and cookbooks and tins. Tins full of Oreos, of course. Don't know what to get Paul as a gift? Anything Oreo-themed is probably going to be well received, fortunately.


So, back to the baking: I was headed over to my brother's one Sunday and promised to bring dessert. I wanted to make Rice Krispie treats, and obviously wanted to have some fun with them. Adding Oreos, I decided, would be a no brainer. I did a quick Internet search, which brought up these and these and these... Oreo Rice Krispie treats are popular things, apparently! I liked bits of several recipes, so played around with them until I had what you see pictured.

These are more of a cookies and creme treat - chocolate rice krispie bars studded with chunks of Oreo cookies, and dipped in a creamy white chocolate topped with crushed Oreos. Oh, yes. And they taste as good as they sound! Needless to say, the ton of leftovers never made it out of my brother's house.

Cookies and Cream Rice Krispie® Treats
(Adapted from several recipes)


Ingredients:
1/2 c. chunks bittersweet chocolate
3-4 Tbsp. unsalted butter
10 oz. (1 pkg) marshmallows
1 tsp. vanilla
6 c. Rice Krispie® cereal
15-20 Oreo® cookies, chopped
4-6 oz. white chocolate, chopped
15 Oreo® cookies

Place bittersweet chocolate in a small bowl. Microwave on high for 1 to 2 minutes, stirring every 30 seconds, until melted. Set aside. Grease a 9X13 pan, and also set aside.

Melt butter in a large pot over medium heat. Add marshmallows, and stir until melted and combined with butter. Turn off heat, and stir in melted bittersweet chocolate and vanilla. Gently stir in cereal and chopped cookies, and mix to coat evenly. Press into 9X13 pan, leveling the top (a buttered spatula works wonders here). Allow to cool completely.

Once cooled: cut into squares. Place remaining cookies in a food processor, and pulse until finely ground. Pour out onto a plate, for dipping. Place white chocolate in a small bowl. Microwave on high for 1 to 2 minutes, stirring every 30 seconds, until melted.

Dip the top of each square into the white chocolate, and then the crushed cookies. Set aside to cool and set completely. These will keep in an air-tight container like, forever. We still had one left over a week after I made them, and it was DELICIOUS.

10 February 2009

Peanut Butter Cup Brownies


Oh my goodness! Where in the world does the time go?? Sorry for the week’s delay, it’s been chaos here. I’ve been working 12+ hour days and trying to keep up at home and spending actual time with other humans in-between, so I haven’t had much time to bake or blog unfortunately. Thank goodness I have this little gem of a recipe left over from SuperBowl time!

There isn’t much of a trick to these brownies – they are Dorie’s signature recipe, which I hadn’t tried before. Rich and much softer than this version, so I am still on the hunt for the perfect chewy-yet-rich brownie recipe. We shall find it one of these days, I have faith.


To up the ante on these, I decided to add some TJ mini peanut-butter cups. There isn’t a Trader Joe’s anywhere near me, but fortunately my sister Anne keeps me hooked up with all their goodies so that we don’t die from TJ withdrawals out here in Larryville. And FYI, the TJ peanut-butter cups are deemed clear of that whole Salmonella scare, so no fear in baking with them either. They added just the right amount of peanut-buttery goodness to these brownies.

Unfortunately I cut them while still a wee bit warm, so the cups oozed out all over the place. Only really a problem in the photogenic sense, though, the oozey goodness was just fine in a brownie…


Peanut Butter Cup Brownies
(adapted from the lovely Ms. Dorie Greenspan)


Ingredients:
2 sticks unsalted butter, cut into 16 pieces
9 oz. bittersweet chocolate, coarsely chopped
1 1/2 c. sugar
4 large eggs
1 tsp. pure vanilla extract
1/2 tsp. salt
1 c. all-purpose flour
1 container Trader Joe's mini peanut butter cups (for you poor slobs with no TJs: that's about 3/4 c. chopped regular peanut butter cups)

Getting Ready: Center a rack in the oven and preheat the oven to 325 F. Line a 9-x-13-inch baking pan with foil, butter the foil and place the pan on a baking sheet.

Set a heatproof bowl over a saucepan of simmering water. Put the butter in the bowl, top with the chopped chocolate and stir occasionally until the ingredients are just melted - you don't want them to get so hot that the butter separates. Remove the bowl from the pan of water.

With a whisk, stir in the sugar. The mixture might get grainy, but it will even out. Whisk in the eggs one by one, then add the vanilla and whisk enthusiastically to smooth the batter. Finally, gently whisk in the salt and flour, stirring only until incorporated. Scrape the batter into the pan and smooth the top with a rubber spatula. Gently stir in peanut butter cups.

Bake the brownies until the top is dull and a knife inserted into the center comes out clean, usually about 40 minutes. Transfer the pan to a rack and cool the brownies to room temperature.

When they are completely cool, turn out onto a rack, peel away the foil and invert onto a cutting board. Cut into 32 slender rectangles, each roughly 2 1/4 x 1 1/2 inches.

02 February 2009

Jean's Cream Puff Cake


Once upon a time, a darling coworker (Jean!) made this cake for one of our coworkers on her birthday. It was soooo good, we were all begging for the recipe. Jean was kind enough to share, and I couldn't even wait I week. I had to make this thing again. It's a lot of cake for just me and Hubs (and Robot), though, so the plan was to bring it into work for my coworkers to yet again enjoy.

I tend to get to work early, about 6am. I didn't want this sucker sitting around warming up in our department (it's best chilled), so I put it in one of the fridges in the breakroom, on the bottom shelf near the back, as to not be in the way of my fellow coworker's lunches and yogurts and such.

Flash forward to 3 days later - I realize, as I shove my lunch in the breakroom fridge that morning, that nooooo! The cake, it's still in here! I had completely forgotten to put it out for my coworkers. I pulled it out of the fridge, popped open the lid to check it out. The cream-puff base had gotten a bit soggy by that point, so I sadly had to toss it in the trash. However there was one peculiar thing to note:

About a third of it was missing. Someone had decided to help themselves to the cake, and then came back for seconds and thirds. Either that, or a whole pack of employees went at it. Dude, seriously? Is nothing personal or sacred in the community office fridge??


I hope this story shows you just how good this cake is, though - worth the crime of sneaking into someone else's pan, in broad (office breakroom fluorescent lighting) daylight. With potential witnesses sitting around, no less. And perhaps later some sort of reprimand for your actions. The cake is EXACTLY like a cream puff - poofy, not sweet, but with a pudding-type filling (on top instead) and whipped cream and chocolate sweet chocolate...

Yeah I don't blame the person or persons, really. I probably would have done it, too.


Jean's Cream Puff Cake
(from my sweetheart of a coworker, Jean)


Ingredients:
1 stick (8 Tbsp.) unsalted butter
1 c. water
1 c. flour
4 large eggs

4 c. milk
8 oz. cream cheese, softened
3 (3.5 oz) pkgs. instant vanilla pudding
1 container Cool Whip
Chocolate syrup

Preheat oven to 400 F.

In a large heavy saucepan, heat butter and water to boiling over medium-high heat. Add flour and reduce heat to low. Cook and stir until it forms a ball and pulls away from the pan. Remove from heat and transfer to a large bowl. Beat in eggs, one at a time, beating well after each egg.
Spread in bottom and up the sides of an ungreased 9x13 inch pan. Bake at 400 degrees F (200 degrees C) for 35 minutes. Cool completely.

To make the filling: In a large bowl, combine cream cheese and milk and beat until smooth. Here's the trick, to keep things smooth: start with the cream cheese, give it a good beating until fluffy. Slowly but surely (while still beating), add the milk. Voila! Once these are well combined, add pudding mix and beat until thickened. Spread over cooled shell.

Top with whipped topping, and drizzle chocolate syrup over the top. Keep refrigerated until serving.

31 January 2009

Chicken Tikka Masala with Saffron Rice Pulau


Chicken Tikka Masala, the chop suey of Indian cuisine.

Ah yes, that's right sadly: not actually of Indian origin, Chicken Tikka Masala is in fact a British creation. But incredibly tasty, I must say, and a nice introduction to the flavors and spices of India for the uninitiated. It is still right behind butter chicken and tandoori in my list of "favorite Indian dish". Even though it's not really Indian. Er, but you know what I mean. Whatever.

Essentially, it is a rich, tomato-based sauce mellowed with some cream and fragrant with garam masala, coriander, and cumin. Then you toss in chicken steeped in garlicky yogurt marinade. Good stuff. Chicken Tikka Masala is as comforting on a winter evening as any American beef stew; just serve over basmati rice with a side of naan. This version is good, but still missing "something" from what my local place can make. I'll keep tinkering, maybe add more heat or some cardamom. Until then, try this one...


Chicken Tikka Masala


Ingredients:
6 cloves of garlic, peeled
3 in. fresh ginger, peeled
2 or 3 fresh red chilis, seeded
Olive oil
1 Tbsp. mustard seeds
1 Tbsp. paprika
2 tsp. ground cumin
2 tsp. ground coriander
3 Tbsp. garam masala, divided
Generous 3/4 c. plain yogurt
4 medium boneless, skinless chicken breasts, cut into large chunks
1 Tbsp. butter
2 medium onions, sliced very thin
2 Tbsp. tomato purée
1/3 to 1/2 c. cashews or almonds, ground very fine in a food processor
Salt
1/2 c. heavy cream
Fresh cilantro, chopped
Limes

If you're using a mini-chopper, use it to finely mince the garlic, ginger, and chilis. Alternately, you can grate them on the smallest teeth of a grater, or chop with a knife.

Heat a splash of olive oil in a large skillet or sauté pan. Add the mustard seeds. When they begin to pop, remove from the heat immediately and add them to the garlic mixture (once mustard seeds start popping, they will pop all over the place, so watch carefully and remove from heat as soon as the first one goes "pop." Toss a lid on that sucker too, so you don't lose all the seeds!)

Add the paprika, cumin, coriander, and 2 Tbsp of the garam masala. Put half of this mix in a large bowl, add the yogurt, and stir in the chicken, making sure to coat all sides with the marinade. Let it sit for about a half-hour.

Melt the butter in the large saucepan and add the sliced onions and remaining half of the garlic-spice mixture. Cook gently for at least 15 minutes. Do not brown the onions; you're trying to soften them up and mellow the spices. Add the tomato puree, ground nuts, 2 1/2 cups of water, and 1/2 tsp of salt. Stir well and bring to a gentle boil. Let the sauce reduce and thicken slightly (about 5 minutes), then reduce heat to low.

Cook the marinated chicken on a grill or under the broiler, until just cooked through.

While the chicken is cooking, add the cream and remaining 1 Tbsp of garam masala to the sauce and bring it up to a boil, then add the chicken. Check the seasoning, adding salt or cayenne pepper if desired. Top the chicken with cilantro and squeeze lime juice over the top. Serve with basmati rice or Saffron Rice Pulau (below).


Saffron Rice Pulau


Ingredients:
1/4 tsp. saffron threads
1/4 c. hot water
2 Tbsp. butter
2 cinnamon sticks
10 whole cloves
1 tsp. cumin seeds
2 c. basmati rice, rinsed well
1/3 c. raw cashews

Put the saffron threads in the hot water and set aside to steep until serving time.

Melt the butter over medium heat in a medium-sized saucepan with a tight-fitting lid. Add the cinnamon, cloves, and cumin seeds and stir, 1 minute. Drain the rice well, then add to the pot and stir-fry until the grains are coated and the rice begins to smell fragrant, about 3 minutes.

Add 3 cups water and bring to a boil, then reduce heat to low and cover. Cook until rice is tender and liquid is absorbed, about 20 minutes. Remove cinnamon sticks and cloves. Just before serving, pour in the saffron water and stir well to combine.

To garnish, roast the raw cashews in a 350 degree oven until light golden, about 8 to 10 minutes (watch carefully, nuts burn quickly). Top rice with nuts and serve alongside Chicken Tikka Masala.

29 January 2009

Tuiles


This month's challenge is brought to us by Karen of Baking Soda and Zorra of 1x umruehren bitte aka Kochtopf. They have chosen Tuiles from The Chocolate Book by Angélique Schmeink and Nougatine and Chocolate Tuiles from Michel Roux. I was a wee bit sad at first, knowing the baking reputations these two lovely Europeans have, but was happy nonetheless to tackle the recipe, as I had never tried tuiles before :)

The whole bit of choosing this recipe for January was to help those who need some waistline mending following the December holidays. Amen! I personally can't actually diet, but eating healthy is very important these days, so I was glad to take on the challenge. We were asked to make our tuiles in any shape we desired, and pair with a light, healthy filling.


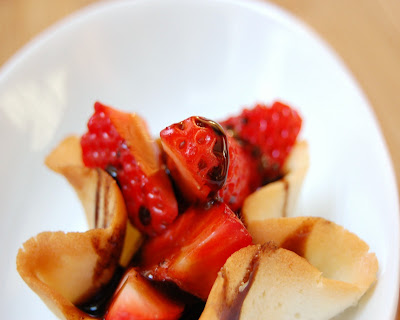
I made small baskets out of mine, simply pushing the hot round cookies into my tiny brioche molds to set. Taking advantage of the fact that the grocer actually had some plump tasty strawberries in the dead of winter, I used these tuile cups to serve up one of my favorite combos - fresh strawberries with a reduced balsamic vinegar.

Oh, mmmm - the tart and sweet and yet Terribly Healthy in a crisp cookie was just perfect. The balsamic reduction was compliments of Trader Joe's (one of several foodie Christmas gifts from my amazing sis Anne), so no recipe to follow unfortunately. Sorry for that. You can surf the Interwebs to find many a recipe though, I am sure.


Thanks to both Karen and Zorra for the recipe - I rather liked it, and will probably give these little light cookies a go again (and probably again). And as always - be sure to check out those other Daring Baker creations out there!

Tuiles
(from The Chocolate Book by Angélique Schmeinck, 1993)


Ingredients:
1/4 c.softened butter (not melted but soft)
1/2 c. sifted confectioner’s sugar
Dash of vanilla extract
2 large egg whites (slightly whisked with a fork)
1/2 c. sifted all purpose flour
1 Tbsp. cocoa powder
Butter or spray to grease baking sheet

Preheat the oven to 350 F. Using a hand whisk or a stand mixer fitted with the paddle (low speed) and cream butter, sugar and vanilla to a paste. Keep stirring while you gradually add the egg whites. Continue to add the flour in small batches and stir to achieve a homogeneous and smooth batter/paste. Be careful to not overmix.

Cover the bowl with plastic wrap and chill in the fridge for at least 30 minutes to firm up. (This batter will keep in the fridge for up to a week, take it out 30 minutes before you plan to use it).

Line a baking sheet with parchment paper or grease with either butter/spray and chill in the fridge for at least 15 minutes. This will help spread the batter more easily if using a stencil/cardboard template such as the butterfly. Press the stencil on the baking sheet and use an offset spatula to spread batter. Leave some room in between your shapes. Mix a small part of the batter with the cocoa and a few drops of warm water until evenly colored. Use this colored batter in a paper piping bag and proceed to pipe decorations on the wings and body of the butterfly (I totally skipped the cocoa-colored decorative bit myself).

Bake butterflies in a preheated oven (350 F) for about 5-10 minutes or until the edges turn golden brown. Immediately release from baking sheet and proceed to shape/bend the cookies in the desired shape. These cookies have to be shaped when still warm, you might want to bake a small amount at a time or maybe put them in the oven to warm them up again.

Or: place a baking sheet toward the front of the warm oven, leaving the door half open. The warmth will keep the cookies malleable.

If you don’t want to do stencil shapes, you might want to transfer the batter into a piping bag fitted with a small plain tip. Pipe the desired shapes and bake. Shape immediately after baking using for instance a rolling pin, a broom handle, cups, cones….

27 January 2009

Seared Venison Roast with a Blueberry Reduction, and Celery Root Mash


My Hubs is a hunter at heart, he doesn't get away to do it much anymore but when he does, we eat well for awhile. This winter he went deer hunting, and came back home with lots of venison for us to use: ground, cubed, and loins. The loin is the good stuff, and we're in for a treat when one of the loins is being thawed for dinner - that usually means we're making Venison with Blueberry Reduction.

Originally this came from an episode of Emeril on the Food Network, many many, like 3 apartments before we bought our home (and we lived in every apartment a good 2-3 years) - yeah, like that many years ago. I couldn't find the original on their site, only our chicken-scratch re-write we've been using for years, so that's what you're getting. Not quite sure how much we changed things up, but I will say this: it is very, very good.


I nuked my meat a bit longer (darn baby Robot ruins all my fun food adventures), but this is best when the meat is seared - venison is very delicate, it works best with the meat's texture and flavor to keep it rare in the center. The blueberry reduction is incredible, just barely sweet with plenty of tart and woodsy savory and oh my goodness - I could just cover everything and anything I eat in the stuff, if only it wasn't a bit too hands-on to make on a daily basis.

We usually have this with mashed potatoes, but this time we switched things up and did a celery root mash. Ooooh, so good. And healthier, for those watching their carbs! The celery root actually paired with the venison and blueberry reduction much better than potatoes did. So if you give this recipe a shot, go with the celery root mash for sure.


Seared Venison Roast with a Blueberry Reduction
(adapted from Emeril Legasse)


Ingredients:
1 venison loin , about 8 oz. (or, use 8-oz. venison chops)
Salt and pepper
1 Tbsp. olive oil
1 Tbsp. finely diced shallots
1 tsp. minced garlic
1/2 c. crushed blueberries
5-6 juniper berries
1 tsp. sugar
1 tsp. chopped rosemary
1/4 c. balsamic vinegar
1/4 c. dry red wine
1/4 c. gin
1 c. beef demi-glace
1 Tbsp. chopped sage
1 Tbsp. cold butter

Lightly season the venison loin on all sides with salt and black pepper. In a large skillet, heat the oil over medium high heat. When the oil starts to smoke, add the loin and sear for 3 minutes. Lower the heat to medium and turn the loin. For medium-rare, cook the loin for 2 to 3 minutes on each turn/side, until you've gone all the way around the loin. Transfer the loin to a plate and let rest, covered loosely with foil.

Return the skillet to medium-high heat. Add the shallots and garlic and cook, stirring for 1 minute. Add the blueberries, juniper berries, sugar, and rosemary and cook, stirring, for 1 minute. Add the balsamic vinegar and red wine and bring to a boil. Cook, stirring occasionally, until reduced by half, about 1 minute.
Add the gin, being careful of flames, and stir to deglaze the pan. (Alternately, remove the pan from the heat and ignite with a match.) When the flames die out, add the demi-glace and sage, and stir well.

Return the loin to the pan and cook to warm the meat through, about 1 minute. Add the cold butter, salt and cracked black pepper, to taste, and swirl to incorporate. Remove from the heat.

Celery Root Mash
(adapted from Chow)


Ingredients:
1 large Celeriac (celery root)
1 large Russet baking potato
2-3 Tablespoons Cream
2 Tablespoons Butter
1 Teaspoon Salt (+ more to taste)
Cracked Black Pepper to taste

Peel the celeriac root and wash any extra traces of dirt off. Wash the potatoes well. *Please note: we left the peels on for extra texture, but you can peel your potatoes if you like.

Cut the celeriac and potatoes into medium sized pieces. Put into a large cooking pot and cover with water. Bring to a boil and then reduce head to a simmer. Cook until soft enough to mash, about 30–40 minutes. Drain and let sit covered in the same pot that you used to cook them in, for about 5 minutes to remove excess water.

Add cream, salt and then mash. I like to use a hand held masher as I dig texture in my mashed potatoes. Season to taste with additional salt and pepper. I love this side in its "pure state", but feel free to go nuts - lots of herbs would complement this well.
To plate, place 1/2 of the celery root mash on each of 2 large plates, and place 3-4 slices of loin on top of the mash. Pour the sauce over the chops and around the plates. Serve immediately.


25 January 2009

The 6th Picture


I was tagged by the darling Sarah at Jagged Diary! Here's the instructions on the tag:


"Go to your documents folder (or wherever you store your photos) and go to your 6th picture folder, then go to the 6th picture in that folder and post it on your blog. Tell a story about it."
Well, oddly enough: it's a food shot. Go figure ;) This is from my post on those pretty little Magnolia Bakery cupcakes, which I blogged about last February. Kinda dry, but not bad! You can read all about them here.
Be back on Tuesday, with a nice little post involving venison, blueberries, and gin. Good stuff. And thanks for the tag Sarah!