No recipe today, but I thought I'd post anyway just to wish everyone a Happy Halloween! I pity those of you that don't have changing seasons, I really do. The maples look just gorgeous right now.
Okay, then, I'm signing off. Have a safe holiday! Until I return tomorrow, please enjoy the photo of our Halloween pumpkin this year. I've affectionately named it JLo.
31 October 2007
Happy Halloween!
30 October 2007
Sauerbraten

Cold weather is here, which means I can finally make my all-time favorite dish: Sauerbraten. This German lady and her German husband love love love their sauerbraten, a traditional dish from Deutschland.
Translated from German, sauerbraten means "sour roast". Essentially, it is a roast marinated in vinegar and spices for a few days then slow roasted in the oven. Do not, however, let this description deter you from the dish. I can't describe the taste if you've never had this, except to say it is absolutely delicious. Tart and tangy and sweet, with the most tender fall-apart roast meat. If you like Carolina BBQ, that vinegary sweet thick sauce, then you will love sauerbraten. And it is actually quite easy to make, just takes some planning ahead for that good long marinade.
Just a few asides: for one, I always roast a big hunk of meat when I do this, then I can use the leftovers to make sandwiches for lunch the rest of the week (on rye bread with just a smear of horseradish spread, mmmm). Also, if you can't find juniper berries at your local market, try a spice shop (e.g. Penzey's in KC) or sometimes organic markets will carry them.
Sauerbraten
Ingredients:
2 c. water
1 c. cider vinegar
1 c. red wine vinegar
1 medium onion, chopped
1 large carrot, chopped
1 Tbsp. + 1 tsp. salt, additional for seasoning meat
1/2 tsp. freshly ground black pepper
2 bay leaves
6 whole cloves
12 juniper berries
1 tsp. mustard seeds
1 (3 1/2 to 4-lb.) bottom round
1 Tbsp. vegetable oil
1/3 c. sugar
18 dark old-fashioned gingersnaps (about 5 oz.), crushed
In a large saucepan over high heat combine the water, cider vinegar, red wine vinegar, onion, carrot, salt, pepper, bay leaves, cloves, juniper, and mustard seeds. Cover and bring this to a boil, then lower the heat and simmer for 10 minutes. Set aside to cool.
Pat the bottom round dry and rub with vegetable oil and salt on all sides. Heat a large saute pan over high heat; add the meat and brown on all sides, approximately 2 to 3 minutes per side. When the marinade has cooled to a point where you can stick your finger in it and not be burned, place the meat in a non-reactive vessel and pour over the marinade. Place into the refrigerator for 3 to 5 days. If the meat is not completely submerged in the liquid, turn it over once a day.
After 3 to 5 days of marinating, preheat the oven to 325 F.
Add the sugar to the meat and marinade, cover and place on the middle rack of the oven and cook until tender, approximately 4 hours.
Remove the meat from the vessel and keep warm. Strain the liquid to remove the solids. Return the liquid to the pan and place over medium-high heat. Whisk in the gingersnaps and cook until thickened, stirring occasionally. Strain the sauce through a fine mesh sieve to remove any lumps.
Slice the meat (or if it gets as tender as mine and slicing is impossible, just shred off in big chunks) and serve with the sauce. Serve over noodles, spaetzle, or with dumplings.
29 October 2007
Harvest Rice Salad

I make this rice dish fairly often, it's a combination of a few different recipes I've seen. Aside from coming together easily, it is also filling and a great mix of flavors and textures. The rice gives the dish a nutty base. The onions and cranberries sweeten it up. The bell pepper and almonds give it a nice crunch, and the lemon zest seems to brighten up all the flavors in the dish.
I like to serve this with salmon or grilled chicken, and I think it's perfect for a cool autumn evening.
Harvest Rice Salad

Ingredients:
1/2 c. slivered almonds
2 c. chicken broth
1/2 c. uncooked brown rice
1/2 c. uncooked wild rice
3 Tbsp. butter
3 onions, sliced into 1/2 inch wedges
1 Tbsp. brown sugar
1 c. dried cranberries
1/2 c. green bell pepper, diced
1/2 tsp. lemon zest
Salt and pepper to taste
2 c. chicken broth
1/2 c. uncooked brown rice
1/2 c. uncooked wild rice
3 Tbsp. butter
3 onions, sliced into 1/2 inch wedges
1 Tbsp. brown sugar
1 c. dried cranberries
1/2 c. green bell pepper, diced
1/2 tsp. lemon zest
Salt and pepper to taste
Place almonds on an ungreased baking sheet. Toast at 350 degrees F (175 degrees C) for 5 to 8 minutes.
Mix broth, brown rice, and wild rice in a medium saucepan, and bring to boil. Reduce heat to low, cover, and simmer about 50 minutes, until rice is tender and broth is absorbed.
In medium skillet, melt butter over medium-high heat. Add onions and brown sugar. Saute until butter is absorbed and onions are translucent and soft. Reduce heat, and cook onions for another 20 minutes, until they are caramelized.
Stir cranberries and green pepper into the skillet. Cover, and cook 10 minutes or until berries start to swell. Stir in almonds and lemon zest, then fold the mixture into the cooked rice. Salt and pepper to taste.
28 October 2007
Ten Restaurant's Signature Chopped Salad

The Hubs and I were married one year ago today. One of the awesome parts of our wedding reception (there were many, but this was a good one) was the fact that the hotel's Ten Restaurant catered the meal. To me the most important thing on that wedding menu, with no argument from the husband-type man, was to serve their signature chopped salad for our first course. I am a sucker for a chopped salad anyway, but this one is truly amazing! It's like a beefed up BLT, in salad form: lots of juicy tomatoes and bacon and blue cheese, plus chicken and green onions and the biggest surprise of all, pasta. And nothing is more appropriate as a dressing as the mustard vinaigrette it's tossed in - it's flavorful but doesn't take away from the ingredients in the least.
I love love love this salad. It is and always has been my most favorite thing on the restaurant's menu. I love it so much, in fact, that I weaseled the recipe out of a friend years ago. I make it frequently for dinner and can attest to the fact that even in leftovers form, wilted greens and all, it's absolutely delicious
And now, in celebration of this fine occasion, I spread the love along to my dear readers. Give this one a try, you will not be disappointed.
Ten Restaurant's Signature Chopped Salad

Ingredients:
1/2 head iceberg lettuce, rinsed and drained
2 romaine hearts, rinsed and drained
2 baked chicken breasts (approx. 2 cups cubed chicken breast meat)
6 bacon strips, fried and crumbled
1 c. diced tomatoes
1 c. cooked ditalini*
1/2 c. green onions, chopped
4 oz. blue cheese crumbles
For the mustard vinaigrette:
1 Tbsp. rice wine vinegar
1 tsp. red wine vinegar
1 tsp. water
1 tsp. minced garlic
1 tsp. dry mustard
1 to 2 Tbsp. sugar, to taste
1/2 tsp. kosher salt, or to taste
1/2 c. salad oil
1 Tbsp. olive oil
1/4 tsp. dried oregano
Pinch of crushed red pepper flakes
Pinch of coarsely crushed black pepper
Chop the iceberg lettuce and romaine hearts and place them in a large salad bowl. Add the cubed chicken, crumbled bacon, tomato, ditalini, green onions and blue cheese crumbles.
For the mustard vinaigrette: In a small bowl, combine the vinegars, water, garlic, dry mustard, sugar and salt and whisk until blended. Pour in the oils slowly, whisking constantly until the mixture is emulsified. Whisk in the oregano, red pepper flakes and black pepper.
Pour as much of the Mustard Vinaigrette as desired over the salad. Toss to coat. Makes 4 main course salad meals, or 8 side salads.
*ditalini = very small, short tubes of macaroni. You can find it with other died pastas at the grocery store. If I'm out (which I happened to be the last time I made this salad, as witnessed in the pics) I will just use any tube-shaped pasta I have on hand. Just give it a rough chop before tossing into the salad.
25 October 2007
Vosges Goji Bar Cookies

Oh, the oven is back! It's here! It's fixed! The landlord installed the new heating element, and it works like a champ. To celebrate my oven's return, and to break in the new element, I thought I'd make a quick batch of cookies.
Not just any cookies, though. See, I need to preface this by telling you that I have this fascination with Vosges Haut Chocolates. If I find myself in Chicago, it's mandatory that we stop by one of their stores. Vosges makes gourmet, exotic truffles in unusual flavor combinations ( dark chocolate + ginger + wasabi, for instance, as can be sampled in their amazing black pearl truffle). And while some combinations sound absolutely crazy, the creations are actually very good.
Luckily, you can find Vosges chocolate bars in a few places here in Larryville. I like to keep a Vosges chocolate bar or two in the house, in case of unexpected chocolate cravings. And I just happened to have an unopened bar of my absolute favorite, the Goji Bar. This bar is a "deep" milk chocolate studded with dried goji berries and Himalayan pink sea salt. It is very very good, and I thought perhaps perfect for celebratory Welcome Home cookies.

I took a basic chocolate chip cookie recipe, and instead of the chips used my Goji Bar (you can most certainly switch back to chips if you try this recipe). These cookies were The Yum - crispy edges and chewy centers, just the way a perfect cookie should be. The Vosges chocolate was great in these cookies, the goji berries were a touch of tart-sweet while the chocolate was just milky enough to be smooth. The sea salt takes a second to hit your palate, which makes for a nice little surprise. My only complaint, if you try this recipe: the cookies spread A LOT. However I think if you added much more flour, they would lose their amazing texture, so the spreading I will take.
Vosges Goji Bar Cookies

Ingredients:
1 c. butter, softened
1 c. white sugar
1 c. packed brown sugar
2 eggs
2 tsp. vanilla extract
3 c. all-purpose flour
1 tsp. baking soda
2 tsp. hot water
1/2 tsp. salt
2 c. chopped Vosges Goji Bar
Preheat oven to 350 degrees F (175 degrees C).
Cream together the butter, white sugar, and brown sugar until smooth. Beat in the eggs one at a time, then stir in the vanilla. Dissolve baking soda in hot water. Add to batter along with salt. Stir in flour and chopped chocolate bar. Drop by large spoonfuls onto ungreased pans.
Bake for about 10 minutes in the preheated oven, or until edges are nicely browned.
24 October 2007
Baja Fish Tacos

If you ever find yourself near Laguna Beach (California) and you're hungry, head down the PCH and find Taco Loco. Large patios and good music playing on the outdoor speakers will let you know that you're at the right spot. It may look like a hole-in-the-wall, but inside this tiny spot has a lot of character. The servers wear tie-dye T-shirts and the menu lists hemp brownies as well as a smattering of vegan offerings and lots of Mexican fare. However, hands down, the fish taco is the true star of this place, and makes it probably my favorite place for a meal in the entire town. There is nothing quite like enjoying a hot crunchy Taco Loco fish taco while basking in the warm California sun, the smell of the ocean nearby. Ahhh.
Now, people have been eating fish tacos in the coastal areas of Mexico for thousands of years. About 40 years ago, the fish taco migrated into Southern California (the San Diego area is well known for this fare). You can thank the surfers for that, dudes. And today, fish tacos are seemingly everywhere. I can even order them at several places here in Kansas. The problem, though? No one seems to get it right. I've seen them on menus on flour tortillas, with lettuce and tomatoes and cheddar cheese. No, no. That will not do at all. I much prefer the fish tacos we make at home, and surprise, my pets: very delicious and quick to make. Right up Nemmie's alley!
The true Baja fish taco consists of lightly-battered white fish. I tend to get creative with the fish part of the equation: sometimes grilled, sometimes battered, and sometimes just frozen battered-fish portions when I'm in a real hurry. But the other elements never change: served in a corn tortilla with shredded cabbage, white sauce, a bit of salsa, and a generous squeeze of lime.
The white sauce is probably the hardest part to recreate: it's tangy and creamy and thin thin thin; also spicy, with a good mix of spices. The recipe below is from a Dan Diego native who did many experiments to get the sauce right; I think she nailed it. And now, whenever I want, I can have a slice of sunny SoCal right here in Kansas.
One last note: If it's made right, a fish taco is a total mess to eat. The cabbage falls all over the place and your fingers get covered in white sauce and salsa. So this is probably not the best thing to make when you're out to impress anyone with your grace and manners.
Baja Fish Tacos

Ingredients:
For fish:
1 c. dark beer
1 c. all-purpose flour
1/2 tsp. salt
1 1/2 lb. boned, skinned cod (or almost any white fish will do)
Oil for frying
For white sauce:
1/2 c. plain yogurt
1/2 c. mayonnaise
1 lime, juiced
1 jalapeno pepper, minced
1 tsp. minced capers
1/2 tsp. dried oregano
1/2 tsp. ground cumin
1/2 tsp. dried dill weed
1 tsp. ground cayenne pepper
3-4 c. shredded cabbage
Tomato salsa
2 limes, cut into wedges
10 warmed corn tortillas (steam in the microwave for just a minute, between layers of damp paper towels)
In a bowl, whisk beer, flour, and salt, blending well. Rinse fish and pat dry. Cut into about 10 equal pieces.
To make the fish: In a deep 5- to 6-quart pan, heat 1-in. of oil to 360 F. Using a fork, coat fish pieces with beer batter and lift out, draining briefly. Slide coated fish into oil, about 5 pieces at a time. Adjust heat to maintain oil temperature. When fritters are golden, in about 2 minutes, lift out with a slotted spoon and drain briefly on paper towels; keep warm.
To make white sauce: In a medium bowl, mix together yogurt and mayonnaise. Gradually stir in fresh lime juice until consistency is slightly runny. Season with jalapeno, capers, oregano, cumin, dill, and cayenne.
To assemble each taco: Take a warmed corn tortilla. Add a fish fritter, cabbage, white sauce, and salsa (however, I enjoy mine salsa-free). Squeeze lime over filling, fold tortillas, and eat.
Try any or all of these additional toppings: balsamic, malt or cider vinegar; onions; fresh or pickled jalapeno chilies; sliced radishes; green salsa; or hot sauce.
23 October 2007
Passion-Fruit Gelee with Basil Cream

This comes from an old copy of Gourmet that I keep kicking around, but it can also be found on the epicurious web site. The recipe also calls for an egg carton (for proper tilting of glasses), but I found that a deep pan with tissue paper stuffed in the bottom worked just as well for this dessert.
This gelee cream is gorgeous to look at, and brings a very different taste to dessert. Not used to basil in dessert (mint? sure. basil? hmmm). But it is so very sweet and light and just perfect in the cream mixture, and the perfect foil to the perfume-y fruit gelee found below it. If you have enough time to get this pulled together before company comes for dinner, then definitely give this one a try.
Passion-Fruit Gelee with Basil Cream

Ingredients:
gelee:
1 3/4 tsp. unflavored gelatin (from a 1/4-oz envelope)
1/4 c. water
2 c. passion-fruit nectar (preferably Looza brand)
cream:
1/2 c. loosely packed fresh basil leaves
1/2 c. sugar
1 1/2 c. well-chilled heavy cream
1 tsp. unflavored gelatin (from another 1/4-oz envelope)
2 tsp. water
To make gelée:
Sprinkle gelatin over water in a small saucepan and let stand 1 minute to soften. Cook over low heat, stirring, until gelatin is dissolved, 1 to 2 minutes. Remove from heat and whisk in 1 tablespoon passion-fruit nectar at a time until gelatin mixture is cool, then whisk in remaining nectar.
Transfer to a metal bowl and set bowl into a larger bowl half-filled with ice and cold water. Let stand, stirring occasionally, until gelée is consistency of raw egg white, 15 to 25 minutes.
Put egg carton in a shallow baking pan and arrange glasses in carton, then tilt glasses to a 45-degree angle. Divide gelée among glasses. Carefully transfer pan with glasses to refrigerator and chill until gelée is set, at least 1 hour.
Make cream when gelée has set:
Pulse basil, sugar, and a pinch of salt in a food processor until finely chopped, then transfer to a bowl and add cream, stirring just until sugar is dissolved.
Sprinkle gelatin over water in a small saucepan and let stand 1 minute to soften. Cook over low heat, stirring, until gelatin is dissolved, 1 to 2 minutes. Remove from heat and whisk in 1 tablespoon basil cream at a time until gelatin mixture is cool, then whisk in remaining cream. Pour through a fine-mesh sieve into a metal bowl, pressing hard on solids and then discarding them.
Set bowl in a larger bowl half-filled with ice and cold water and let stand, stirring occasionally, until cream is consistency of raw egg white, 15 to 25 minutes.
Holding 1 glass of gelée at a 45-degree angle, slowly fill glass with basil cream, gradually righting glass as filled. Fill remaining glasses in same manner. Chill, covered, until set, at least 1 hour.

22 October 2007
Grilled Salmon Vera Cruz with Lemon Thyme-Scented Salsa

Yum. This recipe is compliments of Rick Bayless, and I love it. Very spicy and flavorful, the salsa really perks up the fish (sometimes I get bored with salmon, all we seem to do is either a white wine or dill/mustard sauce with the stuff). This is definitely different, and the colors are bright and gorgeous (pictures don't do it justice!).
The best part of the whole thing: This dish is meant to be served at room temperature, and you can make the salsa up to 2 days ahead, plus grill the salmon a day ahead if needed (then just bring both to room temperature, on the counter for an hour or two).
Grilled Salmon Vera Cruz with Lemon Thyme-Scented Salsa

Ingredients:
1/4 c. extra-virgin olive oil, plus more for oiling the grill and the salmon
1 medium-sized onion, thinly sliced
4 cloves of garlic, finely chopped
7 c. diced (1/2 inch) ripe tomatoes
2 Tbsp. chopped fresh thyme leaves, plus a few sprigs for garnish
2 tsp. finely grated lemon zest
1 c. pitted, roughly sliced green olives (preferably manzanillo olives)
1/4 c. capers, drained and rinsed
3 pickled jalapeño peppers, stemmed, seeded and thinly sliced
Salt, to taste
6 salmon steaks (7 to 8 ounces each), about 1 inch thick
Prepare the sauce: Place oil in a saucepan over medium heat. Add the onion and cook, stirring, until just beginning to brown, about 5 minutes. Add the garlic and cook 1 minute more. Raise the heat to medium-high and add the tomatoes, chopped thyme, lemon zest, and half of the olives, capers, and peppers. Simmer briskly, stirring, for about 5 minutes to evaporate some of the liquid. Reduce the heat to medium-low, stir in 1 cup water and simmer for 15 minutes. Taste and season with salt. Cool.
Preheat a gas grill to medium-high or light a charcoal fire and let it burn just until the coals are covered with gray ash and very hot. Reduce the heat on one side of the gas grill to medium-low or set up the charcoal grill for indirect cooking by banking all of the coals to one side, leaving the other half of the grill empty. Set the cooking grate in place, cover the grill and let the grate heat for 5 minutes. **Note: I skipped all this craziness, and just grilled fish in my grill pan on the stovetop.
Oil the grill and both sides of each salmon steak; sprinkle fish with salt. Cook the salmon over the hottest part of the grill for about 4 minutes, until nicely browned underneath. Carefully flip over the fish onto the cooler side of the grill; cook 2 to 4 minutes more for medium-rare.
Spoon the sauce into a deep platter and nestle the fish in it. Let stand at room temperature for about an hour to bring together the flavors of the fish and the sauce.
To serve, sprinkle the fish with remaining olives, capers, and peppers; garnish with the thyme sprigs. Serve immediately.

21 October 2007
Oreo Truffles

I need to thank Sarah for this recipe. After over 2 weeks with no oven, I've been in quite the funk. These truffles, while not a baking recipe to fulfill that particular 'itch' of mine, came out perfectly and taste great. I was a bit surprised: I thought the truffle/oreo filling would be light, but in fact it really is quite rich. I wanted to spice things up a bit so I added some flavoring to my mixtures (vanilla to one-half the truffle filling, those are white-chocolate decorated; mint flavoring to the other half with green sugar sprinkles).
They were perfect, a great little treat after a filling dinner. Pretty fun to make, too!
Oreo Truffles (from Sarah)

Ingredients:
1 pkg. (1 lb.-ish) Oreo sandwich cookies
1 pkg. (8 oz.) cream cheese, softened
1 tsp. flavoring (vanilla, mint, almond, cherry; anything your little heart desires)
2 pkgs. (8 oz. each) semi-sweet chocolate chips
Decoration (melted white chocolate, sprinkles, raw sugar, etc.)
Crush cookies to a fine crumb in a food processor. Add cream cheese and flavoring; pulse until well blended. Put mixure in a large bowl.
Line a cookie sheet with wax paper. Roll cookie mixture from bowl into balls, about 1-inch in diameter. Place on cookie sheet. Refrigerate until firm, about 45 minutes.
Melt chocolate in a saucepan (do not burn). Dip balls in chocolate and place on another wax paper-covered baking sheet. Sprinkle with sugar or decorate as desired.
Refrigerate until firm, about 1 hour. Store leftover truffles, covered, in refrigerator.

Chicken and Sweet Potato Soup

Well, I'm officially losing my drive. It is hard living without an oven, much harder than I thought it would be. My dinner choices seem to be narrowed down to either (1) soups/stews or (2) things I need to constantly stand over while making, like seared meats and veggies and things. No baking. No roasting. No heating in the good old oven. And desserts, don't even get me started on desserts. *Sigh.* However, enough whining. I'm going to try my best to suck it up and be a big girl about it! The landlord called to tell me the oven part is on back-order, but that means that, well, at least eventually I'll have an oven again, right?
Here's a soup recipe I made earlier in the week, and really liked. I made it on the stove top instead of in the crock pot, but that's only because I totally forgot to get it started before work that day, as I had planned. Oops. It was still very easy to pull together, though. And since I don't feel much like cooking as of late, it was a good one to make for dinner.
I really liked it - it turned out spicier than I expected, a nice plus (I love spicy foods). I am usually not a huge fan of sweet potatoes, but they give a great taste to this soup.
Chicken and Sweet Potato Soup

Ingredients:
3/4 lb. skinless, boneless chicken breasts, cut into 1" cubes
3 small or 2 medium sweet potatoes, pared and cut into 1" cubes
1 large onion, chopped
1 can (29 oz.) salsa-style diced tomatoes with chilies (undrained)
1 can (14.5 oz.) fat-free chicken broth
1 tsp. dried oregano leaves
1/2 tsp. ground cumin
1 1/2 c. frozen corn kernels (do not thaw)
In 4-quart slow cooker combine chicken, sweet potatoes, onion, tomatoes, broth, oregano, and cumin; cover and cook on Low for at least 6 hours. Stir in corn; cook on High until chicken and vegetables are very tender, about 30 minutes.
18 October 2007
Tomatillo Shrimp Fajitas

Well, this one is a winner. Healthy, tastes great, and comes together sooo quickly: took me longer to chop the veggies than cook! I used frozen shrimp, because I'm too lazy to devein the things, and I also served them with lime slices (because limes make everything oh so much better). And a big thanks to Julie for the fabulous recipe!
Tomatillo Shrimp Fajitas

Ingredients:
Cooking spray
1 1/2 c. red bell pepper strips
2 tsp. bottled minced garlic
1 small red onion, vertically sliced
1/2 c. bottled green salsa
1 tsp. ground coriander
1/4 tsp. salt
1 1/2 lbs. peeled and deveined large shrimp
8 (6-inch) corn tortillas
2 Tbsp. chopped fresh cilantro
Heat a large nonstick skillet over medium-high heat. Coat pan with cooking spray. Add bell pepper, garlic, and onion; sauté 4 minutes.
Stir in salsa, coriander, salt, and shrimp; sauté 2 minutes or until shrimp are done.
Arrange about 1/2 c. shrimp mixture down center of each tortilla; sprinkle each tortilla with 1 1/2 tsp. cilantro.
17 October 2007
Orange-Roasted Chicken on Tossed Greens

This recipe is from my copy of Celebrating the Midwestern Table, and is actually an older recipe I hadn't posted yet (I still don't have an oven). What I like about it is that - even though it might appear a bit complicated - it is very easy to put together, and really is a full meal: you've got lots of flavorful, juicy chicken meat along with a healthy, filling salad (all in one!).
And also, I am very much a cheap-lettuce kinda girl. Hubs loves the healthy (weird) mixed fancy greens, but I need the crunch of iceburg or romaine to enjoy a salad. That being said: I have finally, finally found a recipe where I actually ENJOY those strange bitter fancy greens that he loves so much.
Orange-Roasted Chicken on Tossed Greens

Ingredients:
1 broiler chicken, about 2 1/2 lbs., split and with the backbone removed
1 broiler chicken, about 2 1/2 lbs., split and with the backbone removed
Salt and pepper to taste
6 large cloves of garlic, split
3 oz. frozen orange juice concentrate, thawed (about half a can)
3/4 c. chicken stock
2 tsp. balsamic vinegar
Pinch cayenne pepper
1 small fennel bulb, trimmed and cut into a small dice (about 1 1/2 c.)
2 1/2 c. mixed salad greens
Put oven rack in the center of the oven; preheat th eoven to 450 F. Line a shallow roasting pan with foil. Set aside.
Sprinkle the entire surface of the chicken with salt and pepper. Place the chicken, skin side up, in a single layer in the prepared pan. Scatter the garlic in the pan.
Roast the chicken for 30 min. Meanwhile, combine the orange juice concentrate, stock, vinegar, and cayenne pepper in a small mixing bowl. After 30 minutes, remove the chicken from the oven and pour this mixture into the pan. Continue to roast, basting the chicken often (about every 10 min.) with the pan juices as they cook and thicken, until the chicken is well browned and cooked through, about 30 minutes longer.
Remove the chicken from the pan and transfer to a heated platter; tent with foil. Put the pan juices and garlic in a fat-skimming cup or small dish. Remove all of the fat. Mix the garlic and skimmed juices in a blender or food processor until the garlic is pureed.
Transfer the garlic mixture to a small pan, adding a little water if needed (you want the sauce the consistency of heavy cream). Add the fennel to the pan and bring to a boil. Remove from the heat and salt/pepper as needed.
To serve: cut the chicken into serving portions. Place the chilled greens in a large bowl. Toss the greens with the sauce and fennel, reserving a few tablespoons. Spoon the reserved sauce over the chicken. Serve hot.
16 October 2007
La Vapeur De Pudding

A few weeks ago, I took a trip to our local cookware/bakeware shop downtown. They always have lots of unique items, and their stock seems to change constantly, so going in is always a treat. Never know what you'll find on the store shelves.
I already have a nice pile at the register: teeny tartlet pans, soufflé cups, cookie cutters. I'm admiring their new popover tins, when something else catches my eye. It's almost like a bundt pan, but much smaller. And it has a lid attached, so it kinda looks like a mini trashcan when inverted. I have no idea what it could be. While I pick it up and look it over, the owner walks up to me excitedly to tell me all about it. It's a French pan, for cooking some sort of traditional dessert. She couldn't exactly remember what it was. They only ordered 1 pan, so once it's sold that's it. Well then, that made up my mind. I just had to buy this thing.

I finish up at the store and head home with my new prizes, including the mystery pan. Thoughts of delicate lavender cakes and chocolate Charlotte floated around in my head. I absolutely could not wait to get home and look this thing up, then start baking cakes so refined and gorgeous that no one would believe it came from my shoebox-sized kitchen in the Midwest.
After some research, I found out exactly what I had purchased: A steamed pudding mold. Yes, steamed pudding. The English "treat" that is so bland and unmemorable that even the English rarely make it these days. Ever heard of figgy pudding? Spotted dick? Both are variations of steamed pudding. As I desperately dug deeper on the subject, I found talk about an "outdated" dessert, I read that it will keep for months if wrapped in a wet towel, and most recipes required suet – yeah, that would be beef lard. Fannie Farmer even recommends that you "keep the lard from several cuts of beef until you have enough for your suet, then combine". Oh, no. No no no. And of course, not a word about steamed puddings in my copy of La Technique.
After much embarrassment (and a fit of uncontrollable giggling), I made up my mind to push ahead. So be it. A steamed pudding mold I had bought, and a steamed pudding I would make. I was on a mission: Find a steamed pudding recipe that would knock people's socks off. In a good way, of course. It turns out that The Naked Chef has a several recipes for steamed puddings, and The Gourmet Cookbook has a very-involved, drool-worthy Sticky Toffee Pudding recipe. I finally decided on Cranberrry Steamed Pudding (from allrecipes.com), and off I went. To steam some pudding.

What amazed me about this dessert is just how complex it was. The steamed pudding uses molasses instead of sugar for its sweetness, so there is a rich, deep, molasses-bitter quality to it (very reminiscent of brown bread). This very moist cake is also studded with plump cranberries, adding just the right amount of lightness (and a great tart contrast). And the recipe included a hard sauce to pour over slices, which was the ideal compliment: it's sweet and buttery, which cut through the cake nicely. This was very very good. I am impressed. And I think this steamed pudding would be absolutely PERFECT on a cold day, with a nice hot cup of coffee.
The cranberry steamed pudding turned out so well, I think I'll break out the steamed pudding mold a lot more often than I originally thought. Recipe is below for those adventurous people (you can make it without the mold by putting it in a loaf pan and covering tightly with foil).
Next maybe a chocolate pudding, or sticky toffee…

Cranberry Steamed Pudding
Ingredients:
2 tsp. baking soda
1/2 c. hot water
1 tsp. white sugar
1/2 c. molasses
2 c. whole cranberries
1 1/2 c. all-purpose flour
Dissolve the baking soda in the hot water. Stir in sugar and molasses, then mix in the cranberries and flour. Pour into a greased 6-cup steamer mold.
Cover the mold, and place into a steamer basket over a pot of boiling water. Cover the steaming pot. Cook over medium heat for 1 hour before checking, but it will take about 1 1/2 hours total. A toothpick inserted into the pudding should come out clean. Loosen the edges, and cool on a wire rack in the mold.
Hard Sauce:
1/2 c. unsalted butter
1/2 c. heavy cream
1 c. white sugar
1 c. white sugar
1 tsp. vanilla
Make the hard sauce just before serving: Heat the unsalted butter, cream, sugar, and vanilla in a small saucepan over medium heat. Cook stirring constantly until heated through and smooth.
15 October 2007
Buffalo Chicken Chili

I love buffalo chicken wings. That hot, spicy tang of hot sauce goes great with chicken, and is perfectly cooled by a nice creamy blue cheese dressing. I could eat buffalo wings any time, any day. Just to show you how much I love them: once, I had to have a 2-hour root canal (that tooth was pretty ganky). And it got infected. So they gave me some medication, but it didn't help much and the infection grew to a big ole abcess. Yes, not something one would usually want to read on a food blog... But, anyway, point of story: I was on a liquidy diet for several weeks while dealing with that whole mess, and when I could finally have solid food, the first thing I did was go out for buffalo wings. Best. Meal. Ever. And that is how much I love them.
That being said: I am trying to eat better, not so much with the fried/fattening stuff. Which, one would think, would not include buffalo wings. But oh! I was cruising Heather's Core Recipes Blog, and found a buffalo chicken chili recipe (with blue cheese dressing to boot!). I had to try it. And it didn't disappoint in the least: this bright red "chili" has that great heat and taste one gets with buffalo wings, without the frying. And you still get the blue cheese! I have a feeling that I will be making this a lot this coming winter.
Buffalo Chicken Chili

Ingredients:
1 Tbsp. extra-virgin olive oil
2 lb. all-white meat ground chicken breast (I used shredded cooked chicken)
1 large carrot, peeled and finely chopped
1 large onion, chopped
3 ribs celery, finely chopped
5 large cloves garlic, chopped
1 Tbsp. smoked paprika
1 bay leaf
Salt and freshly ground black pepper
2 c. low-sodium chicken broth
1/4-1/2 c. hot sauce, depending on how hot you like it
1 (28 oz.) can crushed tomatoes
Fat free blue cheese salad dressing, for topping
Place a large pot over medium-high heat; add the oil. Once the pot is hot, add the ground chicken. Brown it, using the back of a wooden spoon to break it up in to small pieces, about 5-6 minutes. (If you use cooked shredded chicken, like I did, you can skip this step.)
Add the carrot, onion, celery, garlic, paprika, bay leaf and some salt and pepper to the pot. Cook, stirring frequently, for about 3-4 minutes (add shredded chicken at this time, if using). Add the chicken broth and scrape up any brown bits on the bottom of the pot. Add the hot sauce and crushed tomatoes, and bring up to a bubble. Simmer for 8-10 minutes to let the flavors come together.
Top each serving with a dollop of fat free blue cheese dressing.
Chocolate Truffles

This is my first attempt at truffles. Now, I'd like to preface this by saying that I am a regular baker, and I make several kinds of candy around Christmastime, so I have a bit of experience making treats. I may not be the most experienced or gifted baker/candymaker, but I can hold my own. And this was the most frustrating recipe I've ever tried. I am hoping I just had a bad night, and it's not that my candymaking skills are lost.
I wanted to start with a good instructive recipe, and found one with tons of accolades on the Food Network web site. I set to work, and everything was going fine until it was time to create the truffles.
I chilled my filling for over 2 hours, and yet every time I would try to roll a ball, the mixture would melt all over the place and never form into balls (just slide around all lumpy in the thick melted mixture coating my hands). So I formed a method of partially rolling, then chilling another 20 minutes, then roll some more, then chill again, on and on. Took forever, and they were still quite lumpy! Then, the tempered dipping chocolate: it was SO THICK at 92 degrees, that trying to coat the (already melty) truffles was impossible. I tried one, it was a complete mess, and then I gave up. Just coated my truffles in raw sugar or cocoa, and was finished with the whole mess. I give up.
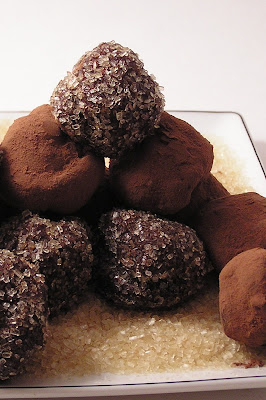
They still tasted terrific though. I used amaretto instead of brandy, and they turned out great: very rich, slightly bitter, dark dark dark chocolate taste with a hint of amaretto. I'm sure the problems with this recipe was user error, as all the reviews for this recipe on the Food Network site said things went perfectly for other users, so yeah. Give it a try, I'm sure it will work just fine. I would like to think I just had an 'off' night of candymaking.
Chocolate Truffles (courtesy of Alton Brown, Good Eats)

Ingredients:
10 oz. bittersweet chocolate, chopped fine
3 Tbsp. unsalted butter
1/2 c. heavy cream
1 Tbsp. light corn syrup
1/4 c. brandy
8 oz. semisweet or bittersweet chocolate, chopped fine
1/2 c. Dutch process cocoa powder, finely chopped nuts, and/or toasted coconut, for coating truffles
Place the bittersweet chocolate and butter in a medium-size glass mixing bowl. Microwave for 30 seconds. Remove and stir, and repeat this process 1 more time. Set aside.
Heat the heavy cream and corn syrup in a small saucepan over medium heat until simmering. Remove from the heat and pour the mixture over the melted chocolate mixture; let stand for 2 minutes. Using a rubber spatula, stir gently, starting in the middle of bowl and working in concentric circles until all chocolate is melted and mixture is smooth and creamy. Gently stir in the brandy. Pour the mixture into an 8 by 8-inch glass baking dish and place in the refrigerator for 1 hour.
Using a melon baller, scoop chocolate onto a sheet pan lined with parchment paper and return to the refrigerator for 30 minutes.
Place the cocoa powder, nuts, and/or toasted coconut each in its own pie pan and set aside.
In the meantime, place the 8 ounces of chocolate into a medium mixing bowl which is sitting on top of a heating pad lined bowl, with the heating pad set to medium. Depending on the heating pad, you may need to adjust the heat up or down. Stirring the chocolate occasionally, test the temperature of the chocolate and continue heating until it reaches 90 to 92 degrees F; do not allow the chocolate to go above 94 degrees F. If you do, the coating will not have a nice snap to it when you bite into the chocolate. Once you have reached the optimal temperature, adjust the heat to maintain it.
In the meantime, place the 8 ounces of chocolate into a medium mixing bowl which is sitting on top of a heating pad lined bowl, with the heating pad set to medium. Depending on the heating pad, you may need to adjust the heat up or down. Stirring the chocolate occasionally, test the temperature of the chocolate and continue heating until it reaches 90 to 92 degrees F; do not allow the chocolate to go above 94 degrees F. If you do, the coating will not have a nice snap to it when you bite into the chocolate. Once you have reached the optimal temperature, adjust the heat to maintain it.
Remove the truffles from the refrigerator and shape into balls by rolling between the palms of your hands. Use powder-free vinyl or latex gloves, if desired.
Dip an ice cream scoop into the chocolate and turn upside down to remove excess chocolate. Place truffles 1 at time into the scoop and roll around until coated. Then place the truffle into the dish with either the cocoa powder, nuts or coconut. Move the truffle around to coat; leave truffle in the coating for 10 to 15 seconds before removing. In the meantime, continue placing the chocolate-coated truffles in the cocoa or other secondary coating. After 10 to 15 seconds, remove the truffle to a parchment lined sheet pan. Repeat until all truffles are coated. Allow to set in a cool dry place for at least 1 hour; or store in an airtight container in the refrigerator.
Truffles are best when served at room temperature.
12 October 2007
Restaurant Review: bluestem

Feeling rather harried with work and home, and a bit blah in the creative writing area right now (probably also because of my oven-less home, which makes cooking and posting oh so much harder than usual), so I'm posting my review on our meal at Kansas City's bluestem, back in mid-February. Pics kinda suck (it's intimidating to whip out your camera in a place like that!), so apologies now. And luckily I wrote down this review a few days after our meal, otherwise I'd have serious trouble whipping this up from scratch right now!
First off, a few things about bluestem itself. Cody and Megan Garrelts, the co-owner chefs, come from Tru in Chicago. Their restaurant bluestem has garnered attention from several biggies – Food and Wine, James Beard Foundation, Wine Spectator. Some national newspapers (such as the Washington Post, San Francisco Gate, and NY Times) have taken note as well. Cody was named one of the best new chefs of 2005 by Food and Wine magazine, and then they honored Megan for her pastries in late 2006. That adorable food writer at the KC Star only gave it 3.5 stars, but then again… well, now is not the time to get into her misguided tastes (if bluestem put BBQ sauce on everything, it'd be automatic 5 star).
Bluestem has tons of accolades, and yet the place is so laid back. The sommelier and Megan take turns running the floor. Everyone there is excited to explain things on the menu. They treat every customer in their tiny, 14-table establishment as if they were the only customer in the place. And that alone is a reason for splurging on a meal here.

So, we make a reservation. We go to bluestem. They have this miniscule parking area behind the restaurant, we were lucky enough to get a spot there. We gave ourselves plenty of time to get to Westport, not sure on traffic, and ended up getting there 40 minutes before our reservation. Oopie. Lucky for us, the restaurant has a wine lounge. We checked in with the host/sommelier and made our way to the cooshy chairs and sofas in the bar area. Scott ordered a dirty martini and I got a Manhattan – my cocktail was dressed with imported Italian cherries rather than maraschinos. They were a dark ink-red, way way sweet and seriously tart. Already a good sign.
We finished our drinks and then were seated in the dining room. Immediately an amuse bouche was sent out - pineapple juice with strawberry foam(?). Yup, a shooter. I don't like pineapple juice, at all. This was good though, and the strawberry foam on top was insane – it tasted just like fresh strawberries, I swear you could even taste the seeds.
We ordered the five-course meal, which consisted of two "openers" and two entrees, plus dessert. We also sprang for the wine tasting menu - very glad we did this, not only cheaper than ordering a few glasses ourselves but also it didn't hurt to have the sommelier hand-choosing wines to match our courses. Scott got the wagyu tartare for his first course. I ordered the seafood chowder: crispy rock shrimp with fingerlings and pearl onions. They poured seafood puree over the shrimp et al. tableside, so the shrimp was still crispy in the soup. I've never had chowder like this before. Even though there was only shrimp in it, I tasted a million different kinds of seafood. The sommelier came with our wines, Scott had champagne and my chowder was paired with an Austrian Veltliner that was crisp and almost lemony.
Second course: Scott had the oxtail torchio, I had the foie gras. The foie gras was served torchon-style, with brioche French toast, kumquat jam, burnt honey drizzle, and sprinkled with pink peppercorns. Oh! The foie gras was cold and firm but melted in your mouth, and the sweet garnishes were perfect. The sommelier served a wine that I can't remember, embarrassingly enough – it wasn't the usual sauternes, but was similar. Sweet and tart and it complemented the foie gras well. That's the best I can remember. That foie gras was good, man. Scott's pasta was paired with an Argentinian Syrah.
Third course. I had Ahi tuna, with a ragout of winter veggies and a rock shrimp verjus fume. They poured the broth over my tuna tableside, and it turned into a creamy broth. Like magic! The tuna was just seared, my favorite way to have it. The tuna dish was very clean and fresh, the ragout and verjus did not take over the flavor of the meat which was awesome. The sommelier paired it with a nice pinot noir from Oregon, plum-y and thick and a good contrast to the freshness of the tuna.

Scott got the scallop dish – a big fat caramelized scallop sided by chanterelle mushrooms, cauliflower and huge chunks of braised bacon. He took his first bite and looked at me, all incredulous, and asked me why in the world I did not love scallops. Um, actually I'm allergic, I truly like the taste, but thanks for rubbing it in, my Darling. He said the smokey bacon and mushrooms were perfect with the shellfish. I'll take his word for it. It was paired with a Sonoma Chardonnay.
Fourth Course. I ordered the veal short ribs – the chef kept one small bone, and wrapped the meat around and around it. It was sided with turnips, fingerlings, and a horseradish devonshire. The meat was sooo good – rich and tender, like a huge veal cinnamon roll. Scott had the wagyu again, this time a striploin with smoked potato puree, tomato jam, and spinach croquettes.
Fourth Course. I ordered the veal short ribs – the chef kept one small bone, and wrapped the meat around and around it. It was sided with turnips, fingerlings, and a horseradish devonshire. The meat was sooo good – rich and tender, like a huge veal cinnamon roll. Scott had the wagyu again, this time a striploin with smoked potato puree, tomato jam, and spinach croquettes.


We both were served the same wine, Hartwell cabernet sauvignon from Napa Valley. The sommelier left the bottle on the table for us. This sucker was almost pure Cab and very, very good - earthy, dark ruby color, strong berries. And soft tannins, which I enjoyed (not a fan of those rich-tannin wines, I'm a total red wine weenie). We looked this one up online later, because we loved it and wanted to buy some for home. Alas, it retails at about 100 bucks a bottle. Yeah, probably not buying that. Ever.

On to the wonderful desserts! There were so many choices – fruit flan with coconut shortbread? Banana fritter with graham cracker pound cake? Chocolate toffee tart? After much careful thought (obviously the most important part of the meal) I went with the chestnut cake and poached pears. It was served with a frozen chestnut rum parfait as well. The chestnut cake was hefty and moist with chunks of dried orange and cranberry. Yum. But Scott won out with dessert, as usual – he ordered the baked caramel apple, which came with gingerbread cake and pistachio ice cream. The gingerbread was to die for! I was insanely jealous. He had moscato with his dessert, I had port. We can't remember the names of them either, too much fancy schmancy wine at that point. Sorry! But both were sweet and went well with our desserts.


After all that, we were full, tired, and ready to take off. But oh no! Megan, the pastry chef, sent out champagne floats for us before we left for the evening. Loved it – they were fizzy and sweet. So simple and perfect. How we found room to gulp them down is beyond me.

We ran into Megan at the hostess desk when we were leaving, and thanked her profusely (foodie nerds). And off we went, back to Lawrence and straight to bed. But man – best meal evah. That bluestem knows what it's doing. Scott and I have decided – if we cut back on spending, don't eat out as often as we're used to, we can swing this kind of outing about once every few months. Pretty tempting.
11 October 2007
Chicken Quesadillas with Salsa Verde

I was dying to try a fellow food blogger's recipe for Chicken Enchiladas with Salsa Verde. And off I went to the grocery store, making sure I got everything on my list. I was ready to make some enchiladas.
And then I remembered: duh, I don't have a working oven right now.
So I did a wee bit of tweaking, took out the chicken broth and cream cheese, and swapped the corn tortillas for flour. Added some cheddar, and mushrooms/chiles I still had in the fridge. And of course, had to prepare it a bit differently, decided on a quesadilla method. This recipe is very very yummy - I love the heat from the salsa verde and the mix of ingredients is just perfect. Nice kick, fresh-tasting thanks to the cilantro, and very healthy I would imagine (given the ingredients list).
Will try the enchiladas, for sure, once I get my oven back. Promise.
Chicken Quesadillas with Salsa Verde
(Adapted from Amanda's lovely Enchiladas)

Ingredients:
1 c. chopped onion
2 garlic cloves, minced
1/4 c. chopped fresh cilantro
1/2 tsp. chili powder
2 c. shredded cooked chicken breast
1/4 c. crumbled queso fresco
1 c. shredded "light" (reduced fat) cheddar cheese
Olive oil
8 flour tortillas
Salsa verde
In a sauté pan over medium heat, warm 1 Tbsp. olive oil. Sauté the onion until soft and beginning to brown. Add garlic, and sauté for a few more minutes, until fragrant. Remove from heat.
In a sauté pan over medium heat, warm 1 Tbsp. olive oil. Sauté the onion until soft and beginning to brown. Add garlic, and sauté for a few more minutes, until fragrant. Remove from heat.
Combine sautéd onion mixture and next 5 ingredients cilantro, chili powder, chicken, and cheeses) in a large bowl.
Put 1 tortilla on a cutting board and spread 1/2 cup chicken mixture over half of tortilla, then fold other half over to form a half-moon, pressing firmly on seam. Assemble 7 more quesadillas in same manner.
Heat lightly oiled grill pan over high heat until it begins to smoke, then reduce heat to moderate and grill quesadillas, 2 at a time, turning over once, until cheese is melted and golden brown grill marks appear, about 4 minutes total per batch. Transfer with a spatula to cutting board and cut in half. Top with salsa verde, and serve.
09 October 2007
Pan-Fried Onion Dip
 This dip is so so good. It's kinda like the onion dip you buy in the grocery store, only a thousand times better. It's super-awesome-perfection onion dip, and if Ina Garten had her way, it would be a lot less healthy than what I made.
Another Ina recipe, although this one I had to alter because I'd gain 5 pounds if I made it as directed. Maybe for a special occasion, or on my death bed, I'll make it the full-fat way as Ina instructs. But I am way too in love with this dip (and make it way too often) to make it the way she gives it.
In Ina's defense: I hear people complain about her fattening recipes, but frankly I can't blame her for using such artery-clogging ingredients. These are more than likely the recipes from her catering business, which had quite the reputation for its delicious offerings. And if I had a catering business, you better believe that I'd use the most tasty, flavor-enhancing (more than likely fattening) ingredients, too. Butter, lard, cream, sugar. Pile it on. Get 'em hooked and keep the jobs coming in. The woman has the nicest smile, and she sure seems like a sweetie-pie on her television show, but make no mistake: she's a smart businesswoman.
Anyway, the recipe below is my (normal-person) version of Ina's recipe. I cut down on the butter/oil, and used reduced fat where I could. I'm sure it is still very bad for you, but think of it this way: it's not as bad as it could be! I ate it with Wheat Thins instead of kettle-style potato chips, but I can't blame you if you use the kettle chips (there is no better way to eat this dip).
Pan-Fried Onion Dip

Ingredients:
2 large yellow onions (you want about 3 c. of sliced onion)
3 Tbsp. unsalted butter
3 Tbsp. canola oil
1/4 tsp. ground cayenne pepper
1 tsp. kosher salt
1/2 tsp. freshly ground black pepper
4 oz. reduced-fat cream cheese, at room temperature
1/2 c. reduced-fat sour cream
1/2 c. reduced-fat mayonnaise
Cut the onions in half, and then slice them into 1/8-in. thick half-rounds. Cut the halves in half again (quarters) if you want shorter onion pieces in your dip.
Heat the butter and oil in a large sauté pan on medium heat. Add the onions, cayenne, salt and pepper and sauté for 10-15 minutes, until they are beginning to brown. Reduce heat to medium-low and cook, stirring occasionally, for 20-30 more minutes, until the onions are completely browned and caramelized. Allow the onions to cool.
Place the cream cheese, sour cream, and mayonnaise in the bowl of an electric mixer fitted with a paddle attachment and beat until smooth. Add the onions and mix together well. Taste for seasonings (add salt and pepper if needed).
Serve at room temperature, with chopped veggies, thick (kettle-style) chips, crackers, etc. It's important to serve this at room temperature! The dip is rather thick, if you serve it cold (refrigerated) then it'll be very hard to dip.
Subscribe to:
Posts (Atom)

