Showing posts with label Baking. Show all posts

04 June 2009

Mango Muffins


So, the Tuesdays with Dorie folks made Dorie's mango bread a few weeks ago. It looked totally good, but when I saw that Caitlin made muffins instead, I was sold. I am always up for a good muffin recipe! And mangoes were super-cheap at the market that week, a sign of fate that I needed to try these out.


Now, I must say: WATCH THE TIMER WITH THESE. The bread may take 90 minutes, but these muffins are going to take probably a third of that - I say 'probably' because I set my timer for 40 minutes, and out came hard-as-rock muffins. I stuck them in a tightly-lidded container and they softened up nicely by the second day, but they were still kinda brown.

Yummy nonetheless, though! The chunks of mango do a lot to moisten these guys up (you'll see for yourself if you mix up some of this batter), and the flavor is a.m.a.z.i.n.g. I am not a giant fan of deeply spiced things in the spring/summer (I want light and fresh instead!), but these were just delicious and not too heavy, which I loved. Plump raisins, juicy mango, fantastic mix of spices. Once again, Dorie's recipe is a winner...

Mango Muffins
(adapted from Dorie's Baking: From My Home To Yours)


Ingredients:
3 large eggs
3/4 c. flavorless oil, such as canola or safflower oil
2 1/2 c. all-purpose flour
1 c. sugar
1 tsp. baking powder
1 tsp. baking soda
1 1/2 tsp. ground ginger
1 tsp. ground cinnamon
1/4 tsp. salt
1/2 c. (packed) light brown sugar
2 c. diced mango
3/4 c. golden raisins
Grated zest of 1/2 a lime

Center a rack in the oven and preheat the oven to 350 F. Grease the top of a muffin pan, line muffin cups with paper liners, and put the pan on an insulated baking sheet or on two regular baking sheets stacked one on top of the other. (This extra insulation will keep the bottom of the muffins from overbaking).

Whisk the eggs and oil together.

In a large bowl, whisk together the flour, sugar, baking powder, baking soda, spices and salt. Rub the brown sugar between your palms into the bowl, breaking up any lumps, then stir it in. Pour the wet ingredients over the dry, switch to a sturdy rubber spatula or wooden spoon and mix until blended — the batter will be very VERY thick (really more like a dough than a batter) and not easily mixed, but persevere, it will soon come together.

Stir in the mango, raisins, and zest. Scrape the batter into the muffin cups in pan, and smooth the tops with a rubber spatula.

Bake the bread for 30-40 minutes, or until muffins are golden brown and a thin knife inserted into the center comes out clean. (If the muffins look as if they're getting too brown as they bake, cover tops loosely with a foil tent). Transfer the muffin pan to a rack and cool for 5 minutes before unmolding. Invert muffins and cool to room temperature right side up on the rack.

26 May 2009

Mini Lime Pavlovas


Yeah, you wanna talk about where I've been? Here's the best part, the total kicker - um, I haven't had a baby. Nope, not yet. Just got a terrible case of the "Busy Bee!"s and haven't had time to type anything up and post to the beloved blog. Yeah, I know - I pretty much suck at this blogging thing these days. But! I've been able to spend a lot of quality-time with friends and family galore before this Robot of ours shows up, so I won't let the blog make me feel too terribly guilty.


Anyhoo! On to the recipe, shall we? Now, I love a good Pavlova. The only problem is that it is so darn humid in Kansas, I rarely get the opportunity to make them in the summer months (and let's admit it, it's not really the type of thing you bust out in the wintertime). I was hosting my book club and wanted to make a dessert, and figured since hey, it was pretty nice, I'd make Pavlovas. I baked them off the night before and planned on serving them with strawberries and kiwi.

So of course, it rained that evening. And the next day. And the next...

So while they were mighty delicious, the Pavlovas were also a bit sad looking. They *poof* fell apart with the slightest touch, so what you're seeing in pictures is a nice, sadly crumbled Pavlova. No matter, though - what they lacked in presentation, they more than made up for in taste. I love Pavlovas because they have that soft, melt-on-your-tongue outer meringue with a lovely, smooshy, marshmallow-like interior. Add some light whipped cream and fruit, and it's absolute heaven.

Also I should note: as far as desserts go, this one is about as healthy as it gets if you go easy on the whipping cream! A note to Kris and Alfie: you can sub the fine sugar with Splenda, just cut down about 1/4 of the amount. It'll turn out the same but will be sugar free!


Mini Lime Pavlovas
(adapted from sadly I can't remember where, but I swiped a mini Pav recipe and worked from there...)


Ingredients:
4 large egg whites, at room temperature
Pinch of salt
1 c. fine granulated (baker's) sugar
2 tsp. cornstarch
2 tsp. white wine vinegar
Zest of 1/2 of a lime
1/2 tsp. vanilla extract
Whipped cream
Sliced fruit

Preheat oven to 180 F. Place 2 sheets of parchment paper on 2 sheet pans. Draw several small circles on the paper, using a small ramekin or similar item as a guide, then turn them over so the circles are on the reverse side (this way you won't get pencil marks on your meringue).
Place the egg whites and salt in the bowl of an electric mixer fitted with the whisk attachment. Beat the egg whites on high speed until firm, about a minute. With the mixer on high, slowly add the sugar and beat until it makes firm, shiny peaks, about 2 minutes.

Remove the bowl from the mixer, sift the cornstarch onto the beaten egg whites, add the vinegar, zest, and vanilla, and carefully fold them lightly with a rubber spatula. Pile the meringue on your circle outlines, making a small indentation in the middle (for your cream and fruit later). We're not going for gorgeous and smooth here - rough edges are prettier with this dessert anyway, so just pile them on with that spatula.

Bake for 90 minutes. Turn off the oven, keep the door closed, and leave the mini Pavlovas in the oven for about an hour. They should be crisp on the outside and soft inside.

To serve: place one mini Pavlova on each plate. Top with whipped cream and fruit.


20 April 2009

Italian Love Cake


Hubs made fun of the name, but he still ate the heck out of this cake. So there. It has a rather heavy texture (the ricotta bakes into the cake portion, which is the reason for this) but that light top layer of cream and pudding evens things out nicely. It tastes a bit like tiramisu, if you're into that sort of thing. Pretty good stuff, and a heck of a lot easier than dipping all those ladyfingers in espresso and laying them out...

Italian Love Cake
(from the lovely Leslie)


Ingredients:
1 box marble cake mix
1 large container (~2 lb.) ricotta cheese
1 tsp. vanilla
3/4 c. sugar
4 eggs
1 pkg. instant chocolate pudding
1 c. milk
1 container Cool Whip

Prepare marble cake mix according to directions, and pour into a (greased and floured) 9X13 pan.

Mix eggs, cheese, sugar, vanilla and pour over cake mix. Bake 1 hour at 350 F. Cool cake-completely!

Mix pudding mix with 1 cup milk. Beat 3 minutes. Add Cool Whip and spread over cake. Refrigerate cake.

Leslie's note: "I normally make this the day before so its completely set up and cold. "

28 February 2009

Chocolate Valentino and Chubby Hubs Ice Cream


The February 2009 challenge is hosted by Wendy of WMPE's blog and Dharm of Dad ~ Baker & Chef. We have chosen a Chocolate Valentino cake by Chef Wan; a Vanilla Ice Cream recipe from Dharm and a Vanilla Ice Cream recipe from Wendy as the challenge. Although I didn't use either ice cream recipe, as we were allowed to make any kind we wanted...

Okey dokey, the official wording is out of the way, so now I can do my real write up :)

Like probably half of the Daring Baker community, I made my cake for Valentine's Day. I mean really - what could be more romantic than a dense brownie-like cake and some homemade ice cream for dessert? I ran into a bit of a snag, but I was no worse for the wear.

This cake only has 3 ingredients. Now, at first reading I thought, Piece of cake! I'll have this one finished and done in no time. True, very true, but when I actually settled in to make it, I realized that if I mess up any part of this recipe, it'll be an expensive thing to re-do (especially since I was using my precious stash of Valrhona chocolate for this). But not to be easily intimidated, I forged ahead.


Things were a little hairy right off the bat, when I freaked for a second thinking I had overheated my butter/chocolate (therefore burning the chocolate to worthlessness), but thankfully that was fine. Whew! I whipped my whites and carefully folded them in. No screwing around. I carefully poured my batters into my cake pan and mini Le Creuset heart pan (perfect for pictures, thanks Anne!). I bake, and watch that lovely rise and slight fall of the cake, the characteristic dimpling of the top. I pulled the cakes out and set them too cool. Ten minutes later, faithful to the recipe, I picked up the round cake pan to unmold my cake.

Um. Well, here's where I had a problem: I went to gracefully (but quickly) flip it onto the cooling rack to finish cooling. Only I kinda moved too quick, and my pregnant butter-fingers started to lose grip on the pan. I fumbled with it, flipped it (very impressively, I might add) in the air, and then popped it with my palm when I went to desperately grasp it. Well, that was it. Up! it went and then Down! it landed. With a splat. Chocolate Valentino, shredded and smooshed and not looking too good:


Yeah.

It wasn't a total loss - I just let the darn thing cool in the state you see above, then chunked up the surviving parts to make a lovely ice cream parfait for our dinners. The Le Creuset heart, fortunately, was just fine so I used that the next morning to take pictures.

So: on to the cake. If you try this, keep in mind that there is no messing around with this Valentino recipe! Use good chocolate, as the cake will taste exactly like the chocolate you use. It gets a bit expensive (as you need to use a pound of chocolate), but that won't stop me from making this again. The cake ends up very dense, reminiscent of a brownie. Oooooh, so good.

We were asked to make homemade ice cream to accompany the cake. Initially I was going to make something plain, as I didn't want to overtake the glorious cake. Then at the last minute I changed my mind, when I thought about just how good Chubby Hubby is (and how much I didn't want to buy ice cream when I needed to also make ice cream...). I came up with my own version thanks in part to this recipe, and I must say: it tastes remarkably like the original. Awesome.

For those not in the know: Chubby Hubby is only the BEST flavor ever made by Ben & Jerry's. It's a malted vanilla ice cream with chunks of chocolate-covered, peanut-butter-filled pretzel nubs, and ribbons of peanut butter and fudge. It is salty and sweet and creamy and crunchy and just all-around perfect. Go buy a pint and see for yourself, or make my version below...


Chocolate Valentino
(from Sweet Treats by Chef Wan)


Ingredients:
16 oz. of roughly chopped chocolate (I used half Ghirardelli milk chocolate, half Valrhona bittersweet)
1/2 c. + 2 Tbsp. unsalted butter
5 large eggs, separated

Put chocolate and butter in a heatproof bowl and set over a pan of simmering water (the bottom of the bowl should not touch the water) and melt, stirring often.

While your chocolate butter mixture is cooling. Butter your pan and line with a parchment circle then butter the parchment.

Separate the egg yolks from the egg whites and put into two medium/large bowls.

Whip the egg whites in a medium/large grease free bowl until stiff peaks are formed (do not over-whip or the cake will be dry).

With the same beater beat the egg yolks together. Add the egg yolks to the cooled chocolate.

Fold in 1/3 of the egg whites into the chocolate mixture and follow with remaining 2/3rds. Fold until no white remains without deflating the batter.

Pour batter into prepared pan, the batter should fill the pan 3/4 of the way full, and bake at 375 F. Bake for 25 minutes until an instant read thermometer reads 140 F. Note – If you do not have an instant read thermometer, the top of the cake will look similar to a brownie and a cake tester will appear wet.

Cool cake on a rack for 10 minutes, then unmold.


(Not Actually) Chubby Hubs Ice Cream
(my shameless adaption of B&J's Chubby Hubby, and no my Hubs is not actually chubby)


Ingredients:
2 c. half and half (or 1 c. heavy cream + 1 c. whole milk)
4 egg yolks
1/2 c. sugar, divided
A dash of salt
1 c. heavy cream
2/3 c. malt powder
1/2 recipe of Peanut Butter Swirl (follows)
Hot fudge (I just used jarred)
1 c. chocolate-covered, peanut-butter filled pretzel nuggets (World Market has them!)

Whisk yolks and 1/4 c. sugar until ribbon-like in a medium bowl.

Heat half and half and 1/4 c. sugar and the salt over medium heat until barely boiling, stirring constantly. Add the half and half mixture to the egg yolk mixture, slowly so as not to curdle the eggs, and return everything to the pan. Bring the mixture to a boil over medium-low heat and cook for about 10 minutes or so or until the mixture coats the back of a wooden spoon (you're going to have to stir it the entire time and probably will be using a wooden spoon, so at some point, take the spoon out, run your finger down the back and if the track stays 'clear', the mixture is done).

Turn off the heat, and add the heavy cream to cool the mix and then strain into the medium bowl.

Put the bowl over a larger bowl filled with ice water and stir in order to speed up the cooling process, whisk in the malt and vanilla, and then chill in the refrigerator overnight to make the following day.

Mix the malted custard in your ice cream maker as directed. Once the ice cream has finished churning (after 20-40 minutes): place in your freezable container. Add a few blobs of Peanut Butter Swirl and hot fudge, and fold a few times into the soft ice cream mixure. Add the pretzels, and fold 2-3 more times to fully incorporate. Freeze for at least a few hours before serving.

Peanut Butter Swirl

Ingredients:
1 c. creamy peanut butter
1 (14 oz.) can sweetened condensed milk
3-4 Tbsp. heavy cream, to thin

Whip peanut butter until fluffy. Slowly add the sweetened condensed milk. Once incorporated, use the heavy cream to thin the mixure a bit.

10 February 2009

Peanut Butter Cup Brownies


Oh my goodness! Where in the world does the time go?? Sorry for the week’s delay, it’s been chaos here. I’ve been working 12+ hour days and trying to keep up at home and spending actual time with other humans in-between, so I haven’t had much time to bake or blog unfortunately. Thank goodness I have this little gem of a recipe left over from SuperBowl time!

There isn’t much of a trick to these brownies – they are Dorie’s signature recipe, which I hadn’t tried before. Rich and much softer than this version, so I am still on the hunt for the perfect chewy-yet-rich brownie recipe. We shall find it one of these days, I have faith.


To up the ante on these, I decided to add some TJ mini peanut-butter cups. There isn’t a Trader Joe’s anywhere near me, but fortunately my sister Anne keeps me hooked up with all their goodies so that we don’t die from TJ withdrawals out here in Larryville. And FYI, the TJ peanut-butter cups are deemed clear of that whole Salmonella scare, so no fear in baking with them either. They added just the right amount of peanut-buttery goodness to these brownies.

Unfortunately I cut them while still a wee bit warm, so the cups oozed out all over the place. Only really a problem in the photogenic sense, though, the oozey goodness was just fine in a brownie…


Peanut Butter Cup Brownies
(adapted from the lovely Ms. Dorie Greenspan)


Ingredients:
2 sticks unsalted butter, cut into 16 pieces
9 oz. bittersweet chocolate, coarsely chopped
1 1/2 c. sugar
4 large eggs
1 tsp. pure vanilla extract
1/2 tsp. salt
1 c. all-purpose flour
1 container Trader Joe's mini peanut butter cups (for you poor slobs with no TJs: that's about 3/4 c. chopped regular peanut butter cups)

Getting Ready: Center a rack in the oven and preheat the oven to 325 F. Line a 9-x-13-inch baking pan with foil, butter the foil and place the pan on a baking sheet.

Set a heatproof bowl over a saucepan of simmering water. Put the butter in the bowl, top with the chopped chocolate and stir occasionally until the ingredients are just melted - you don't want them to get so hot that the butter separates. Remove the bowl from the pan of water.

With a whisk, stir in the sugar. The mixture might get grainy, but it will even out. Whisk in the eggs one by one, then add the vanilla and whisk enthusiastically to smooth the batter. Finally, gently whisk in the salt and flour, stirring only until incorporated. Scrape the batter into the pan and smooth the top with a rubber spatula. Gently stir in peanut butter cups.

Bake the brownies until the top is dull and a knife inserted into the center comes out clean, usually about 40 minutes. Transfer the pan to a rack and cool the brownies to room temperature.

When they are completely cool, turn out onto a rack, peel away the foil and invert onto a cutting board. Cut into 32 slender rectangles, each roughly 2 1/4 x 1 1/2 inches.

02 February 2009

Jean's Cream Puff Cake


Once upon a time, a darling coworker (Jean!) made this cake for one of our coworkers on her birthday. It was soooo good, we were all begging for the recipe. Jean was kind enough to share, and I couldn't even wait I week. I had to make this thing again. It's a lot of cake for just me and Hubs (and Robot), though, so the plan was to bring it into work for my coworkers to yet again enjoy.

I tend to get to work early, about 6am. I didn't want this sucker sitting around warming up in our department (it's best chilled), so I put it in one of the fridges in the breakroom, on the bottom shelf near the back, as to not be in the way of my fellow coworker's lunches and yogurts and such.

Flash forward to 3 days later - I realize, as I shove my lunch in the breakroom fridge that morning, that nooooo! The cake, it's still in here! I had completely forgotten to put it out for my coworkers. I pulled it out of the fridge, popped open the lid to check it out. The cream-puff base had gotten a bit soggy by that point, so I sadly had to toss it in the trash. However there was one peculiar thing to note:

About a third of it was missing. Someone had decided to help themselves to the cake, and then came back for seconds and thirds. Either that, or a whole pack of employees went at it. Dude, seriously? Is nothing personal or sacred in the community office fridge??


I hope this story shows you just how good this cake is, though - worth the crime of sneaking into someone else's pan, in broad (office breakroom fluorescent lighting) daylight. With potential witnesses sitting around, no less. And perhaps later some sort of reprimand for your actions. The cake is EXACTLY like a cream puff - poofy, not sweet, but with a pudding-type filling (on top instead) and whipped cream and chocolate sweet chocolate...

Yeah I don't blame the person or persons, really. I probably would have done it, too.


Jean's Cream Puff Cake
(from my sweetheart of a coworker, Jean)


Ingredients:
1 stick (8 Tbsp.) unsalted butter
1 c. water
1 c. flour
4 large eggs

4 c. milk
8 oz. cream cheese, softened
3 (3.5 oz) pkgs. instant vanilla pudding
1 container Cool Whip
Chocolate syrup

Preheat oven to 400 F.

In a large heavy saucepan, heat butter and water to boiling over medium-high heat. Add flour and reduce heat to low. Cook and stir until it forms a ball and pulls away from the pan. Remove from heat and transfer to a large bowl. Beat in eggs, one at a time, beating well after each egg.
Spread in bottom and up the sides of an ungreased 9x13 inch pan. Bake at 400 degrees F (200 degrees C) for 35 minutes. Cool completely.

To make the filling: In a large bowl, combine cream cheese and milk and beat until smooth. Here's the trick, to keep things smooth: start with the cream cheese, give it a good beating until fluffy. Slowly but surely (while still beating), add the milk. Voila! Once these are well combined, add pudding mix and beat until thickened. Spread over cooled shell.

Top with whipped topping, and drizzle chocolate syrup over the top. Keep refrigerated until serving.

29 January 2009

Tuiles


This month's challenge is brought to us by Karen of Baking Soda and Zorra of 1x umruehren bitte aka Kochtopf. They have chosen Tuiles from The Chocolate Book by Angélique Schmeink and Nougatine and Chocolate Tuiles from Michel Roux. I was a wee bit sad at first, knowing the baking reputations these two lovely Europeans have, but was happy nonetheless to tackle the recipe, as I had never tried tuiles before :)

The whole bit of choosing this recipe for January was to help those who need some waistline mending following the December holidays. Amen! I personally can't actually diet, but eating healthy is very important these days, so I was glad to take on the challenge. We were asked to make our tuiles in any shape we desired, and pair with a light, healthy filling.


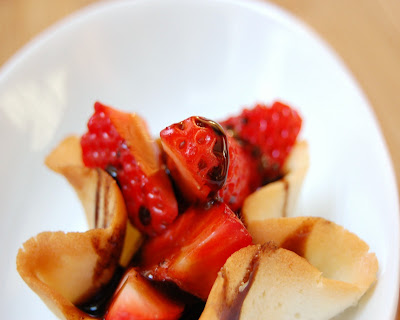
I made small baskets out of mine, simply pushing the hot round cookies into my tiny brioche molds to set. Taking advantage of the fact that the grocer actually had some plump tasty strawberries in the dead of winter, I used these tuile cups to serve up one of my favorite combos - fresh strawberries with a reduced balsamic vinegar.

Oh, mmmm - the tart and sweet and yet Terribly Healthy in a crisp cookie was just perfect. The balsamic reduction was compliments of Trader Joe's (one of several foodie Christmas gifts from my amazing sis Anne), so no recipe to follow unfortunately. Sorry for that. You can surf the Interwebs to find many a recipe though, I am sure.


Thanks to both Karen and Zorra for the recipe - I rather liked it, and will probably give these little light cookies a go again (and probably again). And as always - be sure to check out those other Daring Baker creations out there!

Tuiles
(from The Chocolate Book by Angélique Schmeinck, 1993)


Ingredients:
1/4 c.softened butter (not melted but soft)
1/2 c. sifted confectioner’s sugar
Dash of vanilla extract
2 large egg whites (slightly whisked with a fork)
1/2 c. sifted all purpose flour
1 Tbsp. cocoa powder
Butter or spray to grease baking sheet

Preheat the oven to 350 F. Using a hand whisk or a stand mixer fitted with the paddle (low speed) and cream butter, sugar and vanilla to a paste. Keep stirring while you gradually add the egg whites. Continue to add the flour in small batches and stir to achieve a homogeneous and smooth batter/paste. Be careful to not overmix.

Cover the bowl with plastic wrap and chill in the fridge for at least 30 minutes to firm up. (This batter will keep in the fridge for up to a week, take it out 30 minutes before you plan to use it).

Line a baking sheet with parchment paper or grease with either butter/spray and chill in the fridge for at least 15 minutes. This will help spread the batter more easily if using a stencil/cardboard template such as the butterfly. Press the stencil on the baking sheet and use an offset spatula to spread batter. Leave some room in between your shapes. Mix a small part of the batter with the cocoa and a few drops of warm water until evenly colored. Use this colored batter in a paper piping bag and proceed to pipe decorations on the wings and body of the butterfly (I totally skipped the cocoa-colored decorative bit myself).

Bake butterflies in a preheated oven (350 F) for about 5-10 minutes or until the edges turn golden brown. Immediately release from baking sheet and proceed to shape/bend the cookies in the desired shape. These cookies have to be shaped when still warm, you might want to bake a small amount at a time or maybe put them in the oven to warm them up again.

Or: place a baking sheet toward the front of the warm oven, leaving the door half open. The warmth will keep the cookies malleable.

If you don’t want to do stencil shapes, you might want to transfer the batter into a piping bag fitted with a small plain tip. Pipe the desired shapes and bake. Shape immediately after baking using for instance a rolling pin, a broom handle, cups, cones….

20 January 2009

Cherry Chocolate Muffins


When I was little, my parents used to can Door County cherries every year (I think they were Door County, anyway - my mom would put in an order at the grocers every year for a giant container of them, and then she'd split it up and jar them for use throughout the year). My absolute favorite use of those cherries? After-church cherry muffins. You knew it was going to be a good Sunday when our parents sent us down to the dark chilly basement to get a jar of those cherries off of the canning shelf.


Theirs were soft, warm muffins dotted with juicy cherries, and slathered with a thick smear of butter. Oh, so good. Here's my own version. Who doesn't like chocolate in a muffin, right? And for those of you giving these the sidelong glance and mumbling about mislabeling: no way, these are absolutely not cupcakes. They are a proper breakfast muffin. Do you see any frosting on these suckers? Yeah, that's what I thought. Told you, definitely muffins. Duh.


Anyhoo: I used a dark chocolate-cherry bar for the chocolate in this recipe (compliments of my sister Anne), which helped deepen the cherry flavor. In the spirit of my roots, I also used canned cherries. These muffins were soft, moist, and dense (but not too heavy); the cherries were, as they always are in muffins, so good. Ah, perfect.


Cherry Chocolate Muffins
(adapted from Dorie's Chocolate Chocolate-Chunk Muffins)


Ingredients:
6 Tbsp. unsalted butter
4 oz. bittersweet chocolate, coarsely chopped
2 c. all purpose flour
2/3 c. sugar
1/3 c. cocoa powder, sifted
1 Tbsp. baking powder
1/2 tsp. baking soda
1/2 tsp. salt
1 1/4 c. buttermilk
1 large egg
1 tsp. pure vanilla extract
2/3 c. pitted tart cherries

Center a rack in the oven and preheat oven to 375 F. Butter or spray a 12- slot muffin pan, or line with muffin liners. Place pan on a baking sheet.

Melt butter and half the chopped chocolate in a bowl over simmering water (or in the microwave). Take off heat and set aside.

In a large bowl, mix together the flour, sugar, cocoa, baking powder, baking soda, and salt. In another bowl, whisk the buttermilk, egg, and vanilla together until well combined.
Pour the buttermilk mixture and the chocolate mixture into the dry ingredients. Mix gently but quickly to blend, but do not over mix as this will toughen the muffins. A few lumps are OK! Carefully stir in the remaining chopped chocolate and cherries.

Divide batter among the muffin tins. Bake for 20 minutes, or until a thin skewer inserted into the middle of a muffin comes out clean. Cool pan on a rack for 5 minutes before removing muffins from pan.

10 December 2008

Sugar Cookies


There is a photo somewhere floating around in a photo box in my house (and for the life of me I can't find it, or else I would have scanned it and included it here). It is a picture from an office holiday party, back in my college days. There is a lone subject in the picture, a sweet college-aged girl with her unruly curly hair in a loose ponytail, sitting in a recliner. She's wearing a festive sweater with reindeer on it, and there is a large Tupperware tub full of sugar cookies perched on her lap. She has a huge smile on her face, she's actually laughing to be honest, in fact her face is kinda red from laughing so hard. She's looking at someone off to the side, waving a pretty, perfect, frosted (and be-sprinkled) sugar cookie in her hand.

Now let me tell you the story behind that picture: this was my darling coworker, who had just spent 15 minutes in front of an audience of all our other coworkers, trying everything in her power to break one of the (Nemmie-made) super-Teflon sugar cookies.

Yes, to somehow get a piece or chunk or heck, even a crumb to fall off one of those cookies. You see, the cookies were sure pretty and kept their shape and decorated like a dream, but ah... Were not edible. At all. And this poor girl spent all night trying to get a piece off of just one cookie. My cookies that year, they were the talk of the party let me tell you. Not in a good way. I was totally a sucky baker in college.

Since that time, I have much matured (in many ways). Thankfully, I have also found a much better sugar cookie recipe. I have tried many, believe me: you know how a lot of recipes are either pretty when decorated but too hard/tasteless to enjoy eating? Or on the flip side: taste good, but the shapes spread while baking and you're stuck with 48 undecipherable blobs? Well, this is truly the best sugar cookie recipe I've ever used: they never spread. They taste yummy (it's the citrus, methinks). And they aren't rock hard, the biggest factor of all for me. Total win!

Sugar Cookies
(from Williams Sonoma)


Ingredients:
1/2 c. unsalted butter, at room temperature
1/2 c. granulated sugar
2 tsp. grated lemon zest (don't like zest? Try 2 tsp. vanilla paste)
1 large egg
1 3/4 c. all-purpose flour
1/2 tsp. baking powder
1/4 tsp. salt
Royal icing for decorating

Preheat oven to 350 F.

In a food processor, combine the butter, granulated sugar, and zest and pulse until creamy. Add the egg and pulse 5 or 6 times until fluffy and blended. In a small bowl, whisk together the flour, baking powder, and salt. Add one-third of the flour mixture to the food processor and process until blended, about 45 seconds. Add the remaining flour in two batches, processing after each addition until the dough is smooth.

Turn the dough out onto a well-floured work surface, shape into a ball, and then roll out 1/8-inch thick (you can also chill the dough for about half an hour if you'd like, it helps in rolling out the dough). Using cookie cutters, cut the dough into desired shapes. Then, using a spatula, transfer the cutouts to the baking sheets. Gather up the dough scraps, form into a ball, roll out and cut more shapes, and add to the baking sheets.

Bake until lightly browned on the bottom and pale golden on top, 6-8 minutes. Transfer to wire racks and allow to cool on the baking sheets for 5 minutes, then transfer to the racks alone to cool completely.

Decorate the cooled cookies with royal icing, chocolate ganache, sprinkles, etc. etc. etc.

04 December 2008

Cinnamon Roll Cookies


Uh ohs! Almost forgot that today was a posting day... Well, let's see. I have some brownie bites to post, and ice cream, and soup... But I'm still on a cookie kick, at least for now, so that's what you're getting.

I picked up this recipe from Pea's site, yet again. I am like a stalker, no? But these were worth it. I love the little cinnamon roll shape! Plus, the kitchen will totally smell like (yeast-free) cinnamon rolls while baking. And they have the cinnamony, buttery taste down pat. Very glad to find this one floating out in the Interwebs. All I did was add a little zest into the mix, and they were pretty much like my favorite cinnamon roll recipe, just in cookie form :)


Cinnamon Roll Cookies
(from Pea)


Ingredients:
½ c. sugar
2 Tbsp. ground cinnamon
3 c. all-purpose flour
2 tsp. baking powder
1 tsp. ground cinnamon
½ tsp. salt
1 c. unsalted butter, at room temperature
Zest of 1 lemon, or 1/2 an orange
1 c. brown sugar
2 eggs
1 tsp. vanilla extract
1 c. powdered sugar
¼ c. warm water
½ tsp. powdered egg whites

For the filling combine sugar and 2 TBSP cinnamon in a small bowl, set aside.

Whisk flour, baking powder, 1 tsp cinnamon, and salt together for the dough in a bowl; set aside.
Cream butter, zest, and brown sugar in a bowl with a mixer until smooth. Add the eggs and vanilla; mix until incorporated. With the mixer on low speed, add the dry ingredients, blending just to incorporate; do not over mix.

Trace a 16-x-9-inch rectangle on a sheet of parchment or wax paper. Pat the dough into the rectangle using your hands, then sprinkle half the cinnamon mixture over the dough.

Beginning on a long side and using the paper to help you, roll the dough into a log. Dust the outside of the log with the remaining cinnamon mixture (I forgot to do this). Wrap log in plastic and chill for at least 3 hours.

Preheat oven to 350 F; line two baking sheets with parchment paper.
Slice chilled dough into 1/4-inch thick slices and arrange on prepared baking sheets, spacing 1 inch apart. Bake 10-12 minutes, or until golden brown. Let cookies cool on the pan for 5 minutes, then transfer to a rack.

Combine icing ingredients in a bowl. Drizzle icing over cooled cookies, let stand at room temperature.

26 November 2008

Pumpkin Whoopie Pies


Did you know that Dean & DeLuca are selling these puppies for $55 a dozen? I could make a killing! Because they are so easy to make, seriously. And fun to assemble too.


The flavor is out of this world - Hubs took them to his office "Thanksgiving Potluck", and there were several requests for the recipe. They are sweet, spicy, deeply pumkin, and full of a soft, creamy cinnamon filling. Mmmmm. Take it from Peabody, who said she couldn't stop eating them (and she's one to give all her treats away) - these are well worth making.

Pumpkin Whoopie Pies


Ingredients:
3 c. all-purpose flour
1 tsp. salt
1 tsp. baking soda
1 tsp. baking powder
2 Tbsp. cinnamon
1 tsp. ground ginger
1/2 tsp. ground fresh nutmeg
1 c. granulated sugar
1 c. dark brown sugar, firmly packed
1 c. canola oil
3 c. chilled pumpkin puree
2 large eggs
1 tsp. vanilla extract
3 c. powdered sugar
1/2 c. unsalted butter, at room temperature
8 oz. cream cheese, at room temperature
1 Tbsp. cinnamon
1 tsp. vanilla

Preheat oven to 350F. Prepare to baking sheets lined with parchment paper.

In a large bowl, whisk together the flour, salt, baking soda, baking powder, and spices. Set aside.In a separate bowl, whisk to sugars and oil together. Add the pumpkin puree and whisk to combine thoroughly. Add the eggs and vanilla and whisk until combined.

Sprinkle the flour mixture over the pumpkin mixture and whisk until completely combined.Use a small ice cream scoop with a release mechanism to drop healing TBSP of the dough onto the prepared baking sheets, about 1 inch apart.

Bake for 10-12 minutes, until the cookies are just starting to crack on top and a toothpick inserted into the center of a cookie comes out clean. Remove from the oven and let the cookies cool completely on the pan while you make the filling. They will look more like mini cakes then cookies, so don’t panic about that.

For the filling: In the bowl of an electric mixer fitted with a paddle attachment, beat the butter until smooth with no visible lumps. Add the cream cheese an beat until combined.Add the powdered sugar, maple syrup and vanilla and beat until smooth. Be careful no to overbeat the filling, or it will lose structure.

To assemble: Turn half the cooled cookies upside down. Pipe filling (about a TBSP) onto that half. Place another cookie, flat side down, on top of the filling. Press down slightly so that the filling spread to the edges of the cookie. Repeat until all the cookies are used. Put the whoppie pies in the refrigerator for about 30 minutes to firm before serving.

17 November 2008

Dimply Plum Cake


I have seen the dimply plum cake being made all over the Interwebs, and just based on how adorable it is I decided to dive in and make it myself. I had a coworker's birthday to bake for anyway. Only it didn't photograph too well for me, I had a slight issue...

One giant thing to note: this recipe doesn't double especially well. At least, it doesn't look as beautiful when you double it... The cooking time is much longer, so those poor plums sank into my cake rather than sit pretty on top. No worries though - still tasted like a dream! Like a deep brown sugar coffee cake, with juicy halves of fruit inside. Mmmm. This one went over quite well at the office, ugly appearance aside :)

Dimply Plum Cake
(shocker: another one from Dorie's Baking: From My Home to Yours, 2006)


Ingredients:
1 1/2 c. all purpose four
2 tsp. baking powder
1/4 tsp. salt
1/4 tsp. ground cardamom
5 Tbsp. unsalted butter
3/4 c. packed light brown sugar
2 large eggs
1/3 c. canola oil
Grated zest of 1 lemon
1 1/2 tsp. pure vanilla extract
8 purple or red plums, halved and pitted

Preheat the oven to 350 F. Butter an 8x8 baking dish or a glass pie plate and set aside.

Combine the flour, baking powder, salt and ground cardamom.
In a stand mixer, cream the butter with the brown sugar. Add the eggs, one at a time, beating well after each addition. Beat in the oil, lemon zest and vanilla. Reduce the speed and add the flour mixture. Pour the batter in the prepared dish, smooth the top and arrange the plums on top, cut side up.

Bake for about 40 minutes or until a knife inserted in the middle comes out clean. Let cool for at least 15 minutes before serving.

06 November 2008

Laugen Brotchen


Yum! I love a good pretzel roll - salty, chewy, and that distinctively pretzel-y taste (kinda sweet yeah, and a bit doughy and Something Else that just can't be described). And yet, only with a pretzel roll you can eat alone with a nice spicy mustard OR you can use it for sandwiches. Brilliant!

This takes me back to when my parents always used to make pretzels at home, although they went the more "traditional" route and boiled the dough in a lye bath. I used baking soda, because I'm a wimp (and a klutz, so someone would have lost an eye if I'd done the traditional thing). They were still very good! If you haven't made homemade pretzels (or pretzel rolls) before, you are truly missing out. Quite the treat.

Laugen Brotchen (Pretzel Rolls)
(from RecipeZaar)


Ingredients:
1 1/3 c. warm water
2 Tbsp. warm milk
2 1/2 tsp. active dry yeast
1/3 c. light brown sugar
2 Tbsp. butter, melted
4 c. all-purpose flour
Kosher salt or pretzel salt
2 qt. cold water
1/2 c. baking soda

In the bowl of your stand mixer, mix 1/3 cup of the warm (105-115 F) water with the yeast and let stand until foamy. Add the remaining cup of warm water, the warm milk, melted butter, and brown sugar and mix to dissolve the sugar.

Attach your dough hook to your stand mixer, and slowly add the 4 cups of flour until combined. Continue using your dough hook to mix the dough until it forms a nice, firm dough that pulls away from the sides of the bowl.

Turn the dough out onto a lightly floured surface and knead by hand for 2 minutes. Roll into a 2-foot long log and cut into 12 even pieces. Cover the dough with plastic wrap and a damp cloth and let sit for 30 minutes.

Pat dough into rolls, or form pretzel knows and arrange on a lightly floured surface, about an inch apart, and cover with lightly oiled plastic wrap. Let the dough rest for an additional 30 minutes.

Preheat the oven to 425 degrees. Lightly oil 2 baking sheets.

In a large stockpot, bring the cold water to a rolling boil and add the baking soda. Drop the rolls -- one or two at a time -- into the boiling water and boil for no more than 30 seconds, turning them over once. Carefully remove with tongs, spatula, or slotted spoon and hold above the pot to let drain.

Deposit boiled rolls into the greased baking sheet (6 per sheet) and sprinkle lightly with pretzel or kosher salt. Repeat with the remaining rolls.

Bake the rolls on the upper and middle racks of the oven for 8-10 minutes until brown all over -- if necessary, shift pans from top to bottom and back to front halfway through, for even baking.

Let the rolls cool on the baking sheets for 5 minutes, then transfer them to a rack. Serve warm, or at room temperature.

03 November 2008

Dorie's Snickery Squares


Every single food blogger on the planet with a copy of Dorie Greenspan's beloved Baking book has made these bars, so it was only appropriate that I caught up and made them myself....

Dorie likens these bars to Snickers candy bars, but they actually don't taste like Snickers bars. They are decidedly better - the shortbread crust is fantastic, in fact I'll probably use it as a base for other desserts in the future. The center is sweet, dense, with candied peanuts that are to die for. And the chocolate crust, of course, is much better than the cheap milk-crud they dip those candy bars in! I can now see why these are so popular in the Dorie-obsessed blogosphere.


They are also terribly rich, so keep in mind that a batch of these will last you a long time (or will feed many, at least).

Snickery Squares
(from Dorie's Baking: From My Home To Yours, 2006)


Ingredients:

For the Crust:
1 c. all-purpose flour
¼ c. sugar
¼ tsp. salt
1 stick unsalted butter, cut into small pieces and chilled
1 large egg yolk, lightly beaten

For the Filling:
½ c. sugar
3 Tbsp. water
1 ½ c. salted peanuts
About 1 ½ c. store-bought dulce de leche

For the Topping:
7 oz. bittersweet, coarsely chopped
½ stick unsalted butter, cut into 8 pieces, at room temperature

Getting Ready:
Preheat oven to 350 F. Butter a 8-inch square pan and put it on a baking sheet.

To Make the Crust:
Toss the flour, sugar, powdered sugar and salt into a food processor and pulse a few times to combine. Toss in the pieces of cold butter and pulse about 12 times, until the mixture looks like coarse meal. Pour the yolk over the ingredients and pulse until the dough forms clumps and curds-stop before the dough comes together in a ball.
Turn the dough into the buttered pan and gently press it evenly across the bottom of the pan. Prick the dough with a fork and slide the sheet into the oven.Bake the crust for 15-20 minutes, or until it takes on just a little color around the edges. Transfer the pan to a rack and cool to room temperature before filling.

To Make the Filling:
Have a parchment or silicone mat-lined baking sheet at the ready, as well as a long-handled wooden spoon and a medium heavy bottomed saucepan.

Put the sugar and water in the saucepan and cook over medium-high heat, stirring, until the sugar dissolves. Keeping the heat fairly high, continue to cook the sugar, without stirring, until it just starts to color. Toss the peanuts and immediately start stirring. Keep stirring, to coat the peanuts with sugar. Within a few minutes, they will be covered with sugar and turn white—keep stirring until the sugar turns back into caramel. When the peanuts are coated with a nice deep amber caramel, remove the pan from the heat and turn the nuts out onto the baking sheet, using the wooden spoon to spread them out as best you can. Cool the nuts to room temperature.

When they are cool enough to handle, separate the nuts or break them into small pieces. Divide the nuts in half. Keep half of the nuts whole or in biggish pieces for the filling, and finely chop the other half for the topping.

Spread the dulce de leche over the shortbread base and sprinkle over the whole candied nuts.
To Make the Topping:
Melt the chocolate in a heatproof bowl set over a saucepan of barely simmering water. Remove chocolate from the heat and gently stir in the butter, stirring until it is fully blended into the chocolate.

Pour the chocolate over the dulce de leche, smoothing it with a long metal icing spatula, then sprinkle over the rest of the peanuts. Slide the pan into the fridge to set the topping, about 20 minutes; if you’d like to serve the squares cold, keep them refrigerated for at least 3 hours before cutting.

Cut into 16 bars.