16 September 2008

Cinnamon Buns


Every year for my husband's birthday, I get up early and make him cinnamon rolls. Most years I just use pre-made stuff (you know, like the biscuits in a can?). This year, though, I decided to make them from scratch. The Daring Bakers made cinnamon rolls last year before I joined up, and they looked so good. I decided that this year, I was making those yummy looking cinnamon rolls for the Hubs.

I made the bulk of the recipe the night before, then set my alarm for 3am to pull the dough out of the fridge to temp (!). We weren't disappointed: warm and gooey, sticky cinnamon goodness stuck to your fingers while you pulled apart the soft bread for breakfast: cinnamon rolls (buns) have a special place in this world, and the warm just-out-of-the-oven ones are insanely good. Just trust me, and give these a shot.

There is a reason 90% of the Daring Bakers threw away their previous Cinnamon Roll recipe and made this their main stay.


Cinnamon Buns


Ingredients:
6 1/2 Tbsp. granulated sugar
1 tsp. salt
5 1/2 Tbsp. shortening or unsalted butter
1 large egg, slightly beaten
1 tsp. lemon extract OR 1 tsp. grated zest of 1 lemon
3 1/2 c. unbleached bread or all-purpose flour2 tsp. instant yeast*
1 1/8 to 1 1/4 c. whole milk or buttermilk, at room temperature
1/2 c. cinnamon sugar (6 1/2 Tbsp. granulated sugar + 1 1/2 tsp. ground cinnamon)
White fondant glaze (at the end of the recipe.)

*Instant yeast contains about 25% more living cells per spoonful than active dry yeast, regardless of the brand. Instant yeast is also called rapid-rise or fast-rising.

Making the Dough: Cream together the sugar, salt, and shortening or butter on medium-high speed in an electric mixer with a paddle attachment (or use a large metal spoon and mixing bowl and do it by hand).

Whip in the egg and lemon extract/zest until smooth. Then add the flour, yeast, and milk. Mix on low speed (or stir by hand) until the dough forms a ball.

Switch to the dough hook and increase the speed to medium, mixing for approximately 10 minutes (or knead by hand for 12 to 15 minutes), or until the dough is silky and supple, tacky but not sticky. You may have to add a little flour or water while mixing to achieve this texture.

Lightly oil a large bowl and transfer the dough to the bowl, rolling it around to coat it with oil. Cover the bowl with plastic wrap.

Fermentation: Ferment at room temperature for approximately 2 hours, or until the dough doubles in size.

Form the Buns: Mist the counter with spray oil and transfer the dough to the counter. Roll out the dough with a rolling pin, lightly dusting the top with flour to keep it from sticking to the pin. Roll it into a rectangle about 2/3 inch thick and 14 inches wide by 12 inches long for larger buns, or 18 inches wide by 9 inches long for smaller buns. Don´t roll out the dough too thin, or the finished buns will be tough and chewy rather than soft and plump. Sprinkle the cinnamon sugar over the surface of the dough and roll the dough up into a cigar-shaped log, creating a cinnamon-sugar spiral as you roll. With the seam side down, cut the dough into 8 to 12 pieces each about 1 3/4 inches thick for larger buns, or 12 to 16 pieces each 1 1/4 inch thick for smaller buns.)

Prepare the Buns for Proofing: line 1 or more sheet pans with baking parchment. Place the buns approximately 1/2 inch apart so that they aren´t touching but are close to one another.

Proof at room temperature for 75 to 90 minutes, or until the pieces have grown into one another and have nearly doubled in size. You may also retard the shaped buns in the refrigerator for up to 2 days, pulling the pans out of the refrigerator 3 to 4 hours before baking to allow the dough to proof.

Bake the Buns:Preheat the oven to 350 F with the oven rack in the middle shelf for cinnamon buns. Bake the cinnamon buns for 20 to 30 minutes, or until golden brown.

Cool the buns: Cool the buns in the pan for about 10 minutes and then streak white fondant glaze across the tops, while the buns are warm but not too hot. Remove the buns from the pans and place them on a cooling rack. Wait for at least 20 minutes before serving.

Cinnamon buns are usually topped with a thick white glaze called fondant. There are many ways to make fondant glaze, but here is a delicious and simple version, enlivened by the addition of citrus flavor, either lemon or orange. You can also substitute vanilla extract or rum extract, or simply make the glaze without any flavorings.

Sift 4 cups of powdered sugar into a bowl. Add 1 teaspoon of lemon or orange extract and 6 tablespoons to 1/2 cup of warm milk, briskly whisking until all the sugar is dissolved. Add the milk slowly and only as much as is needed to make a thick, smooth paste.

When the buns have cooled but are still warm, streak the glaze over them by dipping the tines of a fork or a whisk into the glaze and waving the fork or whisk over the tops. Or, form the streaks by dipping your fingers in the glaze and letting it drip off as you wave them over the tops of the buns. (Remember to wear latex gloves.)

14 September 2008

The VGT Omnivore’s Hundred; and more Meme!

I've tagged this as a blogging event, and as much play time as it's gotten on foodie blogs, it might was well be! This "Quiz of Foods" originated from Very Good Taste.

1) Copy this list into your blog or journal, including these instructions.
2) Bold all the items you’ve eaten.
3) Cross out any items that you would never consider eating.

Without further ado...


The VGT Omnivore’s Hundred:

1. Venison (duh - the Hubs is a hunter; this stuff rocks)
2. Nettle tea
3. Huevos rancheros
4. Steak tartare
5. Crocodile (from some chain Outback Steakhouse-type place, but still)
6. Black pudding
7. Cheese fondue
8. Carp
9. Borscht (Russian food at its finest!)
10. Baba ghanoush
11. Calamari
12. Pho
13. PB&J sandwich
14. Aloo gobi
15. Hot dog from a street cart
16. Epoisses
17. Black truffle (teeny bits on a pasta dish count, right?)
18. Fruit wine made from something other than grapes
19. Steamed pork buns
20. Pistachio ice cream
21. Heirloom tomatoes
22. Fresh wild berries
23. Foie gras
24. Rice and beans
25. Brawn, or head cheese
26. Raw Scotch Bonnet pepper
27. Dulce de leche
28. Oysters
29. Baklava
30. Bagna cauda
31. Wasabi peas
32. Clam chowder in a sourdough bowl
33. Salted lassi
34. Sauerkraut (LOVE)
35. Root beer float
36. Cognac with a fat cigar (cigarette instead of cigar is okay, yeah?)
37. Clotted cream tea
38. Vodka jelly/Jell-O (Jello shots! Who didn't have one in college??)
39. Gumbo
40. Oxtail
41. Curried goat
42. Whole insects
43. Phaal
44. Goat’s milk
45. Malt whisky from a bottle worth £60/$120 or more
46. Fugu
47. Chicken tikka masala
48. Eel
49. Krispy Kreme original glazed doughnut, while still hot
50. Sea urchin
51. Prickly pear
52. Umeboshi
53. Abalone
54. Paneer
55. McDonald’s Big Mac Meal
56. Spaetzle
57. Dirty gin martini (dirty gin martinis are the only true martini, darling)
58. Beer above 8% ABV
59. Poutine (Canada's version of heart-attack-on-a-plate; quite addicting)

60. Carob chips (blech)
61. S’mores
62. Sweetbreads
63. Kaolin
64. Currywurst
65. Durian (this is that stinky fruit; no way man)
66. Frogs’ legs
67. Beignets, churros, elephant ears or funnel cake
68. Haggis
69. Fried plantain
70. Chitterlings, or andouillette
71. Gazpacho
72. Caviar and blini
73. Louche absinthe
74. Gjetost, or brunost (I had an author from Norway; somehow we got in the conversation of this caramel-y cheese and I was then his US soulmate. He still randomly sends me pictures of his hometown occasionally, that dear man)
75. Roadkill
76. Baijiu
77. Hostess Fruit Pie
78. Snail
79. Lapsang souchong
80. Bellini
81. Tom yum (yum indeed!)
82. Eggs Benedict
83. Pocky
84. Tasting menu at a three-Michelin-star restaurant.
85. Kobe beef (small bit in tartar; that counts right?)
86. Hare
87. Goulash
88. Flowers
89. Horse
90. Criollo chocolate
91. Spam
92. Soft shell crab
93. Rose harissa
94. Catfish
95. Mole poblano
96. Bagel and lox
97. Lobster Thermidor
98. Polenta
99. Jamaican Blue Mountain coffee
100. Snake

I have tried 63 out of 100... what about you? Post the results on your blog, dear readers!


ALSO: dear Amy at Cape Cod Makeover tagged me for a Meme, so here goes that as well! I am supposed to post 6 facts about myself. Yay, I'm flattered Amy :) Here we go:


1. I love the smell of paint. Love love love the smell of it. It just smells fresh and new I guess. I was so happy when we first moved into our house after painting the entire thing; it smelled so good to me that first month or so.

2. My freshman year of high school, I was the Best Basket Weaver in 3 counties. (Seriously: I won 1st place in 3-dimensional art at the SEK High School Art Fair)

3. Today is my birthday :)

4. I know Don Gorske. Well, actually my parents and brother know him better (my brother and his son were great pals growing up). Still, I do know him! And will report that he truly is a wonderful, skinny, fit guy. His wife is a total doll, too.

5. The company I work for is in a building that used to be a Van Camp factory many many years ago. The Van Camp people put a time capsule in the wall, which we are opening this year. I am totally hoping that big canister is full of Beanee Weenee.

6. I have become an expert at manicure/pedicure/nail painting; in fact: I don't go to salons any more, because I do a better job myself. Totally in the wrong field of work, I tell you.


That's it! Have a great day dear readers! Here's a pic of my sous chef to tide you over until I post again (it's not a post without pictures, after all).


Beep beep! All dressed and ready to head to Nemmie's for a nice long visit :)


12 September 2008

Capellini with Salmon and Lemon-Dill Sauce


This is more of a winter dish: it simmers down for a long time, making a thick, rich sauce. And keeps the room warm (not really something necessary in September in Kansas, but whatever). The sauce tastes so deeply of cream, with a hint of the lemon and dill. And in honestly, while rich, the sauce quotient is low so is just enough to coat the pasta and salmon (no puddles of sauce on the plate, hurrah!). Something I tried once and loved, so keep making even when the weather is more than warm outside.

Quick note: Gourmet piggy-backed this with a recipe for roasted salmon, recommending that you use the leftover salmon for this pasta recipe. I'll make it when I have salmon leftover from a meal, but more often than not I will just pop a few foil-wrapped fillets in the oven for 20 minutes. Works like a charm.

Capellini with Salmon and Lemon-Dill Sauce
(adapted from Gourmet, June 2005)


Ingredients:
1 medium onion, finely chopped
1 Tbsp. olive oil
3 c. reduced-sodium chicken broth
1 1/3 c. heavy cream
1/2 tsp. salt
1/2 c. chopped fresh dill
1 1/2 tsp. finely grated fresh lemon zest
2 Tbsp. fresh lemon juice
1/4 tsp. coarsely ground black pepper
2 c. flaked broiled salmon
10 oz. capellini (angel-hair pasta; about two thirds of a 1-lb box)

Cook onion in oil in a 3-quart heavy saucepan over moderate heat, stirring occasionally, until softened (but not browned), about 6 minutes. Add broth, cream, and salt and boil over moderately high heat, stirring occasionally, until sauce is reduced to 2 cups, 40 to 50 minutes.

Remove from heat and stir in dill, lemon zest and juice, and pepper. Reserve 1/2 cup sauce, then add salmon to saucepan and cook over moderately low heat until fish is just heated through, 2 to 3 minutes.

While fish is heating, cook pasta in a 6- to 8-quart pot of boiling salted water until al dente.Reserve 1/2 cup pasta-cooking water, then drain pasta in a colander. Return pasta to pot, then toss with reserved sauce and cooking water. Serve pasta immediately with fish and sauce spooned over the top.

11 September 2008

No-Bake Chocolate and Peanut Butter Oatmeal Bars


One of my employees has abandoned me (sniff). E. is sweet and smart and just a doll to work with; she often hides behind her shy personality, and was a vital part of our department. When she sat me down a few months ago to tell me she was moving out of state, I was not only surprised but a bit sad to see her presence go.

I also must mention that E. has a slight obsession with cows. Slight is an understatement. They cover her very being, found in every square inch of her cubicle, hanging from the ends of her bookshelves and overflowing onto her desk. I'm not totally clear on the story behind them (well, actually I kind of am, but am not going to divulge it here), but it's a very intriguing part of her personality.

When she announced her leaving, we found a way to have her contract out as a freelancer for our company. Sweet! And yet, I was still sad to see E. and her cow shrine go. On her last day in our office, she carefully packed all her belongings, including her cows. One lone cow remained on a shelf, and when she took a load of boxes to her car, I stood over her cubicle staring at that sad lonely cow. The sole reminder of a great gal soon to be no longer around.
So I stole him. He's a smushy plastic mess of a cow, but beloved none the less.


I sneaked out of her cubicle with him, but not before leaving a gift in exchange: two huge squares of that peanut-buttery, chocolate-y dessert that Martha Stewart fancy-fied into bars. Yum. Totally worth my petty theft.

I took these bars to a potluck for the Cow-Lovin' Coworker in Question, in honor of her last official day of employment. They are everything a person could want from a no-bake: rich, sweet, filling. These suckers don't disappoint.

No-Bake Chocolate and Peanut Butter Oatmeal Bars
(shamelessly stolen from Cape Cod Makeover)


Ingredients:
Cooking spray
9 oz. chocolate wafers, finely ground (2 cups)
1 1/2 c. old-fashioned oats
1 1/4 c. confectioners' sugar
1/4 tsp. salt
5 oz. unsalted butter
1 c. chunky peanut butter
3/4 c. + 3 Tbsp. creamy peanut butter
10 oz bittersweet chocolate, melted

Coat a 9-by-13-inch baking dish with cooking spray. Line with parchment, leaving a 2-inch overhang on the 2 long sides.

Combine wafers, oats, sugar, and salt in a large bowl. Melt butter in a medium saucepan over medium heat, then add chunky peanut butter and 3/4 cup smooth peanut butter, whisking until well combined. Add peanut butter mixture to wafer mixture, stirring until combined. Transfer to baking dish, and use the bottom of a measuring cup or an offset spatula to firmly press mixture into an even layer. Refrigerate for 30 minutes.

Pour melted bittersweet chocolate over chilled mixture and, using an offset spatula, spread into a thin layer that covers the entire surface. Refrigerate until hardened, at least 15 minutes.

Heat remaining 3 tablespoons smooth peanut butter in a small saucepan until runny. Drizzle peanut butter over chilled chocolate. Refrigerate until hardened, about 15 minutes.

Use parchment to lift out chilled block of bars. Run a sharp knife under hot water, dry well, and cut into 24 squares, wiping knife between cuts. Let bars stand at room temperature for 10 minutes before serving. (Sliced bars can be refrigerated for up to 1 week or frozen for up to 1 month.) We used chocolate graham crackers in place of the wafer cookies and dark chocolate in place of the milk chocolate.

09 September 2008

Corn on the Cobb Salad Wrap


This made a TON of food - I halved the recipe, and we still literally ate this for days. Days! Days of lunches and dinners both. Not like that is a bad thing: it was very, very good. Great as just a salad, and also fabulous as a wrap. So count it in as versatile as well :)

The only think I'd change: I'd grill the onions for the dressing a bit longer, so that they are good and carmelized. The flavor was totally lost in the blue cheese dressing; not that this 'problem' is necessarily terrible, mind you, but it did overpower the onions. Other than that, though, this was amazing. It's not often that I'd willingly eat the same thing for several days, but this definitely is an exception.

Thanks bunches to Drewie, once again, for a wonderful recipe!

Corn on the Cobb Salad Wrap


Ingredients:
2 whole skinless boneless chicken breasts (about 1 1/2 lb.)
Salt and freshly ground pepper
1 Tbsp. olive oil
6 slices prosciutto (or plain ole bacon)
2 ripe avocados
1/2 head romaine, rinsed, spun dry, and finely chopped (about 4 c.)
1 c. cooked corn, heated or defrosted
1 bunch watercress
2 tomatoes, seeded and finely chopped
3 large hard-boiled eggs, separated and chopped
4 large flour tortillas
1 1/2 c. Grilled Onion Blue Cheese Dressing, recipe follows

Preheat a grill or grill pan. Season chicken breasts on both sides with salt and pepper and drizzle with olive oil. Grill for about 4 to 5 minutes on each side or until cooked through. Set aside to rest for 2 minutes and then cut into bite-size pieces.

In a skillet, cook the prosciutto over moderate heat until it is crisp; transfer with a slotted spoon to paper towels to drain. Break into bite-size pieces. Halve, pit, peel and cut the avocado into 1/2-inch pieces.

In a large salad bowl, toss together the romaine, corn, and watercress. Add the chicken, prosciutto, tomatoes, egg yolks and whites, and avocado. Pour Grilled Onion Blue Cheese Dressing over salad and toss well. Divide over tortillas and fold or roll up to make a sandwich wrap.

Grilled Onion Blue Cheese Dressing:

1 sweet white onion
2 Tbsp. extra-virgin olive oil
Salt and freshly ground black pepper
2 c. mayonnaise
1 c. sour cream
1 c. buttermilk
2 tsp. hot sauce (recommended: Tabasco)
1/2 tsp. Worcestershire sauce
12 oz. blue cheese, crumbled

Preheat a grill or grill pan. Onions can be grilled utilizing a stove top grill pan or outside grill. Remove outer skin of the onion. Cut into 1/2-inch thick circles. Place in bowl and season with extra-virgin olive oil, salt, and pepper, to taste. Transfer onion to grill or grill pan and cook over medium-high heat until they have a transparent, caramelized color, about 5 to 7 minutes. Remove from heat and allow to cool, then cut into medium dice.

In mixing bowl, combine mayonnaise, sour cream, buttermilk, hot sauce, and Worcestershire until well blended. Add blue cheese and mix well to incorporate throughout dressing. Fold in diced grilled onions. Check for seasoning. Refrigerate until ready to use.

06 September 2008

Peanut Butter Chocolate Rice Krispie Treats


Ali, darling. Some of your recipes just drown me in deliciousness. Just like your portobello sandwiches, this recipe is totally awesome. And can I just say? So glad you didn't allow the blog to self-destruct :)

For some reason, my Rice Krispie treats in the past have always been a bit... dense. Kinda dry. I never thought much of it, but when I made these I read the magical words "... don't press down too hard or else your treats will be too dense". Well, duh Nemmie. That was my problem, every single time. But not any more! These treats are chocolate-ty, and full of peanut butter goodness to boot. Can't beat them.

Today my treats are dedicated to that husband of mine - it's his birthday, you see, so he gets a bit of the royal treatment today. Chocolate and peanut butter are his absolute favorite combination, so it seemed fitting.

Happy Birthday, darling!

Peanut Butter Chocolate Rice Krispie Treats
(From Ali)


Ingredients:
4 Tbsp. (1/2 stick) unsalted butter, plus more to butter dish
10 oz. jumbo marshmallows
3/4 c. creamy, common brand peanut butter
1 tsp. vanilla extract
6 c. crispy rice cereal (recommended: Rice Krispies)
6 oz. bittersweet chocolate

Melt the butter over low heat in a large pot. Stir in the marshmallows and cook until fully melted and no marshmallow white remains. Stir in the peanut butter until combined. Stir in the cereal until distributed evenly through the marshmallow mixture. Pour out onto a lightly greased rectangular baking dish (9" x 13"). Smooth out the top of the treats by moistening your hands with a little water and using the palms of your hand to press down gently. Don't press down too hard or else your treats will be too dense. Set aside to cool.

Once the treats have cooled, melt the chocolate over low heat. Cut the treats into even squares and quickly just shallowly dip the top side of the treats into the chocolate. Turn chocolate side up and set in a baking dish or on a rack until set.


04 September 2008

Catfish Po' Boy


Cheap, easy, and good for you. Oh, and really really yummy. Can't beat that, can you? Thank goodness for Louisiana, folks.

I had Po' Boys on our Labor Day weekend menu well before Gustav reared its ugly head, but eating these after seeing its path on the news made for a good, filling, yet melancholy dinner. Thank goodness this hurricane was not another Katrina, but there was still a lot of damage. So to the people of Louisiana: you're in my thoughts and prayers, here's to a quick recovery. God bless.


Catfish Po' Boy
(from Cooking Light, October 2002)


Ingredients:
2 Tbsp. fat-free milk
1 lb. catfish fillets, cut into 2 1/2-inch pieces
1/2 tsp. salt
1/4 c. yellow cornmeal
1 Tbsp. Cajun seasoning (such as McCormick)
2 tsp. vegetable oil
1 Tbsp. white wine vinegar
2 Tbsp. fat-free mayonnaise
1 Tbsp. fat-free sour cream
1 1/2 tsp. sugar
Dash of crushed red pepper
2 c. bagged broccoli coleslaw
4 kaiser buns (French bread if you want to be traditional!), split and toasted

Combine milk and catfish in a large bowl, tossing gently to coat. Remove fish from bowl; shake off excess milk. Sprinkle fish with salt. Combine cornmeal and Cajun seasoning in a large zip-top plastic bag. Add fish to bag. Seal and shake to coat.

Heat oil in a large nonstick skillet over medium-high heat. Add fish; cook 3 minutes on each side or until fish flakes easily when tested with a fork.

While fish cooks, combine vinegar and next 4 ingredients (vinegar through pepper) in a medium bowl. Add broccoli coleslaw; toss well to coat. Spoon 1/2 cup slaw mixture onto bottom half of each roll. Arrange fish evenly over each serving, and top with top halves of rolls. I also doused the fish liberally with Tabasco sauce. Yum!

02 September 2008

Blueberry Scones


My parents gave me a subscription to Cook's Illustrated one year for Christmas, and it wasn't a gift wasted. The magazine essentially takes classic recipes and perfects them, finding a way to get the best possible outcome.

This scone recipe is nothing short of brilliant: freezing the butter insures a very flaky scone; the bare minimum of kneading makes it incredibly light. Lemon brings out that fabulous blueberry taste, and folding in the berries rather than mixing in and breaking the delicate berries is nothing short of genius. I love love love this recipe, it is a classic I'll always use around here.


I made these late at night, so Hubs could take them to work the next morning for a "Breakfast Potluck" at his office. Why oh why doesn't my office do this?? Anyway. I took my pictures late over the light of the under-cabinet-LED lighting, so excuse the photos please. I did swipe one to keep and photograph (and sample), so there's a few shots of that too for you to enjoy.

Blueberry Scones
(from Cook's Illustrated, July 2007)


Ingredients:
16 Tbsp. unsalted butter (2 sticks), frozen whole
1 1/2 c. fresh blueberries
1/2 c. whole milk
1/2 c. sour cream
2 c. unbleached all-purpose flour, plus additional for work surface
1/2 c. sugar, + 1 Tbsp. for sprinkling (I used turbino sugar for sprinkling)
2 tsp. baking powder
1/4 tsp. baking soda
1/2 tsp. table salt
1 tsp. grated lemon zest

Adjust oven rack to middle position and heat oven to 425 degrees. Score and remove half of wrapper from each stick of frozen butter. Grate unwrapped ends on large holes of box grater (you should grate total of 8 tablespoons). Place grated butter in freezer until needed. Melt 2 tablespoons of remaining ungrated butter and set aside. Save remaining 6 tablespoons butter for another use. Place blueberries in freezer until needed.

Whisk together milk and sour cream in medium bowl; refrigerate until needed. Whisk flour, 1/2 cup sugar, baking powder, baking soda, salt, and lemon zest in medium bowl. Add frozen butter to flour mixture and toss with fingers until thoroughly coated.

Add milk mixture to flour mixture; fold with spatula until just combined. With rubber spatula, transfer dough to liberally floured work surface. Dust surface of dough with flour; with floured hands, knead dough 6 to 8 times, until it just holds together in ragged ball, adding flour as needed to prevent sticking.

Roll dough into approximate 12-inch square. Following illustrations, fold dough into thirds like a business letter, using bench scraper or metal spatula to release dough if it sticks to countertop. Lift short ends of dough and fold into thirds again to form approximate 4-inch square. Transfer dough to plate lightly dusted with flour and chill in freezer 5 minutes.

Transfer dough to floured work surface and roll into approximate 12-inch square again. Sprinkle blueberries evenly over surface of dough, then press down so they are slightly embedded in dough. Using bench scraper or thin metal spatula, loosen dough from work surface. Roll dough, pressing to form tight log. Lay seam-side down and press log into 12 by 4-inch rectangle. Using sharp, floured knife, cut rectangle crosswise into 4 equal rectangles. Cut each rectangle diagonally to form 2 triangles and transfer to parchment-lined baking sheet.

Brush tops with melted butter and sprinkle with remaining tablespoon sugar. Bake until tops and bottoms are golden brown, 18 to 25 minutes. Transfer to wire rack and let cool 10 minutes before serving.

31 August 2008

Pierre Hermé’s Chocolate Éclairs


Daring Bakers time once again, my pets. This time we're tackling éclairs.


Remember my dear sister Aimbot? Well. This recipe had her name written all over it. Aimbot was lucky enough to take a trip to France in high school, apparently to practice her mad French-speaking skillz. I may have only been ten years old, but from what I could see what she really got out of the trip was a suitcase stuffed with the latest fashions and a worldly air.

And an éclair recipe.


She flew home, and after many hugs and much chatting about her two weeks away, Aimbot did something I had never seen her do before. She donned a fashionable new chemise, tied on an apron, and set about the kitchen to bake. Aimbot, baking! And not only baking, but she was making éclairs. Those puffy, sweet, elegant little treats enjoyed in France. All I really remember is that she spent a LONG TIME in the kitchen, and what resulted were puffs of warm heaven, split in half and filled with a sweet creamy filling, and bitter chocolate swipe across the top.

When I saw we were making éclairs this challenge, I immediately thought of that time when I was younger and Aimbot made éclairs. I wanted more than a simple chocolate pastry filling, though, so added some orange zest and Grand Marnier to the pastry filling as well as Grand Marnier to the chocolate glaze.

Ooo la la! Good stuff, ladies and gents. Hubs and I enjoyed a few of these as our Sunday breakfast, with thick slices of cantaloupe and big steaming mugs of coffee. While making up fake French words, as to appear more sophisticated (I don't think that worked, though).


Don't forget to check out those other éclairs from my fellow Daring Bakers! And many thanks to this month's hosts Tony Tahhan and MeetaK, you really brought back memories :)

Pierre Hermé’s Chocolate Éclairs
(from Chocolate Desserts by Pierre Hermé)


Assembling the éclairs:
20-24 éclairs
Chocolate glaze
Chocolate pastry cream

Slice the éclairs horizontally, using a serrated knife and a gently sawing motion. Set aside the bottoms and place the tops on a rack over a piece of parchment paper.

The glaze should be barely warm to the touch (between 95 – 104 degrees F or 35 – 40 degrees C, as measured on an instant read thermometer). Spread the glaze over the tops of the éclairs using a metal icing spatula. Allow the tops to set and in the meantime fill the bottoms with the pastry cream.

Pipe or spoon the pastry cream into the bottoms of the éclairs. Make sure you fill the bottomswith enough cream to mound above the pastry. Place the glazed tops onto the pastry creamand wriggle gently to settle them.

Notes: If you have chilled your chocolate glaze, reheat by placing it in a bowl over simmering water, stirring it gently with a wooden spoon. Do not stir too vigorously as you do not want to create bubbles.

The éclairs should be served as soon as they have been filled.

Pierre Hermé’s Cream Puff Dough

Ingredients:
½ cup (125g) whole milk
½ cup (125g) water
1 stick (4 ounces; 115g) unsalted butter, cut into 8 pieces
¼ teaspoon sugar
¼ teaspoon salt
1 cup (140g) all-purpose flour
5 large eggs, at room temperature

In a heavy bottomed medium saucepan, bring the milk, water, butter, sugar and salt to theboil.

Once the mixture is at a rolling boil, add all of the flour at once, reduce the heat to medium and start to stir the mixture vigorously with a wooden spoon. The dough comes together very quickly. Do not worry if a slight crust forms at the bottom of the pan, it’s supposed to. You need to carry on stirring for a further 2-3 minutes to dry the dough. After this time the dough will be very soft and smooth.

Transfer the dough into a bowl of a mixer fitted with the paddle attachment, or using your hand mixer or if you still have the energy, continue by hand. Add the eggs one at a time, beating after each egg has been added to incorporate it into the dough. You will notice that after you have added the first egg, the dough will separate, once again do not worry. As you keep working the dough, it will come back all together again by the time you have added the third egg. In the end the dough should be thick and shiny and when lifted it should fall back into the bowl in a ribbon.

The dough should be still warm. It is now ready to be used for the éclairs as directed above.

Notes: Once the dough is made you need to shape it immediately.

You can pipe the dough and the freeze it. Simply pipe the dough onto parchment-lined baking sheets and slide the sheets into the freezer. Once the dough is completely frozen, transfer the piped shapes into freezer bags. They can be kept in the freezer for up to a month.

Preheat your oven to 375 degrees F (190 degrees C). Divide the oven into thirds by positioning the racks in the upper and lower half of the oven. Line two baking sheets with waxed or parchment paper.

Fill a large pastry bag fitted with a 2/3 (2cm) plain tip nozzle with the warm cream puff dough. Pipe the dough onto the baking sheets in long, 4 to 41/2 inches (about 11 cm) chubby fingers. Leave about 2 inches (5 cm) space in between each dough strip to allow them room to puff. The dough should give you enough to pipe 20-24 éclairs.

Slide both the baking sheets into the oven and bake for 7 minutes. After the 7 minutes, slip thehandle of a wooden spoon into the door to keep in ajar. When the éclairs have been in theoven for a total of 12 minutes, rotate the sheets top to bottom and front to back. Continue baking for a further 8 minutes or until the éclairs are puffed, golden and firm. The total bakingtime should be approximately 20 minutes.

Notes: The éclairs can be kept in a cool, dry place for several hours before filling.

Chocolate Pastry Cream Recipe

Ingredients:
2 cups (500g) whole milk
4 large egg yolks
6 tbsp (75g) sugar
3 tablespoons cornstarch, sifted
7 oz (200g) bittersweet chocolate, preferably Velrhona Guanaja, melted
2½ tbsp (1¼ oz: 40g) unsalted butter, at room temperature

In a small saucepan, bring the milk to a boil. In the meantime, combine the yolks, sugar and cornstarch together and whisk in a heavy‐bottomed saucepan.

Once the milk has reached a boil, temper the yolks by whisking a couple spoonfuls of the hot milk into the yolk mixture. Continue whisking and slowly pour the rest of the milk into the tempered yolk mixture.

Strain the mixture back into the saucepan to remove any egg that may have scrambled. Place the pan over medium heat and whisk vigorously (without stop) until the mixture returns to a boil. Keep whisking vigorously for 1 to 2 more minutes (still over medium heat). Stir in the melted chocolate and then remove the pan from the heat.

Scrape the pastry cream into a small bowl and set it in an ice‐water bath to stop the cooking process. Make sure to continue stirring the mixture at this point so that it remains smooth.

Once the cream has reached a temperature of 140 F remove from the ice‐water bath and stir in the butter in three or four installments. Return the cream to the ice‐water bath to continue cooling, stirring occasionally, until it has completely cooled. The cream is now ready to use or store in the fridge.

Notes: The pastry cream can be made 2‐3 days in advance and stored in the refrigerator.

In order to avoid a skin forming on the pastry cream, cover with plastic wrap pressed onto the cream.

Tempering the eggs raises the temperature of the eggs slowly so that they do not scramble.

Chocolate Glaze Recipe

Ingredients:
1/3 cup (80g) heavy cream
3½ oz (100g) bittersweet chocolate, finely chopped
4 tsp (20 g) unsalted butter, cut into 4 pieces, at room temperature
7 tbsp (110 g) Chocolate Sauce (recipe below), warm or at room temperature

In a small saucepan, bring the heavy cream to a boil. Remove from the heat and slowly begin to add the chocolate, stirring with a wooden spoon or spatula.

Stirring gently, stir in the butter, piece by piece followed by the chocolate sauce.

Notes: If the chocolate glaze is too cool (i.e. not liquid enough) you may heat it briefly in the microwave or over a double boiler. A double boiler is basically a bowl sitting over (not touching) simmering water. It is best to glaze the eclairs after the glaze is made, but if you are pressed for time, you can make the glaze a couple days ahead of time, store it in the fridge and bring it up to the proper temperature (95 to 104 F) when ready to glaze.

Chocolate Sauce Recipe

Ingredients:
4½ oz (130 g) bittersweet chocolate, finely chopped
1 cup (250 g) water
½ cup (125 g) crème fraîche, or heavy cream
1/3 cup (70 g) sugar

Place all the ingredients into a heavy‐bottomed saucepan and bring to a boil, making sure to stir constantly. Then reduce the heat to low and continue stirring with a wooden spoon until the sauce thickens.

It may take 10‐15 minutes for the sauce to thicken, but you will know when it is done when it coats the back of your spoon.

29 August 2008

Happy Labor Day Weekend!

I have a busy weekend ahead, so Mahni has graciously offered to once again write a post for the blog. Have a safe and wonderful Labor Day weekend!


What I Did On My Summer Vacation
A pictorial by Mahni, Sous Chef

Enjoyed the fruits of the season (namely, ice cream).

Played on the swings with Grandpa Peedoh.


Saw the countryside from my bike.

Took long walks with Aunt Jeannie.

Went swinging some more.

Learned the art of properly handling fireworks.

Participated in squirt gun stand-offs.

More swinging. With my brother Dyl.

Took in the sights from my dad's sweet ride (while my dad walked the bike, of course).


Swinging. Again.


Worked on my Paris Hilton impression.


Researched different ways to do this swinging thing.


And my most favorite summer activity of them all: eating cold fried chicken for breakfast.


See you Sunday :)


28 August 2008

Salmon Rotini with Roasted Garlic and Lemon


Oh, for the love of garlic. This recipe was loaded with the stuff, so if you're not a fan, no need to read on.


What I love about this pasta is the sheer amount of garlic - not only roasted, smashed, and dissolved into the sauce - no, it also has chunks of that sweet, roasted bulb throughout as well.


Roasted garlic is such a different animal from its raw counterpoint - it is mellow and sweet, slightly caramelized, and adds such a fantastic buttery flavor to a dish. This recipe uses 2 heads of roasted garlic, so it is full of that toasted, warm flavor that is so much more subtle than raw garlic. The lemon gives a nice contrast, and the salmon plays second fiddle to the other flavors going on.

Salmon Rotini with Roasted Garlic and Lemon

(from Everyday Pasta, 2007)


Ingredients:
2 whole heads of garlic
2 Tbsp. olive oil
Salt and pepper
1 lb. rotini
1/2 c. Marsala or white wine
1 c. chicken broth
1 lb. salmon, cut into 1-in. cubes
1 Tbsp. minced fresh rosemary
2 Tbsp. olive oil
2 Tbsp. drained capers

Preheat oven to 400 F.

Cut the heads of garlic in half crosswise and place on a sheet of foil. Drizzle with the olive oil and season with salt and pepper. Fold the foil up and around the garlic, making sure it stays flat, and fold the edges to seal into a tight packet. Roast until soft, about 60 minutes. Let the garlic cool slightly, then squeeze the cloves out of the skin. Mash half of the roasted garlic cloves into a paste with the back of a knife. Set aside.

Bring a large pot of salted water to a boil over high heat. Add the pasta and cook until tender but still al dente, stirring occasionally, 8-10 minutes. Drain.

Meanwhile, combine the wine and chicken broth in a large, heavy skillet and bring to a simmer. Add the mashed roasted garlic and stir to dissolve. Simmer uncovered for 4 minutes, then add the salmon, cover, and simmer for 4 minutes longer. Remove from the heat and add the remaining whole roasted garlic cloves, the lemon zest and juice, rosemary, and cooked pasta. Stir to combine; add the olive oil, capers, 1/2 tsp. salt, and 1/2 tsp. pepper. Stir once more. Serve immediately.

26 August 2008

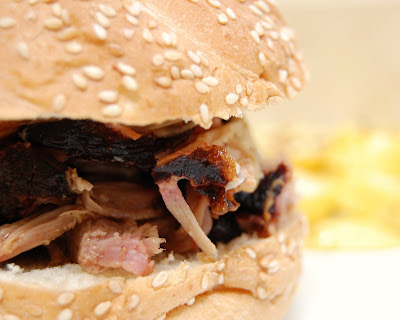
Pulled Pork


What is summer without a BBQ recipe, may I ask?

Hubs and I love us some good BBQ. Oh yes, this Wisconsinite has grown to love - and dare I say, crave? - a good smoked meat from time to time. Pulled pork is my favorite: smoked at a low heat for several hours, there is a nice deep smoke flavor to the moist meat that cannot be duplicated in any other way. I am partial to slathering it in vinegar-based sauces (yes, take away my KC-BBQ cred now, that's completely Carolina of me), but it is good topped with absolutely anything.


The Beer-Nerd-Formerly-Known-As-Hubs made this pork, I admit. I had nothing to do with the creation of it. He grabbed the recipe from his beloved copy of Beer Advocate, and while it took him all day, it was worth every second. Succulent and falling apart before we could even shred it properly, the pork rendered its fat to make a slightly crispy crust with soft, smoky meat inside. While messy (and really, what good BBQ isn't?), it was Bliss on a Bun with a nice cold cole slaw and some grilled veg.

Porter-brined Pork Shoulder
(from Beer Advocate, Vol. II(IV) )


Ingredients:
For the brine:
1 c. kosher salt
½ c. dry malt extract (DME; can be found at your local home-brewing shop)
¼ c. black strap molasses
2 Tbsp. black peppercorns, whole
8 garlic cloves, peeled and minced
5 bay leaves, torn
3 carrots, peeled and chopped
2 celery stalks, chopped
1 yellow onion, peeled and chopped
5 c. Porter-style beer
3 c. water
2 qts. ice

To finish:
6 lbs. pork shoulder or butt, bone-in or boneless
Charcoal
Firewood (apple, oak, or almond)
Wood chips, preferably apple, cherry, and pecan
Liquid smoke (optional)

Brining:
In a large pot over medium heat, add the salt, DME, molasses, peppercorns, garlic, bay, carrots, celery, onion, Porter, and water. Stir occasionally until the mixture comes to a boil, then simmer for 15 minutes. Turn off the heat and let the mixture sit for 10 minutes to infuse the flavors.

Add ice to chill the brine to approximately 40 F. Transfer the cooled brine to a large container that will hold both the brine and the displacement of liquid from the pork, placeing a plate or some other heavy waterproof item atop the shoulder, weighing it down so that it is completely submerged in the brine. Refrigerate for 48-72 hours. The general rule of thumb is to brine 12 hours per 1 pound of pork.

Remove the pork from the brine at least 12-24 hours before cooking, still keeping it cool in the refrigerator. This will help the meat form a pellicle, which helps the smoke stick to its surface. Remove the pork shoulder from the refrigerator once you start prepping the coals.

Smoking:
If you have a wood fire smoker, start with 2 lbs. of charcoal in the coal box. In separate medium-size bowls, add ¾ lb. of each type of wood chip, adding enough water to cover the chips. Let them soak for 30-45 minutes.

Once the coals start to show a light layer of white ash on the outside, place a medium-size log of firewood onto the coals and seal the hotbox. Place a water pan under the grill rack and the pork on top. This will help keep a moist environment for the pork. Adjust your air intake and the amount of coal to keep the temperature between 250-275F. Check the coals, adding more firewood periodically, usually every 45 minutes. The pork will cook for 8-10 hours at this temperature.

After 6 hours, it is time to start layering the smoke flavors. Start by adding the apple wood soaked chips, a small handful at a time, every 20 minutes for an hour. Next, add the cherry wood chips in the same fashion at the apple wood chips. Finally, add the pecan wood chips, following the same procedure. The cooking time should be about 9 hours at this point. Thereafter, any remaining wood chips can be mixed together and added every 20 minutes as before.

This technique adds extra layers of smoke, creating a “smoke ring”. Just under the skin, a true sign of good barbeque. The pork should be dark, almost black in color, and should nearly fall apart at the touch of a fork or knife. Remove the pork from the smoker and transfer it to a platter, letting it sit wrapped in foil for 20-30 minutes to redistribute the juices.

Serving:
Once the meat has cooked, rested, and curiosity and hunger have outweighed the idea of waiting any longer: pull the pork apart into thin strips. Serve in a large bowl. The pork may be served as is, or mixed with barbeque sauce. Some prefer to chope the meat into small chunks, others slice the meat like a roast. Whatever approach you use, do not trim the smoky crust that holds most of the smoke flavor. Mixing it into the pulled meat brings the flavor of barbeque to the dish.