15 October 2007

Buffalo Chicken Chili


I love buffalo chicken wings. That hot, spicy tang of hot sauce goes great with chicken, and is perfectly cooled by a nice creamy blue cheese dressing. I could eat buffalo wings any time, any day. Just to show you how much I love them: once, I had to have a 2-hour root canal (that tooth was pretty ganky). And it got infected. So they gave me some medication, but it didn't help much and the infection grew to a big ole abcess. Yes, not something one would usually want to read on a food blog... But, anyway, point of story: I was on a liquidy diet for several weeks while dealing with that whole mess, and when I could finally have solid food, the first thing I did was go out for buffalo wings. Best. Meal. Ever. And that is how much I love them.

That being said: I am trying to eat better, not so much with the fried/fattening stuff. Which, one would think, would not include buffalo wings. But oh! I was cruising Heather's Core Recipes Blog, and found a buffalo chicken chili recipe (with blue cheese dressing to boot!). I had to try it. And it didn't disappoint in the least: this bright red "chili" has that great heat and taste one gets with buffalo wings, without the frying. And you still get the blue cheese! I have a feeling that I will be making this a lot this coming winter.

Buffalo Chicken Chili


Ingredients:
1 Tbsp. extra-virgin olive oil
2 lb. all-white meat ground chicken breast (I used shredded cooked chicken)
1 large carrot, peeled and finely chopped
1 large onion, chopped
3 ribs celery, finely chopped
5 large cloves garlic, chopped
1 Tbsp. smoked paprika
1 bay leaf
Salt and freshly ground black pepper
2 c. low-sodium chicken broth
1/4-1/2 c. hot sauce, depending on how hot you like it
1 (28 oz.) can crushed tomatoes
Fat free blue cheese salad dressing, for topping

Place a large pot over medium-high heat; add the oil. Once the pot is hot, add the ground chicken. Brown it, using the back of a wooden spoon to break it up in to small pieces, about 5-6 minutes. (If you use cooked shredded chicken, like I did, you can skip this step.)

Add the carrot, onion, celery, garlic, paprika, bay leaf and some salt and pepper to the pot. Cook, stirring frequently, for about 3-4 minutes (add shredded chicken at this time, if using). Add the chicken broth and scrape up any brown bits on the bottom of the pot. Add the hot sauce and crushed tomatoes, and bring up to a bubble. Simmer for 8-10 minutes to let the flavors come together.

Top each serving with a dollop of fat free blue cheese dressing.

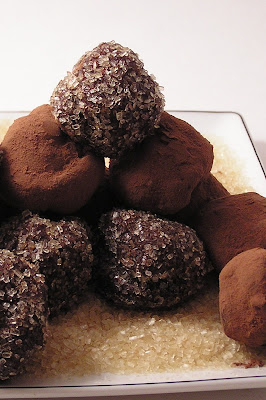
Chocolate Truffles


This is my first attempt at truffles. Now, I'd like to preface this by saying that I am a regular baker, and I make several kinds of candy around Christmastime, so I have a bit of experience making treats. I may not be the most experienced or gifted baker/candymaker, but I can hold my own. And this was the most frustrating recipe I've ever tried. I am hoping I just had a bad night, and it's not that my candymaking skills are lost.

I wanted to start with a good instructive recipe, and found one with tons of accolades on the Food Network web site. I set to work, and everything was going fine until it was time to create the truffles.

I chilled my filling for over 2 hours, and yet every time I would try to roll a ball, the mixture would melt all over the place and never form into balls (just slide around all lumpy in the thick melted mixture coating my hands). So I formed a method of partially rolling, then chilling another 20 minutes, then roll some more, then chill again, on and on. Took forever, and they were still quite lumpy! Then, the tempered dipping chocolate: it was SO THICK at 92 degrees, that trying to coat the (already melty) truffles was impossible. I tried one, it was a complete mess, and then I gave up. Just coated my truffles in raw sugar or cocoa, and was finished with the whole mess. I give up.


They still tasted terrific though. I used amaretto instead of brandy, and they turned out great: very rich, slightly bitter, dark dark dark chocolate taste with a hint of amaretto. I'm sure the problems with this recipe was user error, as all the reviews for this recipe on the Food Network site said things went perfectly for other users, so yeah. Give it a try, I'm sure it will work just fine. I would like to think I just had an 'off' night of candymaking.

Chocolate Truffles (courtesy of Alton Brown, Good Eats)


Ingredients:
10 oz. bittersweet chocolate, chopped fine
3 Tbsp. unsalted butter
1/2 c. heavy cream
1 Tbsp. light corn syrup
1/4 c. brandy
8 oz. semisweet or bittersweet chocolate, chopped fine
1/2 c. Dutch process cocoa powder, finely chopped nuts, and/or toasted coconut, for coating truffles

Place the bittersweet chocolate and butter in a medium-size glass mixing bowl. Microwave for 30 seconds. Remove and stir, and repeat this process 1 more time. Set aside.

Heat the heavy cream and corn syrup in a small saucepan over medium heat until simmering. Remove from the heat and pour the mixture over the melted chocolate mixture; let stand for 2 minutes. Using a rubber spatula, stir gently, starting in the middle of bowl and working in concentric circles until all chocolate is melted and mixture is smooth and creamy. Gently stir in the brandy. Pour the mixture into an 8 by 8-inch glass baking dish and place in the refrigerator for 1 hour.

Using a melon baller, scoop chocolate onto a sheet pan lined with parchment paper and return to the refrigerator for 30 minutes.

Place the cocoa powder, nuts, and/or toasted coconut each in its own pie pan and set aside.
In the meantime, place the 8 ounces of chocolate into a medium mixing bowl which is sitting on top of a heating pad lined bowl, with the heating pad set to medium. Depending on the heating pad, you may need to adjust the heat up or down. Stirring the chocolate occasionally, test the temperature of the chocolate and continue heating until it reaches 90 to 92 degrees F; do not allow the chocolate to go above 94 degrees F. If you do, the coating will not have a nice snap to it when you bite into the chocolate. Once you have reached the optimal temperature, adjust the heat to maintain it.

Remove the truffles from the refrigerator and shape into balls by rolling between the palms of your hands. Use powder-free vinyl or latex gloves, if desired.

Dip an ice cream scoop into the chocolate and turn upside down to remove excess chocolate. Place truffles 1 at time into the scoop and roll around until coated. Then place the truffle into the dish with either the cocoa powder, nuts or coconut. Move the truffle around to coat; leave truffle in the coating for 10 to 15 seconds before removing. In the meantime, continue placing the chocolate-coated truffles in the cocoa or other secondary coating. After 10 to 15 seconds, remove the truffle to a parchment lined sheet pan. Repeat until all truffles are coated. Allow to set in a cool dry place for at least 1 hour; or store in an airtight container in the refrigerator.

Truffles are best when served at room temperature.

12 October 2007

Restaurant Review: bluestem


Feeling rather harried with work and home, and a bit blah in the creative writing area right now (probably also because of my oven-less home, which makes cooking and posting oh so much harder than usual), so I'm posting my review on our meal at Kansas City's bluestem, back in mid-February. Pics kinda suck (it's intimidating to whip out your camera in a place like that!), so apologies now. And luckily I wrote down this review a few days after our meal, otherwise I'd have serious trouble whipping this up from scratch right now!

First off, a few things about bluestem itself. Cody and Megan Garrelts, the co-owner chefs, come from Tru in Chicago. Their restaurant bluestem has garnered attention from several biggies – Food and Wine, James Beard Foundation, Wine Spectator. Some national newspapers (such as the Washington Post, San Francisco Gate, and NY Times) have taken note as well. Cody was named one of the best new chefs of 2005 by Food and Wine magazine, and then they honored Megan for her pastries in late 2006. That adorable food writer at the KC Star only gave it 3.5 stars, but then again… well, now is not the time to get into her misguided tastes (if bluestem put BBQ sauce on everything, it'd be automatic 5 star).

Bluestem has tons of accolades, and yet the place is so laid back. The sommelier and Megan take turns running the floor. Everyone there is excited to explain things on the menu. They treat every customer in their tiny, 14-table establishment as if they were the only customer in the place. And that alone is a reason for splurging on a meal here.


So, we make a reservation. We go to bluestem. They have this miniscule parking area behind the restaurant, we were lucky enough to get a spot there. We gave ourselves plenty of time to get to Westport, not sure on traffic, and ended up getting there 40 minutes before our reservation. Oopie. Lucky for us, the restaurant has a wine lounge. We checked in with the host/sommelier and made our way to the cooshy chairs and sofas in the bar area. Scott ordered a dirty martini and I got a Manhattan – my cocktail was dressed with imported Italian cherries rather than maraschinos. They were a dark ink-red, way way sweet and seriously tart. Already a good sign.

We finished our drinks and then were seated in the dining room. Immediately an amuse bouche was sent out - pineapple juice with strawberry foam(?). Yup, a shooter. I don't like pineapple juice, at all. This was good though, and the strawberry foam on top was insane – it tasted just like fresh strawberries, I swear you could even taste the seeds.

We ordered the five-course meal, which consisted of two "openers" and two entrees, plus dessert. We also sprang for the wine tasting menu - very glad we did this, not only cheaper than ordering a few glasses ourselves but also it didn't hurt to have the sommelier hand-choosing wines to match our courses. Scott got the wagyu tartare for his first course. I ordered the seafood chowder: crispy rock shrimp with fingerlings and pearl onions. They poured seafood puree over the shrimp et al. tableside, so the shrimp was still crispy in the soup. I've never had chowder like this before. Even though there was only shrimp in it, I tasted a million different kinds of seafood. The sommelier came with our wines, Scott had champagne and my chowder was paired with an Austrian Veltliner that was crisp and almost lemony.

Second course: Scott had the oxtail torchio, I had the foie gras. The foie gras was served torchon-style, with brioche French toast, kumquat jam, burnt honey drizzle, and sprinkled with pink peppercorns. Oh! The foie gras was cold and firm but melted in your mouth, and the sweet garnishes were perfect. The sommelier served a wine that I can't remember, embarrassingly enough – it wasn't the usual sauternes, but was similar. Sweet and tart and it complemented the foie gras well. That's the best I can remember. That foie gras was good, man. Scott's pasta was paired with an Argentinian Syrah.

Third course. I had Ahi tuna, with a ragout of winter veggies and a rock shrimp verjus fume. They poured the broth over my tuna tableside, and it turned into a creamy broth. Like magic! The tuna was just seared, my favorite way to have it. The tuna dish was very clean and fresh, the ragout and verjus did not take over the flavor of the meat which was awesome. The sommelier paired it with a nice pinot noir from Oregon, plum-y and thick and a good contrast to the freshness of the tuna.


Scott got the scallop dish – a big fat caramelized scallop sided by chanterelle mushrooms, cauliflower and huge chunks of braised bacon. He took his first bite and looked at me, all incredulous, and asked me why in the world I did not love scallops. Um, actually I'm allergic, I truly like the taste, but thanks for rubbing it in, my Darling. He said the smokey bacon and mushrooms were perfect with the shellfish. I'll take his word for it. It was paired with a Sonoma Chardonnay.

Fourth Course. I ordered the veal short ribs – the chef kept one small bone, and wrapped the meat around and around it. It was sided with turnips, fingerlings, and a horseradish devonshire. The meat was sooo good – rich and tender, like a huge veal cinnamon roll. Scott had the wagyu again, this time a striploin with smoked potato puree, tomato jam, and spinach croquettes.


We both were served the same wine, Hartwell cabernet sauvignon from Napa Valley. The sommelier left the bottle on the table for us. This sucker was almost pure Cab and very, very good - earthy, dark ruby color, strong berries. And soft tannins, which I enjoyed (not a fan of those rich-tannin wines, I'm a total red wine weenie). We looked this one up online later, because we loved it and wanted to buy some for home. Alas, it retails at about 100 bucks a bottle. Yeah, probably not buying that. Ever.


On to the wonderful desserts! There were so many choices – fruit flan with coconut shortbread? Banana fritter with graham cracker pound cake? Chocolate toffee tart? After much careful thought (obviously the most important part of the meal) I went with the chestnut cake and poached pears. It was served with a frozen chestnut rum parfait as well. The chestnut cake was hefty and moist with chunks of dried orange and cranberry. Yum. But Scott won out with dessert, as usual – he ordered the baked caramel apple, which came with gingerbread cake and pistachio ice cream. The gingerbread was to die for! I was insanely jealous. He had moscato with his dessert, I had port. We can't remember the names of them either, too much fancy schmancy wine at that point. Sorry! But both were sweet and went well with our desserts.


After all that, we were full, tired, and ready to take off. But oh no! Megan, the pastry chef, sent out champagne floats for us before we left for the evening. Loved it – they were fizzy and sweet. So simple and perfect. How we found room to gulp them down is beyond me.


We ran into Megan at the hostess desk when we were leaving, and thanked her profusely (foodie nerds). And off we went, back to Lawrence and straight to bed. But man – best meal evah. That bluestem knows what it's doing. Scott and I have decided – if we cut back on spending, don't eat out as often as we're used to, we can swing this kind of outing about once every few months. Pretty tempting.

11 October 2007

Chicken Quesadillas with Salsa Verde


I was dying to try a fellow food blogger's recipe for Chicken Enchiladas with Salsa Verde. And off I went to the grocery store, making sure I got everything on my list. I was ready to make some enchiladas.

And then I remembered: duh, I don't have a working oven right now.

So I did a wee bit of tweaking, took out the chicken broth and cream cheese, and swapped the corn tortillas for flour. Added some cheddar, and mushrooms/chiles I still had in the fridge. And of course, had to prepare it a bit differently, decided on a quesadilla method. This recipe is very very yummy - I love the heat from the salsa verde and the mix of ingredients is just perfect. Nice kick, fresh-tasting thanks to the cilantro, and very healthy I would imagine (given the ingredients list).

Will try the enchiladas, for sure, once I get my oven back. Promise.

Chicken Quesadillas with Salsa Verde
(Adapted from Amanda's lovely Enchiladas)

Ingredients:
1 c. chopped onion
2 garlic cloves, minced
1/4 c. chopped fresh cilantro
1/2 tsp. chili powder
2 c. shredded cooked chicken breast
1/4 c. crumbled queso fresco
1 c. shredded "light" (reduced fat) cheddar cheese
Olive oil
8 flour tortillas
Salsa verde

In a sauté pan over medium heat, warm 1 Tbsp. olive oil. Sauté the onion until soft and beginning to brown. Add garlic, and sauté for a few more minutes, until fragrant. Remove from heat.

Combine sautéd onion mixture and next 5 ingredients cilantro, chili powder, chicken, and cheeses) in a large bowl.
Put 1 tortilla on a cutting board and spread 1/2 cup chicken mixture over half of tortilla, then fold other half over to form a half-moon, pressing firmly on seam. Assemble 7 more quesadillas in same manner.

Heat lightly oiled grill pan over high heat until it begins to smoke, then reduce heat to moderate and grill quesadillas, 2 at a time, turning over once, until cheese is melted and golden brown grill marks appear, about 4 minutes total per batch. Transfer with a spatula to cutting board and cut in half. Top with salsa verde, and serve.

09 October 2007

Pan-Fried Onion Dip

This dip is so so good. It's kinda like the onion dip you buy in the grocery store, only a thousand times better. It's super-awesome-perfection onion dip, and if Ina Garten had her way, it would be a lot less healthy than what I made.

Another Ina recipe, although this one I had to alter because I'd gain 5 pounds if I made it as directed. Maybe for a special occasion, or on my death bed, I'll make it the full-fat way as Ina instructs. But I am way too in love with this dip (and make it way too often) to make it the way she gives it.

In Ina's defense: I hear people complain about her fattening recipes, but frankly I can't blame her for using such artery-clogging ingredients. These are more than likely the recipes from her catering business, which had quite the reputation for its delicious offerings. And if I had a catering business, you better believe that I'd use the most tasty, flavor-enhancing (more than likely fattening) ingredients, too. Butter, lard, cream, sugar. Pile it on. Get 'em hooked and keep the jobs coming in. The woman has the nicest smile, and she sure seems like a sweetie-pie on her television show, but make no mistake: she's a smart businesswoman.

Anyway, the recipe below is my (normal-person) version of Ina's recipe. I cut down on the butter/oil, and used reduced fat where I could. I'm sure it is still very bad for you, but think of it this way: it's not as bad as it could be! I ate it with Wheat Thins instead of kettle-style potato chips, but I can't blame you if you use the kettle chips (there is no better way to eat this dip).

Pan-Fried Onion Dip


Ingredients:

2 large yellow onions (you want about 3 c. of sliced onion)

3 Tbsp. unsalted butter

3 Tbsp. canola oil

1/4 tsp. ground cayenne pepper

1 tsp. kosher salt

1/2 tsp. freshly ground black pepper

4 oz. reduced-fat cream cheese, at room temperature

1/2 c. reduced-fat sour cream

1/2 c. reduced-fat mayonnaise

Cut the onions in half, and then slice them into 1/8-in. thick half-rounds. Cut the halves in half again (quarters) if you want shorter onion pieces in your dip.

Heat the butter and oil in a large sauté pan on medium heat. Add the onions, cayenne, salt and pepper and sauté for 10-15 minutes, until they are beginning to brown. Reduce heat to medium-low and cook, stirring occasionally, for 20-30 more minutes, until the onions are completely browned and caramelized. Allow the onions to cool.

Place the cream cheese, sour cream, and mayonnaise in the bowl of an electric mixer fitted with a paddle attachment and beat until smooth. Add the onions and mix together well. Taste for seasonings (add salt and pepper if needed).

Serve at room temperature, with chopped veggies, thick (kettle-style) chips, crackers, etc. It's important to serve this at room temperature! The dip is rather thick, if you serve it cold (refrigerated) then it'll be very hard to dip.

08 October 2007

Face Off: Vegetable Tea Sandwich

Time for the Face Off entry again, seeing as the oven is dead I thought it would be a good idea to go with something that didn't involve any sort of cooking (because with my luck, I'd break the stovetop and microwave as well). I planned on having one vegetable tea sandwich served at my friend's bridal shower, for all those vegetarians out there, so it seemed just the thing to try this week.

Cucumber Tea Sandwich


This is your classic, cucumber-and-spread, open-faced tea sandwich. It was also the recipe I liked the least, which was a huge surprise (I love cucumbers and this person's recipes are usually spot-on). The spread is made of a mixture of goat cheese, cream cheese, mayo, and some spices. And unfortunately, the goat cheese completely overpowered every other flavor in this sandwich. Oh no, it wasn't the creamy/tangy flavor that overpowered everything, it was that musty, earthly, faintly-mildewy flavor that really came out. While you can usually mask that particular quality with ingredients, this combination only seemed to enhance it. Not a lot of people like goat cheese specifically because of that musty taste, so I thought this was not quite the best way to go.

Sweet Onion Tea Sandwich


Now, I hear this is quite the classic tea sandwich, although I must admit by name alone I was not excited about it. This one surprised me the most, however: it has a creamy mayo spread with fresh tarragon and basil, and very thinly sliced Vidalia onion. The tangy herbed mayonnaise makes the onion even sweeter, so much that you would never guess it was actually raw onion if you didn't see it with your own eyes. However, the mayo-thing is not going to work for our poor Bride-to-be, and also: most people will see the onion and never touch these sandwiches. So, as impressed as I was with this tea sandwich, this recipe wasn't going to do, either.

Tomato Tea Sandwich


I tried this one first, and really thought it wouldn't work. I kinda made this one up on my own, using about 5 different pesto/tomato/goat cheese recipes. I thought all three were good flavors but couldn't find any recipes with all three together, so I improvised a bit. And surprise, it was actually very good! It is a simple tea sandwich, two thin slices of bread with basil pesto spread on one side, and plain goat cheese on the other. A nice juicy tomato slice is the only sandwich filler.


The pesto is bright and the goat cheese tastes very mild and creamy (no musty/earthy taste, yay!). The tomatoes, which I let drain on paper towels beforehand, were just right to balance the two spreads. I think this one is a winner.

Tomato tea sandwiches

Ingredients:
2 c. basil leaves
1 garlic clove, peeled
1/4 c. pine nuts
1/4 c. olive oil
1/2 c. grated Parmesan cheese
1 (5-oz.) log of plain goat cheese, softened to room temperature
6-8 tomatoes, sliced and drained on paper towels
40-ish thin slices of white bread

To make the pesto: Toast the pine nuts in a sauté pan, then cool. In a food processor, combine the basil, garlic, pine nuts. Pulse until finely chopped. Slowly add olive oil to mixture while in food processor, pulsing to emulsify the mixture (you want it thick yet smooth; add more oil if necessary). Place basil mixture into a bowl, and stir in Parmesan cheese.

To assemble sandwiches: Cut bread slices with a biscuit cutter, to make bread circles. Spread one side of 20 circles of bread with the pesto. Spread the goat cheese evenly over remaining 20 slices of bread. Place one tomato slice on goat cheese circle, and top with pesto-spread circle. Can be made up to 8 hours ahead of time, keep wrapped well with plastic wrap and refrigerate until needed.

07 October 2007

Mint Chocolate Chip Cupcakes


So, I had another drama in the kitchen this week. Only this one's a bit harder to fix.

Friday night. I am continuing my Cupcake Baking Extravaganza. I have 3 more recipes I wanted to try out this weekend, making small batches and taking all finished products to work. My coworkers are eagerly awaiting Monday.

I pull out this recipe first, it's from How To Eat A Cupcake. Chocolate and mint, can't go wrong with that! And I have some Godiva chocolate-covered mint candies I was dying to use for decoration. Perfect. So I preheat the oven, and whip together the batter. I fill my muffin pan with liners and plop in the batter (the batter was surprisingly thick, hence plopping rather than pouring/ladeling). I put the pan in the oven and set my timer.

After about ten minutes, I hear this strange fizzling noise. It's coming from the oven. Did my super-thick batter explode all over, and is now baking to the walls of my oven? I'm a little confused, so I open the door and peek inside.

And there are flames emitting from the oven's heating coil.

Aaah! I snatched out the muffin pan (must save the cupcakes!) and turned the oven off. The flames went out as the oven started to cool. And my oven is officially dead. On my weekend of Cupcake Baking Extravaganza. No. This can't be happening.

So, I put in a call to the landlord, and hopefully it's as easy as replacing the heating coil. Cross your fingers, anyway. In an attempt to salvage my half-baked cupcakes, I smooshed the batter-filled paper liners onto a plate and nuked the suckers in the microwave. They are a bit mis-shapen and blobby and a wee bit dry, but they still taste really good.

These cupcakes taste just like Andes mints. The cake is dense and rich and chcolatey, with a hint of the mint flavoring. The light buttercream on top has a deeper mint flavor, and balances the heavy cake really well.

Enjoy these! It's probably the last goodie from my oven for a bit, until the darn thing is fixed. Once that's done though, I've got a few interesting recipes up my sleeve...

Mint Chocolate Chip Cupcakes


Ingredients:
1/4 c. (1/2 stick) unsalted butter, at room temperature
3/4 c. granulated sugar
1/3 c. (2 oz.) unsweetened chocolate, coarsely chopped, melted
2 large eggs, at room temperature
1 tsp. peppermint extract
1/2 c. chocolate milk
1 1/2 c. all-purpose flour
1 tsp. baking soda
1/2 c. (6 oz.) mini semi-sweet chocolate chips

Preheat the oven to 350 F. Insert liners into a medium cupcake pan.

In a large bowl cream together the butter and sugar with an electric mixer on medium speed until light and fluffy, 3-5 minutes. Beat the melted chocolate into the butter mixture. Add the eggs, peppermint extract, and chocolate milk. Beat until creamy.

In a separate medium-sized bowl combine the flour and baking soda.

Add the dry ingredients to the chocolate mixture and beat until well blended (careful not to over-beat the batter). With a spatula, stir in the chocolate chips.

Fill the cupcake liners 2/3-3/4 full. Bake for 15-20 minutes or until a toothpick inserted in the center comes out clean. Cool cupcakes in pan.

Mint Buttercream:
3 c. confectioner's sugar + 3 Tbsp.
1 c. unsalted butter
1 Tbsp. milk
Pinch salt
1 tsp. mint extract
Green food coloring

In a small bowl using an electric mixer on low, beat together sugar, butter, milk, and salt until creamy. Increase speed to high and beat until light and fluffy. Add mint extract and a few drops of green food coloring, beating until frosting is smooth.

Spread icing on cooled cupcakes with a knife or transfer to a pastry bag and pipe over cupcakes.

06 October 2007

Pink Lemonade Cupcakes


I found this recipe at Daisycake's blog, and just had to try them. I baked up the cupcakes Thursday night, which I am very glad I did (more on that in another post).

Such a pretty pale pink cake, only a pretty-princess-pink lemonade buttercream would do for frosting them. They taste wonderful too: the cake is moist, with a lovely bright lemonade flavor. The buttercream has only a hint of the flavoring, so it doesn't overpower. Although the buttercream is SWEET, so try not to over-do it, like I did.

Pink Lemonade Cupcakes


Ingredients:
1 c. all-purpose flour
1/2 tsp. baking powder
1/4 tsp. baking soda
Pinch salt
1/2 c. granulated sugar
1/4 c. vegetable oil
2 egg whites
1/3 c. thawed frozen Pink Lemonade Concentrate
1/4 c. buttermilk
2 or more drops red food coloring

Preheat oven to 350 F. Line muffin pan with liners.

In a small bowl, combine flour, baking powder, baking soda and salt. Set aside.

In a large bowl, whisk together sugar, oil, egg whites and lemonade concentrate. Alternately whisk in flour mixture and buttermilk, making three additions of flour mixture and two of buttermilk, beating until just smooth. Add just enough food coloring to turn the batter a light shade of pink.

Scoop batter into liners (fill about three-fourths full). Bake in preheated oven for 20-25 minutes or until tops of cupcakes spring back when lightly touched. Let cool in pan on rack for 10 minutes. Remove from pan and let cool completely on rack. Top cooled cupcakes with frosting (see below).

Lemonade Buttercream:
3 c. + 3 Tbsp. confectioner’s sugar
1 stick unsalted butter at room temperature
1/8 tsp. salt
2 Tbsp. pink lemonade concentrate
Red food coloring

Add the butter, confectioner’s sugar, salt, lemon juice, and a few drops of food coloring to the stand mixer and mix on low using the paddle attachment until combined. Turn the speed to med-high until the buttercream is fluffy and uniformly pink. Pipe or spread onto cooled cupcakes.

05 October 2007

Chicken Corn Chowder


Yep, another comfort food . Still hoping for cool weather. This time, chowder. Maybe that will help to entice the cool weather to come our way.

This is so warm and thick and yummy, a new recipe I got from some free Kraft pamphlet or other such thing. And considering I'm a picky purist cook who doesn't like to make meals with pre-made ingredients, that's a big compliment. This is also very easy to make – brown your bacon and veggies, dump the rest of the ingredients in the pot, and let it go.

Chicken Corn Chowder


Ingredients:
6 slices bacon
1 Tbsp. oil
1 c. chopped onion
1 c. chopped red bell pepper
2 boneless skinless chicken breast halves, cooked and shredded
1 c. chicken broth
1 c. milk
1 (16-oz.) can creamed corn
1 (4-oz.) can diced green chiles
1 pkg. taco seasoning (about 4 Tbsp.)

Heat soup pot over medium heat. Add bacon and cook until crispy. Remove from pot and drain on paper towels. Crumble bacon.

Raise heat to medium-high. Add oil to bacon grease. Add onion and bell pepper, and cook until browned. Add chicken to warm.

Add remaining ingredients (including bacon) and mix well. Bring to a boil, then reduce heat to medium-low and simmer for 10-15 minutes. Serve.

04 October 2007

Chicken Tortilla Soup


One of my favorite regular soup recipes, and the nice one about this recipe? It's brothy and "fresh-tasting" enough to sneak in when it's still warm out. I came up with this after trying out a few different recipes; I took the best bits of each and tweaked them a bit to our tastes, to come up with what you see below. I love this soup with extra cilantro (me love cilantro) and a good handful of tortilla chips.

Oh and as a really weird aside? I don't make this frequently, but I've definitely made it often enough that the Hubs should remember it. Which he never does; every time I make it I get the "ooh this is really good make sure you keep the recipe!". Thanks, darling.

Chicken Tortilla Soup


Ingredients:
4 boneless chicken breast halves, cooked and shredded
2 (14.5-oz.) cans chicken broth
1 (4-oz) can diced green chiles
1 (10-oz) can diced tomatoes with green chile peppers
1 onion, chopped
2 cloves garlic, minced
1 1/2 Tbsp. fresh lime juice
2 "generous" Tbsp. chopped fresh cilantro
1/2 tsp. ground cayenne pepper
1/2 tsp. ground cumin

Combine the chicken broth, green chilies, tomatoes with green chilies, onion, and garlic in a soup pot. Add the shredded chicken. Bring to a boil, stirring frequently. Reduce heat and simmer for 30-35 minutes.

Add the lime juice, cilantro, cayenne, and cumin. Simmer for 10-15 minutes longer. Ladle the soup into bowls. Garnish with shredded cheese, avocados, sour cream, more cilantro, limes, tortilla strips…

02 October 2007

Cheddar Dill Scones


This quickbread-scone recipe is so easy; I am not a bread-maker, but I was able to pull this one together easily late one evening after dinner (and 2 glasses of wine). Sweet.

The resulting scones were more bread-like than crumbly (probably due to the cream), but still dense and moist. I love the cheddar/dill combo, as I'm not a huge fan of sweet scones. And while they taste best straight from the oven, I found these re-heat well in the microwave, so they're great to make ahead and heat up for breakfast during the week.

Cheddar Dill Scones


Ingredients:
4 c. (plus 1 Tbsp.) all-purpose flour
2 Tbsp. baking powder
2 tsp. salt
3/4 lb. cold unsalted butter, diced
4 extra-large eggs, lightly beaten
1 c. cold heavy cream
1/2 lb. extra sharp cheddar, small-diced (I just used the pre-shredded stuff)
1 c. minced fresh dill
1 egg, beaten with 1 Tbsp. water or milk (for egg wash)
Preheat oven to 400 degrees.

Combine 4 c. of flour, baking powder, and salt in the bowl of an electric mixer fitted with paddle attachment. Add butter and mix on low, until the butter is in pea-sized pieces. Mix the eggs and heavy cream together, and quickly add them to the flour and butter mixture.

Combine until just blended. Toss together the cheese, dill and 1 Tbsp. of flour - then add to the dough and mix until they are almost incorporated.

Dump the dough onto a well-floured surface and knead for 1 minute, until the cheddar and dill are well distributed. Roll the dough 3/4 inch thick, cut into 4 inch squares, and then in half diagonally to make triangles. Brush the tops with the egg wash. Bake on a parchment paper-lined baking sheet for 20-25 minutes, until the outside is crusty and the inside is fully baked.

01 October 2007

Face Off: Chicken Salad

Ah, the time-honored Face Off. This will probably be at least a once-weekly thing for the next month or so. I am hosting my very dear friend's bridal shower, and I'm trying out different recipes to use. The first one into the ring: Chicken Salad. And now, the results.

Chicken with Nectarines and Pecans

First up was a sweet chicken salad. Once, when I was in Atlanta, I ate at Dailey's and that place has the most amazing chicken salad I've ever tasted. It was served with fruit, and then drizzled in a sweet (brown sugar?) glaze and sprinkled with pecans. Sooooo good. I set out to find a recipe that might be similar, and found one at epicurious.com to be the closest to what I wanted to accomplish.

I switched out the peaches in the recipe for nectarines, and used pecans instead of walnuts. The resulting chicken salad was a disappointment, however. The nectarine and pecans were completely overpowered by the poppy seed dressing (that you use instead of mayo). And even with no mayo, the chicken salad tasted STRONGLY of mayonnaise. And the bride-to-be hates mayonnaise, so yeah. That recipe's a bust.

Traditional Chicken Salad


On to the classic, traditional chicken salad/tea sandwich recipe. Also from epicurious.com, it featured fresh tarragon and smoked almonds, plus some nice lettuce on top for crunch. And while it wasn't bad in any way, it also wasn't great. Nothing to brag about, just kinda blah. Will do in a pinch. So, on we move to the final contender...

Curried Chicken Salad


This was by far the best chicken salad sampled, which was kinda depressing. Not because I don't love it (I do, in fact, love this recipe very much). It's that I've made this several times, for home and office and potluck. Heck, I even requested it at my own bridal shower. It's an easy recipe to make in large quantities, can be made well ahead of time, and tastes amazing. It's just that, you know, I wanted to try something new and different and exciting. Sigh.

Recipe is below, we'll only give the winning one for this post. I found the recipe off of foodtv.com, and I recommend giving it a try. Even if you aren't too fond of curry. The curry seems really light in this recipe, and totally masks any of that "mayo" taste (hear that, Nik?). The crunchy almonds and grapes and celery give it a wonderful crunch. The chutney is the real star of this recipe, though. It gives this lovely sweet/spicy kick to the whole thing.


Curried Chicken Salad

Ingredients:
2 c. mayonnaise
1/2 c. commercial chutney
3 Tbsp. mild curry powder
6 bone-in chicken breasts
Salt and black pepper
1/2 c. slivered almonds
1/2 c. grapes, sliced in half or quartered
3/4 c. finely chopped celery
4 croissants

To make the dressing: Combine the mayonnaise with the chutney and the curry powder in a small bowl. Mix well and set aside.

To prepare the sandwiches: Season the chicken breasts with salt and pepper then put them in a large skillet. Add water to cover. Put a lid on the skillet and simmer the chicken until it is cooked through, about 20 minutes. Remove the chicken from the poaching liquid and refrigerate for at least 1 hour.
When the chicken is chilled remove the skin and cut the meat from the bones. Dice the meat and place it in a large bowl. Add the almonds, grapes, and celery and mix well. Moisten the salad with the curry dressing. Cut the croissants in half. Fill each with chicken salad and serve.