31 January 2009

Chicken Tikka Masala with Saffron Rice Pulau


Chicken Tikka Masala, the chop suey of Indian cuisine.

Ah yes, that's right sadly: not actually of Indian origin, Chicken Tikka Masala is in fact a British creation. But incredibly tasty, I must say, and a nice introduction to the flavors and spices of India for the uninitiated. It is still right behind butter chicken and tandoori in my list of "favorite Indian dish". Even though it's not really Indian. Er, but you know what I mean. Whatever.

Essentially, it is a rich, tomato-based sauce mellowed with some cream and fragrant with garam masala, coriander, and cumin. Then you toss in chicken steeped in garlicky yogurt marinade. Good stuff. Chicken Tikka Masala is as comforting on a winter evening as any American beef stew; just serve over basmati rice with a side of naan. This version is good, but still missing "something" from what my local place can make. I'll keep tinkering, maybe add more heat or some cardamom. Until then, try this one...


Chicken Tikka Masala


Ingredients:
6 cloves of garlic, peeled
3 in. fresh ginger, peeled
2 or 3 fresh red chilis, seeded
Olive oil
1 Tbsp. mustard seeds
1 Tbsp. paprika
2 tsp. ground cumin
2 tsp. ground coriander
3 Tbsp. garam masala, divided
Generous 3/4 c. plain yogurt
4 medium boneless, skinless chicken breasts, cut into large chunks
1 Tbsp. butter
2 medium onions, sliced very thin
2 Tbsp. tomato purée
1/3 to 1/2 c. cashews or almonds, ground very fine in a food processor
Salt
1/2 c. heavy cream
Fresh cilantro, chopped
Limes

If you're using a mini-chopper, use it to finely mince the garlic, ginger, and chilis. Alternately, you can grate them on the smallest teeth of a grater, or chop with a knife.

Heat a splash of olive oil in a large skillet or sauté pan. Add the mustard seeds. When they begin to pop, remove from the heat immediately and add them to the garlic mixture (once mustard seeds start popping, they will pop all over the place, so watch carefully and remove from heat as soon as the first one goes "pop." Toss a lid on that sucker too, so you don't lose all the seeds!)

Add the paprika, cumin, coriander, and 2 Tbsp of the garam masala. Put half of this mix in a large bowl, add the yogurt, and stir in the chicken, making sure to coat all sides with the marinade. Let it sit for about a half-hour.

Melt the butter in the large saucepan and add the sliced onions and remaining half of the garlic-spice mixture. Cook gently for at least 15 minutes. Do not brown the onions; you're trying to soften them up and mellow the spices. Add the tomato puree, ground nuts, 2 1/2 cups of water, and 1/2 tsp of salt. Stir well and bring to a gentle boil. Let the sauce reduce and thicken slightly (about 5 minutes), then reduce heat to low.

Cook the marinated chicken on a grill or under the broiler, until just cooked through.

While the chicken is cooking, add the cream and remaining 1 Tbsp of garam masala to the sauce and bring it up to a boil, then add the chicken. Check the seasoning, adding salt or cayenne pepper if desired. Top the chicken with cilantro and squeeze lime juice over the top. Serve with basmati rice or Saffron Rice Pulau (below).


Saffron Rice Pulau


Ingredients:
1/4 tsp. saffron threads
1/4 c. hot water
2 Tbsp. butter
2 cinnamon sticks
10 whole cloves
1 tsp. cumin seeds
2 c. basmati rice, rinsed well
1/3 c. raw cashews

Put the saffron threads in the hot water and set aside to steep until serving time.

Melt the butter over medium heat in a medium-sized saucepan with a tight-fitting lid. Add the cinnamon, cloves, and cumin seeds and stir, 1 minute. Drain the rice well, then add to the pot and stir-fry until the grains are coated and the rice begins to smell fragrant, about 3 minutes.

Add 3 cups water and bring to a boil, then reduce heat to low and cover. Cook until rice is tender and liquid is absorbed, about 20 minutes. Remove cinnamon sticks and cloves. Just before serving, pour in the saffron water and stir well to combine.

To garnish, roast the raw cashews in a 350 degree oven until light golden, about 8 to 10 minutes (watch carefully, nuts burn quickly). Top rice with nuts and serve alongside Chicken Tikka Masala.

29 January 2009

Tuiles


This month's challenge is brought to us by Karen of Baking Soda and Zorra of 1x umruehren bitte aka Kochtopf. They have chosen Tuiles from The Chocolate Book by Angélique Schmeink and Nougatine and Chocolate Tuiles from Michel Roux. I was a wee bit sad at first, knowing the baking reputations these two lovely Europeans have, but was happy nonetheless to tackle the recipe, as I had never tried tuiles before :)

The whole bit of choosing this recipe for January was to help those who need some waistline mending following the December holidays. Amen! I personally can't actually diet, but eating healthy is very important these days, so I was glad to take on the challenge. We were asked to make our tuiles in any shape we desired, and pair with a light, healthy filling.


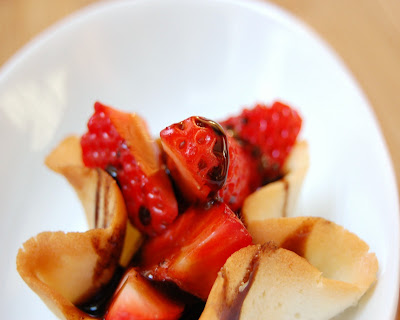
I made small baskets out of mine, simply pushing the hot round cookies into my tiny brioche molds to set. Taking advantage of the fact that the grocer actually had some plump tasty strawberries in the dead of winter, I used these tuile cups to serve up one of my favorite combos - fresh strawberries with a reduced balsamic vinegar.

Oh, mmmm - the tart and sweet and yet Terribly Healthy in a crisp cookie was just perfect. The balsamic reduction was compliments of Trader Joe's (one of several foodie Christmas gifts from my amazing sis Anne), so no recipe to follow unfortunately. Sorry for that. You can surf the Interwebs to find many a recipe though, I am sure.


Thanks to both Karen and Zorra for the recipe - I rather liked it, and will probably give these little light cookies a go again (and probably again). And as always - be sure to check out those other Daring Baker creations out there!

Tuiles
(from The Chocolate Book by Angélique Schmeinck, 1993)


Ingredients:
1/4 c.softened butter (not melted but soft)
1/2 c. sifted confectioner’s sugar
Dash of vanilla extract
2 large egg whites (slightly whisked with a fork)
1/2 c. sifted all purpose flour
1 Tbsp. cocoa powder
Butter or spray to grease baking sheet

Preheat the oven to 350 F. Using a hand whisk or a stand mixer fitted with the paddle (low speed) and cream butter, sugar and vanilla to a paste. Keep stirring while you gradually add the egg whites. Continue to add the flour in small batches and stir to achieve a homogeneous and smooth batter/paste. Be careful to not overmix.

Cover the bowl with plastic wrap and chill in the fridge for at least 30 minutes to firm up. (This batter will keep in the fridge for up to a week, take it out 30 minutes before you plan to use it).

Line a baking sheet with parchment paper or grease with either butter/spray and chill in the fridge for at least 15 minutes. This will help spread the batter more easily if using a stencil/cardboard template such as the butterfly. Press the stencil on the baking sheet and use an offset spatula to spread batter. Leave some room in between your shapes. Mix a small part of the batter with the cocoa and a few drops of warm water until evenly colored. Use this colored batter in a paper piping bag and proceed to pipe decorations on the wings and body of the butterfly (I totally skipped the cocoa-colored decorative bit myself).

Bake butterflies in a preheated oven (350 F) for about 5-10 minutes or until the edges turn golden brown. Immediately release from baking sheet and proceed to shape/bend the cookies in the desired shape. These cookies have to be shaped when still warm, you might want to bake a small amount at a time or maybe put them in the oven to warm them up again.

Or: place a baking sheet toward the front of the warm oven, leaving the door half open. The warmth will keep the cookies malleable.

If you don’t want to do stencil shapes, you might want to transfer the batter into a piping bag fitted with a small plain tip. Pipe the desired shapes and bake. Shape immediately after baking using for instance a rolling pin, a broom handle, cups, cones….

27 January 2009

Seared Venison Roast with a Blueberry Reduction, and Celery Root Mash


My Hubs is a hunter at heart, he doesn't get away to do it much anymore but when he does, we eat well for awhile. This winter he went deer hunting, and came back home with lots of venison for us to use: ground, cubed, and loins. The loin is the good stuff, and we're in for a treat when one of the loins is being thawed for dinner - that usually means we're making Venison with Blueberry Reduction.

Originally this came from an episode of Emeril on the Food Network, many many, like 3 apartments before we bought our home (and we lived in every apartment a good 2-3 years) - yeah, like that many years ago. I couldn't find the original on their site, only our chicken-scratch re-write we've been using for years, so that's what you're getting. Not quite sure how much we changed things up, but I will say this: it is very, very good.


I nuked my meat a bit longer (darn baby Robot ruins all my fun food adventures), but this is best when the meat is seared - venison is very delicate, it works best with the meat's texture and flavor to keep it rare in the center. The blueberry reduction is incredible, just barely sweet with plenty of tart and woodsy savory and oh my goodness - I could just cover everything and anything I eat in the stuff, if only it wasn't a bit too hands-on to make on a daily basis.

We usually have this with mashed potatoes, but this time we switched things up and did a celery root mash. Ooooh, so good. And healthier, for those watching their carbs! The celery root actually paired with the venison and blueberry reduction much better than potatoes did. So if you give this recipe a shot, go with the celery root mash for sure.


Seared Venison Roast with a Blueberry Reduction
(adapted from Emeril Legasse)


Ingredients:
1 venison loin , about 8 oz. (or, use 8-oz. venison chops)
Salt and pepper
1 Tbsp. olive oil
1 Tbsp. finely diced shallots
1 tsp. minced garlic
1/2 c. crushed blueberries
5-6 juniper berries
1 tsp. sugar
1 tsp. chopped rosemary
1/4 c. balsamic vinegar
1/4 c. dry red wine
1/4 c. gin
1 c. beef demi-glace
1 Tbsp. chopped sage
1 Tbsp. cold butter

Lightly season the venison loin on all sides with salt and black pepper. In a large skillet, heat the oil over medium high heat. When the oil starts to smoke, add the loin and sear for 3 minutes. Lower the heat to medium and turn the loin. For medium-rare, cook the loin for 2 to 3 minutes on each turn/side, until you've gone all the way around the loin. Transfer the loin to a plate and let rest, covered loosely with foil.

Return the skillet to medium-high heat. Add the shallots and garlic and cook, stirring for 1 minute. Add the blueberries, juniper berries, sugar, and rosemary and cook, stirring, for 1 minute. Add the balsamic vinegar and red wine and bring to a boil. Cook, stirring occasionally, until reduced by half, about 1 minute.
Add the gin, being careful of flames, and stir to deglaze the pan. (Alternately, remove the pan from the heat and ignite with a match.) When the flames die out, add the demi-glace and sage, and stir well.

Return the loin to the pan and cook to warm the meat through, about 1 minute. Add the cold butter, salt and cracked black pepper, to taste, and swirl to incorporate. Remove from the heat.

Celery Root Mash
(adapted from Chow)


Ingredients:
1 large Celeriac (celery root)
1 large Russet baking potato
2-3 Tablespoons Cream
2 Tablespoons Butter
1 Teaspoon Salt (+ more to taste)
Cracked Black Pepper to taste

Peel the celeriac root and wash any extra traces of dirt off. Wash the potatoes well. *Please note: we left the peels on for extra texture, but you can peel your potatoes if you like.

Cut the celeriac and potatoes into medium sized pieces. Put into a large cooking pot and cover with water. Bring to a boil and then reduce head to a simmer. Cook until soft enough to mash, about 30–40 minutes. Drain and let sit covered in the same pot that you used to cook them in, for about 5 minutes to remove excess water.

Add cream, salt and then mash. I like to use a hand held masher as I dig texture in my mashed potatoes. Season to taste with additional salt and pepper. I love this side in its "pure state", but feel free to go nuts - lots of herbs would complement this well.
To plate, place 1/2 of the celery root mash on each of 2 large plates, and place 3-4 slices of loin on top of the mash. Pour the sauce over the chops and around the plates. Serve immediately.


25 January 2009

The 6th Picture


I was tagged by the darling Sarah at Jagged Diary! Here's the instructions on the tag:


"Go to your documents folder (or wherever you store your photos) and go to your 6th picture folder, then go to the 6th picture in that folder and post it on your blog. Tell a story about it."
Well, oddly enough: it's a food shot. Go figure ;) This is from my post on those pretty little Magnolia Bakery cupcakes, which I blogged about last February. Kinda dry, but not bad! You can read all about them here.
Be back on Tuesday, with a nice little post involving venison, blueberries, and gin. Good stuff. And thanks for the tag Sarah!

23 January 2009

Eggs Benedict


Another weekend yummy from Hubs' favorite issue of Saveur!


For the record: I realized at the last possible second, forked raised over plate, that hmm - perhaps a raw-egg sauce and underdone egg yolks aren't exactly the best fare for a pregnant woman. So I miserably watched Hubs scarf his (and mine) down for his morning meal, while I half-heartedly picked at my side of home-fried potatoes. Which were delicious but not quite as yummy as those eggs benedict looked, with their lemony-yellow sauce and oozing yolks, crispy bacon and toasty muffin... Drats.


Eggs Benedict
(from Saveur magazine, #114)


Ingredients:
FOR THE EGGS:
Salt
2 Tbsp. white vinegar
4 eggs
2 English muffins, split
3 Tbsp. butter
4 slices Canadian bacon
FOR THE HOLLANDAISE:
12 Tbsp. unsalted butter
3 egg yolks
2-3 tbsp. fresh lemon juice

Salt and freshly ground white pepper

For the eggs: Bring a medium skillet of salted water to a simmer over medium heat; add vinegar. Crack eggs into 4 small dishes. Slip eggs into simmering water, turn off heat, cover, and cook until whites are just firm, 4 minutes. Transfer eggs with a slotted spoon to a bowl of ice water and set aside.

Preheat oven to 200 F. Toast muffins, then spread with some of the butter. Transfer to 2-4 plates; keep warm in oven. Melt remaining butter in a medium skillet over medium heat. Fry bacon until browned, about 5 minutes. Place bacon on muffins; keep warm in oven.

For the hollandaise: Melt butter in a small pan over low heat. Whisk egg yolks, lemon juice, 1 tbsp. water, and salt and pepper to taste in a heavy, nonreactive saucepan until pale yellow; then cook, whisking constantly over medium-low heat, until whisk leaves a trail in eggs, about 8 minutes. Remove pan from heat. Add butter 1 tbsp. at a time, whisking constantly, until sauce thickens; gradually pour in remaining butter, whisking constantly, leaving milky solids behind.

Reheat eggs in a skillet of simmering water for 1 minute; transfer with a slotted spoon to paper towels to drain. To serve, carefully place egg on bacon, and spoon some hollandaise on top. Garnish with parsley, if you like.

20 January 2009

Cherry Chocolate Muffins


When I was little, my parents used to can Door County cherries every year (I think they were Door County, anyway - my mom would put in an order at the grocers every year for a giant container of them, and then she'd split it up and jar them for use throughout the year). My absolute favorite use of those cherries? After-church cherry muffins. You knew it was going to be a good Sunday when our parents sent us down to the dark chilly basement to get a jar of those cherries off of the canning shelf.


Theirs were soft, warm muffins dotted with juicy cherries, and slathered with a thick smear of butter. Oh, so good. Here's my own version. Who doesn't like chocolate in a muffin, right? And for those of you giving these the sidelong glance and mumbling about mislabeling: no way, these are absolutely not cupcakes. They are a proper breakfast muffin. Do you see any frosting on these suckers? Yeah, that's what I thought. Told you, definitely muffins. Duh.


Anyhoo: I used a dark chocolate-cherry bar for the chocolate in this recipe (compliments of my sister Anne), which helped deepen the cherry flavor. In the spirit of my roots, I also used canned cherries. These muffins were soft, moist, and dense (but not too heavy); the cherries were, as they always are in muffins, so good. Ah, perfect.


Cherry Chocolate Muffins
(adapted from Dorie's Chocolate Chocolate-Chunk Muffins)


Ingredients:
6 Tbsp. unsalted butter
4 oz. bittersweet chocolate, coarsely chopped
2 c. all purpose flour
2/3 c. sugar
1/3 c. cocoa powder, sifted
1 Tbsp. baking powder
1/2 tsp. baking soda
1/2 tsp. salt
1 1/4 c. buttermilk
1 large egg
1 tsp. pure vanilla extract
2/3 c. pitted tart cherries

Center a rack in the oven and preheat oven to 375 F. Butter or spray a 12- slot muffin pan, or line with muffin liners. Place pan on a baking sheet.

Melt butter and half the chopped chocolate in a bowl over simmering water (or in the microwave). Take off heat and set aside.

In a large bowl, mix together the flour, sugar, cocoa, baking powder, baking soda, and salt. In another bowl, whisk the buttermilk, egg, and vanilla together until well combined.
Pour the buttermilk mixture and the chocolate mixture into the dry ingredients. Mix gently but quickly to blend, but do not over mix as this will toughen the muffins. A few lumps are OK! Carefully stir in the remaining chopped chocolate and cherries.

Divide batter among the muffin tins. Bake for 20 minutes, or until a thin skewer inserted into the middle of a muffin comes out clean. Cool pan on a rack for 5 minutes before removing muffins from pan.

18 January 2009

Austrian Goulash Soup


The story in the cookbook says that this soup can be found along the autobahn, served at roadside stops. Not sure how authentic that little story is, but I can tell you this: the soup is worth that kind of tale.


It is killer - big chunks of beef and potato, lots of good veg, all in a thickened stew fragrant with sweet paprika and caraway. Not a delicate soup in the least - this is a robust, stick-to-your ribs kind of a soup. Perfect for a comfy lunch in the cold days of a Midwestern winter.


Austrian Goulash Soup
(from the "Yellow Bible", aka The Gourmet Cookbook, 2004)


Ingredients:
5 slices bacon, chopped
3 lbs. boneless chuck, trimmed and cut into 1/2-inch cubes
2 Tbsp. vegetable oil
4 medium onions, chopped fine
3 garlic cloves, minced
3 Tbsp. paprika (preferably Hungarian sweet; Penzey's has it)
1 1/2 tsp. caraway seeds
1/3 c. all-purpose flour
1/4 c. red-wine vinegar
1/4 c. tomato paste
5 c. beef broth
5 c. water
1/2 tsp. salt
2 red bell peppers, chopped fine (I am cheap and used green bells)
4 large russet (baking) potatoes (Yukon Golds will work well, also)

In an 8-quart heavy kettle cook bacon over moderate heat, stirring, until crisp and transfer with a slotted spoon to a large bowl. In fat remaining in kettle brown chuck in small batches over high heat, transferring it as browned with slotted spoon to bowl.

Reduce heat to moderate and add oil. Add onions and garlic and cook, stirring, until golden. Stir in paprika, caraway seeds, and flour and cook, stirring, 2 minutes. Whisk in vinegar and tomato paste and cook, whisking, 1 minute. (Mixture will be very thick.) Stir in broth, water, salt, bell peppers, bacon, and chuck and bring to a boil, stirring. Simmer soup, covered, stirring occasionally, 45 minutes.

Peel potatoes and cut into 1/2-inch pieces. Add potatoes to soup and simmer, covered, occasionally until tender, about 30 minutes. Season soup with salt and pepper. Soup may be made 3 days ahead and cooled, uncovered, before chilling, covered. Reheat soup, thinning with water if desired.

14 January 2009

Orange Chocolate Shortbreads


I originally planned on taking these to a Christmas cookie exchange, but sadly I was much to exhausted and sick at the time to attend that (drats, but that was a bummer). So sadly, the dough went in the freezer and I figured that some day, another chance to use it would come around.

Enter: yet another office potluck. And thank goodness for frozen dough! I am not sure how much of an effect the freezing had on it, but the shortbreads didn't spread much in the oven, which was lovely.

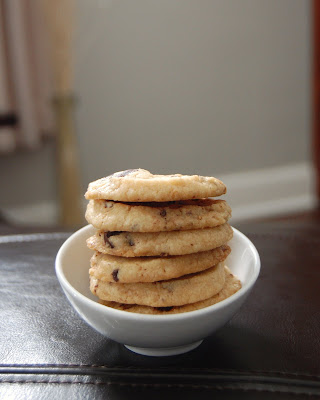
I took 2 different Dorie Greenspan recipes and used a bit from each to come up with these, and it seemed to work quite well. I didn't want boring old regular shortbreads, I wanted something a little more interesting than that. I added some orange zest which gave them a nice orange undertone, and the tiny chunks of bittersweet chocolate gave the cookies just enough umph to shake things up a bit. All in all a very good side-of-the-saucer cookie!

Orange Chocolate Shortbreads
(adapted from Dorie's recipe)


Ingredients:
1 1/2 c. all-purpose flour
1/4 c. cornstarch
1/4 tsp. salt
2 sticks unsalted butter, at room temperature
3/4 c. light brown sugar
2 Tbsp. orange juice or 1 tsp. orange zest
1/2 c. finely chopped bittersweet chocolate

Sift together the flour, cornstarch, and salt. Set aside.

Working with a stand mixer, beat the butter and brown sugar together on medium speed for about 3 minutes, until the mixture is very smooth. Add the orange juice (or zest). Reduce the mixer to low and add the dry ingredients, mixing only until the flour is incorporated.

Add the chocolate and give the mixture a few turns, just to get the chocolate incorporated into the dough. Roll dough into a tube (log) shape, and wrap in plastic wrap.

Refrigerate the dough at least 2 hours, or up to 2 days. The dough also freezes well (for up to 3 months). To bake: preheat your oven to 350 F and line 2 baking sheets with parchment paper. Slice the dough into 1 1/2-inch slices, and transfer to baking sheets.

Bake for 18-20 minutes, rotating the sheets from top to bo0ttom and front to back at the midway point. The shortbreads will be pale - they shouldn't take on much color. Transfer the cookies to a rack. Cool to room temperature before serving.


12 January 2009

Smoked Salmon Hash


I love Hubs dearly. One of the man's many attributes is that his cooking is quite stellar. In fact, when we first were dating I used to pretend that I didn't have the slightest idea as to how to cook, so that he would come over and make dinner for me most evenings. Ah, but those were the days.

Nowadays I must admit, I do most of the cooking. He gets off of work much later than me, and I really do enjoy cooking (fairly relaxing after a long day of work). But weekends - ah, those weekends are when Hubs is in his prime. The man loves nothing more than to spend his Saturday morning puttering around the kitchen, pulling together a rather elaborate breakfast for the two of us to enjoy.


So, imagine the man's complete and utter JOY when a recent issue of Saveur magazine arrived in our mailbox, as it was devoted entirely to - you guessed it - breakfast (thanks for that subscription, Coco). One of the first recipes he tried out of this one was the hash, a particular favorite of his.


The original recipe was for a smoked trout hash, but we had problems finding that around these parts (now if we were in Wisconsin, it wouldn't have been a problem...). Went with a smoked salmon instead, and I must say it was still quite divine! It is amazing but true - the addition of cream really does give the hash an extra-crispy coating. You must try it! All in all the dish was very crispy, filling, and the lemon (and cream sauce with horseradish) really zinged things up nicely. Amazing with your morning eggs and toast.

Smoked Salmon Hash
(Adapted from Saveur magazine, #114)


Ingredients:
4 Tbsp. unsalted butter
1 lb. boiled and cooled russet potatoes, cut into 1⁄2" cubes
1 small yellow onion, finely chopped
4 oz. boneless smoked salmon, diced into 1⁄2" chunks
1⁄4 c. heavy cream
1 Tbsp. finely chopped fresh dill
1⁄4 tsp. cayenne pepper
1 garlic clove, finely chopped
Kosher salt and freshly ground black pepper
3 Tbsp. crème fraîche
2 tsp. prepared horseradish
Finely chopped fresh parsley
Lemon wedges

Heat 3 tbsp. of the butter in a 10" skillet over medium-high heat. Add potatoes; cook, stirring, until lightly browned, 8–10 minutes.

Add remaining tbsp. of butter and onions. Cook, stirring occasionally, until onions soften, about 10 minutes. Add salmon, heavy cream, dill, cayenne pepper, garlic, and salt and pepper to taste. Stir to combine.

Turn hash in parts every 2 minutes, loosening any browned bits, until potatoes are golden brown, about 12 minutes.

Divide hash between 2 plates. Combine crème fraîche with horseradish. Garnish hash with sauce, parsley, and a squeeze of lemon.

09 January 2009

Hawaiian Fruitcake


Yeah, fruitcake. Now before some of you start bashing, take heart. Yes, it has quite the reputation for lasting for... well, quite awhile (thank the healthy dousing in spirits for that one, which gave it a nice long shelf life before the time of preserving). But it is such a classic holiday treat, one that originally had the token of a good-luck charm for spring harvests later, and actually can (and does!) taste rather good.

This is another goodie that I made before the holidays, and perhaps fitting that I'm posting it now, given the storied shelf-life of fruitcake. I didn't want to throw together just any old fruitcake this year, though. I wanted to make something a little bit exciting, you know? So enter this little gem, a recipe for Hawaiian fruitcake.

Chockful of shaved coconut and some new-to-fruitcake dried fruits (pineapple and cherries anyone?), this recipe gives a whole new life to the boring old fruitcake of the past. I omitted the rum when I made mine (knowing that I and another fellow pregnant chum of mine would be eating them), but feel free to let the rum flow with yours! It'll help it keep longer, ya know...


Hawaiian Fruitcake
(adapted from recipe by Audrey Langenhop, pastry arts instructor at YTI Career Institute, Lancaster, Penn.)


Ingredients:

Fruit mixture:
1½ c. golden raisins
1 c. unsweetened shaved coconut
1½ c. chopped dried pineapple
1 c. chopped dried apricots
1 c. candied lemon peel
2 c. dried tart cherries
¾ c. light or dark rum (if you prefer not to use alcohol you may substitute orange juice, as I did)

Cake Batter:
2 sticks softened butter (1 c.)
1¾ c. granulated sugar
¼ c. honey
2 tsp. baking powder
1 tsp. salt
½ tsp. cinnamon
¼ tsp. nutmeg
2 tsp. vanilla extract
5 eggs
3¾ c. all-purpose flour
1 c. whole milk
2 c. chopped macadamia nuts

Combine the fruits in a large bowl. Add the rum (or juice), cover, refrigerate, and allow to steep 6-24 hours.

Preheat the oven to 300 F. Grease and flour two 8½-by-4½-inch loaf pans.

Beat the butter, sugar and honey until well blended. Add the eggs one at a time. Sift together the flour, baking powder, spices and salt.

Carefully add one half of the sifted dry ingredients to the creamed butter mixture. Mix well. Add half the milk and continue to mix. Scrape the bowl. Repeat with the final half of the dry ingredients and milk, blending well after each addition. Stir in the vanilla. Stir in the undrained fruit mixture as well as the macadamia nuts.

Pour the batter into the two prepared pans, filling each ¾ full.

Place the pans into the preheated oven. Bake 50-60 minutes, or until a cake tester inserted into the center comes out clean.

Remove the cakes from the oven and immediately brush with additional rum (if desired). Allow the cakes to cool completely before removing them from the loaf pans. Wrap air tight and store for a minimum of 24 hours prior to serving.

This fruitcake may be brushed with rum weekly and stored at room temperature for four to six weeks. If you prefer, you may wrap the fruitcake and store it in the freezer for several months.

07 January 2009

Roast Beef Soup


Ah, the holidays. I didn't get to tell you very much about the holidays, did I? Well, as usual they were fantastic (and went by a bit too quickly, as they seem to do for everyone). The sous chef Mahni got an Easy Bake Oven from her aunt Nemmie, so our time together was well spent baking goodies.

This year because the holiday fell next to a weekend, we decided to do a whirlwind trip of Kansas, seeing my family south of us and then off to see Hubs' family west of that. Then back northeast to head home at the end of it all... By the time we finally made it home, we (as usual) found ourselves in possession of many edible goodies and leftovers. Among those, a huge hunk of leftover beef roast.


Well, thank goodness for that, because I was craving some soup. This soup is a fantastic way to use up that leftover roast, a steaming and filling bowl of soup that'll warm you up without packing on the pounds. I ate this at work for lunch for an entire week, and never tired of it. In fact, it seems to get better the longer it sits! Definintely something for you out there to try when you find yourself with some leftover beef roast :)

Roast Beef Soup
(adapted from Recipezaar)


Ingredients:
2 Tbsp. butter + 1 Tbsp. olive oil
2 medium yellow onions, cut into large chunks
2 stalks celery, chopped
3-4 cloves garlic, minced
2 c. sliced cremini mushrooms
1 1/2 lbs. leftover cooked beef, cubed
64 oz. beef broth ( I added a bit more, closer to 80 oz.)
2 Tbsp. Worcestershire sauce
Salt and pepper to taste
1 tsp. dried herbes de provence
8 oz. uncooked egg noodles (I used wheat noodles, to make it a wee bit more healthy-ish)

In a large pot, heat the butter and oil over medium heat, until butter is melted and pot is heated. Add the onions and celery, and saute until the onions and celery are softened (about 5-7 minutes). Add the garlic and saute for another 2-3 minutes. Add mushrooms, and cook until they are softened as well (about 5 minutes).

Stir in the chopped cooked beef to warm. Add the beef broth and the Worcestershire, stirring to mix, and seasoning to taste with salt and pepper and herbes de provence. Bring mixture to a boil, then stir in uncooked egg noodles.

Reduce heat and cook, stirring occasionally, for 10-12 minutes or until noodles are tender.


04 January 2009

Cherry Almond Jello Cookies


Okay, random thought but on second viewing perhaps I shouldn't have quite placed those cookies in that fashion on the plate. Looks a bit like I left two burlesque pasties for Santa, oopies. Heh.

So how late is this recap, yeah? Sadly I thought I had prepped a few more blog posts to go up around the holidays (when I was traveling all over this blessed little state). Thought. Apparently not. And then add my post-holiday chaos of trying to catch up on other parts of my life, and there you go. Just now posting my Santa cookies. Only a few weeks late isn't bad, right??

Now, in truth: I started this whole blog thing to keep myself busy. I love to bake/cook, I love to play with my camera, and I needed a low-budget yet highly-interesting hobby while I waited for us to finally buy a house and get a move on with this thing called life. So was born my blog.

Only: these days I have quite a bit on my plate. Work's been more hectic for the past several months, so I've been working long hours. I have a house to renovate, and Hubs and I are expecting our first child in the early summer, so there's plenty to plan around that as well :)


I kept up the good fight through most of the excitement of the past few months, posting loyally every other day, but the last couple of weeks have really walloped me. I couldn't even get the Daring Bakers Challenge finished. I have thought about just taking a hiatus from the blogging, or perhaps shutting the blog down altogether, but in truth? I've grown to love my little "hobby", and it's one of the things that has kept me sane for the past year and a half.

So I made a pact with myself, or actually a New Years Resolution: the blog stays, even if it is extra work. Only the posts might start coming every 3 days instead of every other day as I've kept up for the past year. A few posts a week are better than nothing, I figure. And I get to keep up with you lovely darlings :)

So there you go! Now on to the important part of this post, the cookies: the dough was super-simple, and very very cherry. My favorite, mmmm. I tried to make this work with my new cookie press, but had a bit of an issue - I just couldn't get it to press through, even after adding some water. So hrmph, but still they rolled out just fine. And tasted good, and that's all that matters really, in the end :)


Cherry Almond Jello Cookies
(adapted from allrecipes.com)


Ingredients:
3 1/2 c. flour
1 tsp. baking powder
1 1/2 c. butter, at room temperature
1 c. granulated sugar
1 (3 oz.) pkg. cherry jello
1 egg
1 tsp. almond extract

Preheat oven to 400 F. Whisk together flour and baking powder in a medium bowl. Set aside.

Cream butter, sugar and gelatin. Add egg and almond extract. Beat well. Gradually add flour mixture. Blend until smooth.

If using a cookie press: use dough immediately. Press shapes onto a cookie sheet lined with parchment, and make for 7-10 minutes (until just slightly beginning to brown).

If rolling cookies: refrigerate dough until firm, about 2 hours. Roll into balls and press with bottom of glass with sugar on an ungreased cookie sheet. Bake for 7-10 minutes (until just slightly beginning to brown).